I had a lot of people ask if putting a wood counter in the bathroom was really a good idea or not.
I had the same concerns. Seems like a disaster waiting to happen, right?
Wood and water don’t usually mix.
The Craft-Art crew assured that it can and has held up in many kitchens and bathrooms with proper treatment and maintenance.
I was game for the challenge.
When we received our wood from Craft-Art they were shipped already cut and shaped to our dimensions but the wood was still pretty raw.
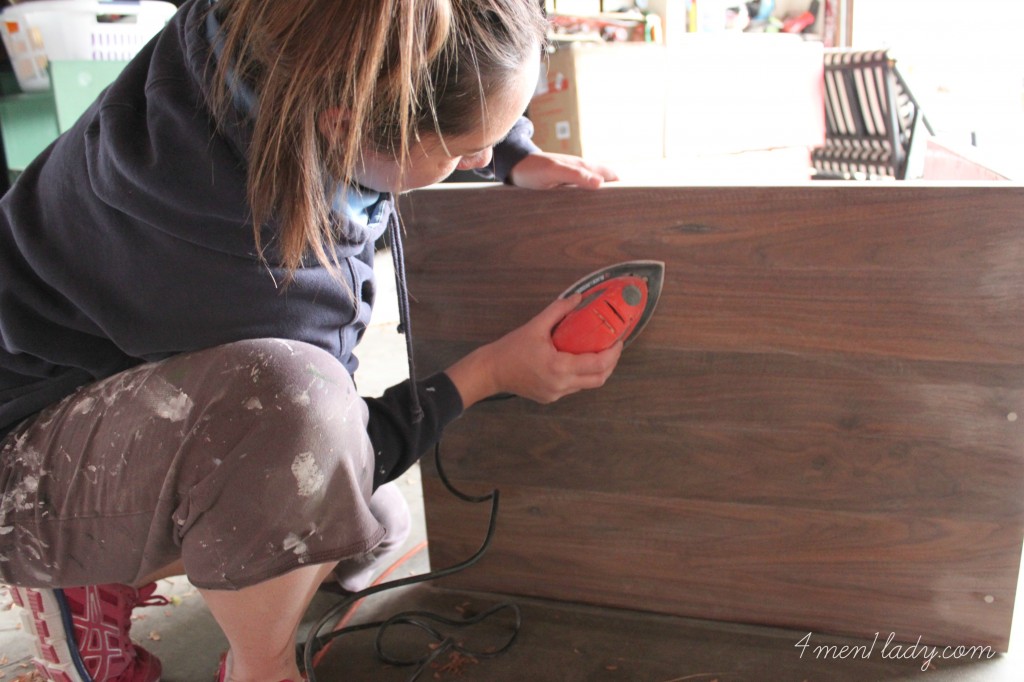
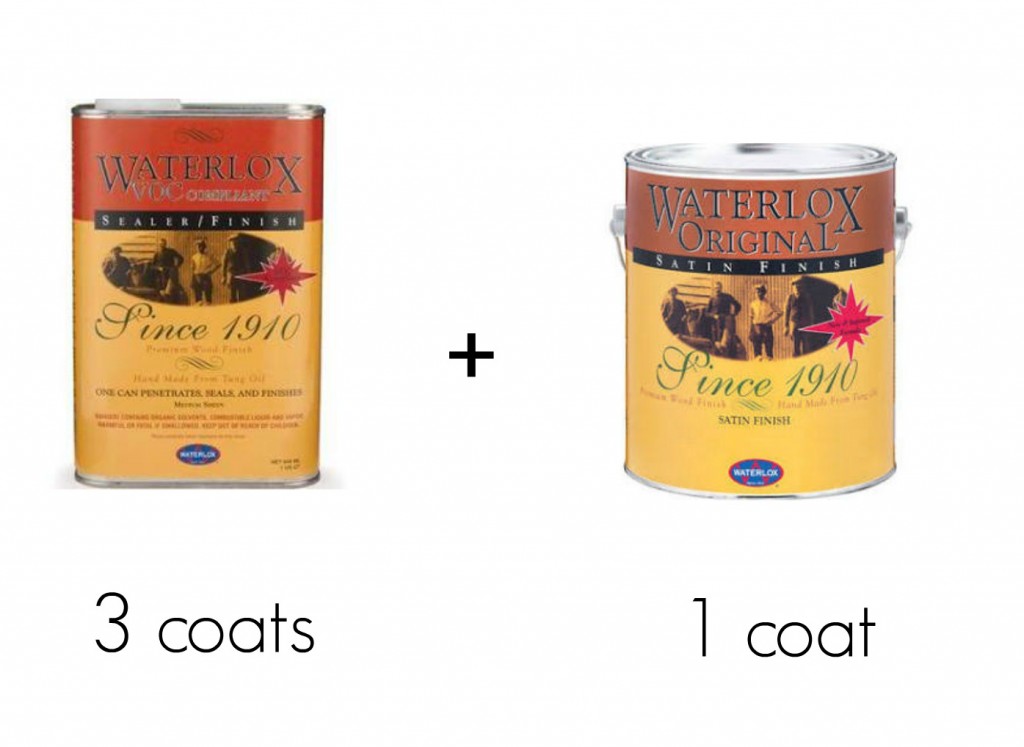
We gave them a light sanding before applying our first coat of Waterlox Sealer/Finish.
Now, I’ve tried a lot of finishes before but this one definitely takes the cake.
It seriously rocks!
It also stinks to high heaven but it’s an “ain’t no messin’ around” product.
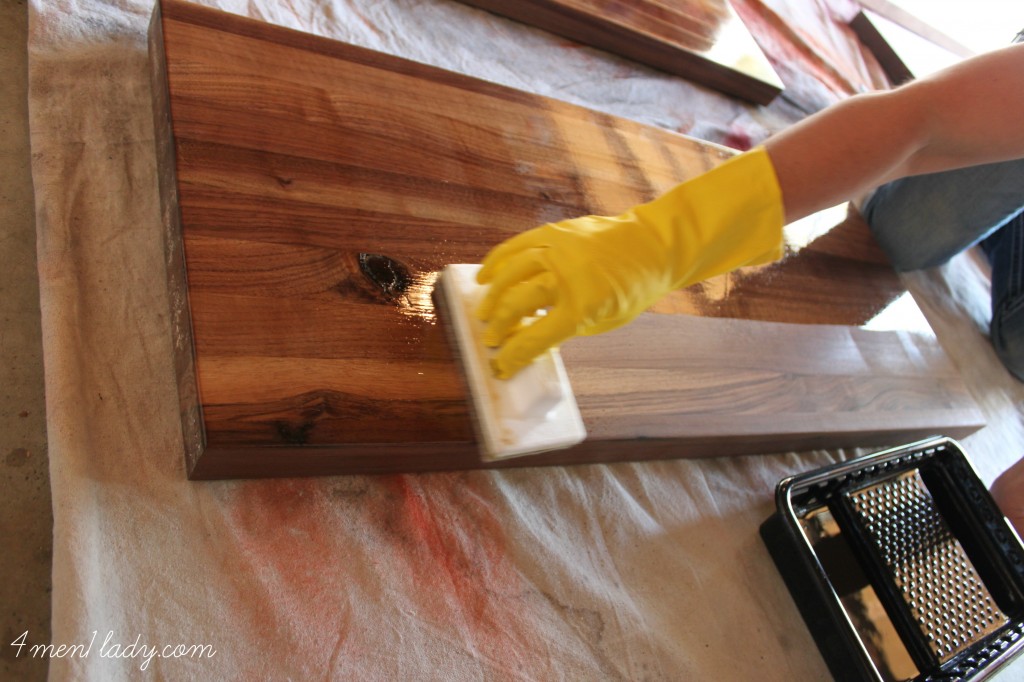
I wish I would have taken this picture from a different angle, without the black door reflecting in the finish, so you could see how slick and clean it finishes.

Waterlox is a tung oil that enhances the natural beauty of the wood and becomes water proof with several coats.
It truly looks like a professional finish.
Make sure to apply according to their recommendations. We did this last October in our garage. On the third coat it was too cold. When I checked it the next day the coat had formed small bubbles which I had to sand out and start over…argh.

So far the wood and the finish have held up marvelously. This is our bathroom basement which rarely gets used except to service the basement family room. When it does get used by little men I’m not aware of it. I came down the other day and found drops of water all over the counter that I know had been sitting there for hours. The Waterlox really did form a waterproof surface on the wood. The water had completely beaded up and there was no absorption in to the wood.
Ba-da-ba-da-da-I’m lovin it.
*I am not affiliated with or being paid by Waterlox. This is a voluntary review.
I did receive wood counters from Craft-Art to use and review. All thoughts and opinions are my own.*


 Hey there! I’m Michelle; I’m an Passionate DIY’er and in constant pursuit of how to bring beauty to my house full of men (3 boys + 1 hubby). Stick around and see what I’ve got up my hard-working sleaves!
We LOVE Waterlox! We installed Ikea butcher block countertops in our kitchen and used Waterlox and it really does the job. One useful tip from the manufacturer is to use vinegar and water to clean versus soap based products and other cleaners because it can break down the finish.
Oh good, thanks for the tip. I’m totally going to try this! Thanks Julie!
I was hoping for an answer to the kitchen counter top question! Thank you, Julie.
Sorry Julie,
My bad. Remind me your question. It’s been one of those weeks.
I was so excited to see your review of Waterlox….We are getting ready to put down wood floors & was thinking of using this product.
I’m hoping the warmer weather comes soon so we can get this done!
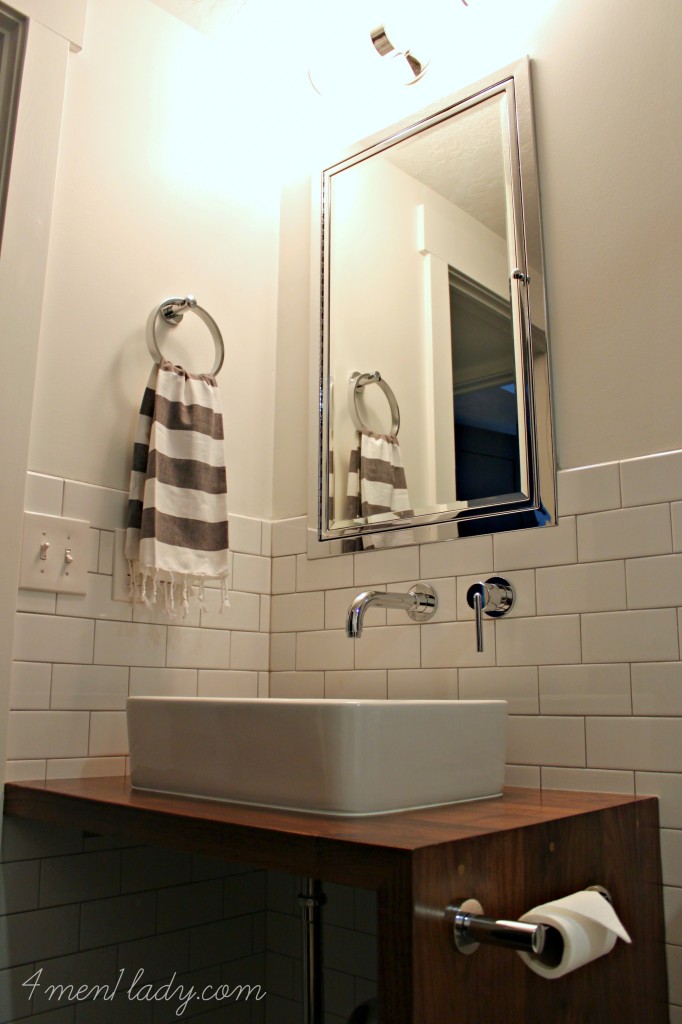
and btw….the sink is gorgeous!
Wow! Hadn’t thought about using it on floors. I’d love to know how it turns out! Please let me know!
A contractor friend recently told us to use marine varnish to finish the wood trim necessary around the window in our bathroom during our upcoming bathroom reno. Saves us from moving the shower away from the window and all that added expense.
GREAT tip! Putting that little tidbit in my back pocket for future use. Thanks Jenna!
wow! this waterlox is exactly what I need for my kitchen table…been looking for something that will still show the wood but be water-resistant. score! now if it would just warm up…
Waterlox really is a force to be reckoned with! You’ll love it. But yes, wait till you can use it outside. It’s pretty smelly. 🙂
I used waterlox on my floors last April and it started to rain after we applied the final coat. It rained for days on end and the same thing happened to our finish. But, we sanded it down and we love how it turned out.
Hadn’t even thought about using them on the floors! Brilliant! Thanks Hope. 🙂
Would you know if this product works well on teak furntiure? We have teal furniture in ou rbackyard that has really taken a beating from the sun. Now that we’re getting a roof out back we’d like to sand everything down and start fresh.
I believe it works on all woods but I would refer to them just to be sure. http://www.waterlox.com/.
love this! definitely pinning this one!
Long time lurker, first time commenter. Your home and remodels are the stuff of legends in this house! You’ve got the BEST taste! This bathroom is beautiful! That wood adds the much needed warmth!
I have the same tile on my floor and walls in my master, coincidence, but the best kind!
(but I don’t have anything to warm it up yet and I’m near out of ideas new counters and cabinets not in the budget) – Your grout is so much better than mine! I had an unfortunate tile installing company convince me I was all wrong about my grout. So instead of grey on the walls and white on the floors, I have white on white and grey on grey and I hate it. I have to dig out the floor’s grout to correct it – ugh…. I digress…
What I wanted to ask about (even though this post is about wood….) did you use spacers on the subway tile install? I’m about to start the install of my kitchen backsplash – standard subway tile – and I see a lot of folks not using the spacers. Was just wondering if you do? What are your thoughts on grey grout in white subway tile?
Thanks for any advice (if you have the time) – otherwise, I love your style – this bathroom is terrific!
Wow, thanks Janice! You’ve made my day! As far as subway tile goes…most s. tile are made with a small lip built in to the back of the tile that acts as a spacer. That way you can butt them right up against each other. It’s hard to even tell it’s there. If you didn’t know what you were looking for you wouldn’t even have a clue. Case in point. I installed my tiled back splash myself with subway tile. My tile had a spacer but I didn’t know it so I used spacers. I was so burned out by the time I was finally finished I hired a tiler to come and grout it for me. He asked why I used spacers. Duh. I got an education that day. My grout lines are larger than normal but not THAT noticeable. It only bugs me. So when you buy your subway tile ask if the tile already has spacers. Best of luck! I hope you share pictures! Best, Michelle
Hi Janice,
Here’s a post about the do’s and don’ts of subway tiling. Enjoy! – Michelle
http://myblessedlife.net/2014/01/subway-tile-tub-surround.html
We also used Waterlox on our kitchen counters and it’s held up beautifully to daily use (and spills). Two years later, it’s still going strong. Love the look of your new counters.
I love your vanity! It is unexpected and modern, yet warm. Just beautiful. I’m wondering how it affixes to the wall on the side and back? Thanks for the inspiration!
It is attached to the wall with wood screws. Thanks!
Hi Michelle – love the vanity. What species of wood did you use?
Many thanks!
Thanks Susan! Wood is Walnut.
Looks great, I’m jealous…. and curious about the temp. when you got the bubbles. I’m finishing counters in my garage in Nov. and now December in Ohio. i get bubbles unless I wipe it on very thin. I heat the garage to 60 deg. Any thoughts or advice?
I saw that Waterlox did a youtube tutorial on correct application that was very helpful. Check it out: https://www.youtube.com/watch?v=Gj-dc6I5__k
Thanks for the reply. I talked with a professional who had used the Waterlox product for 25 years. He recently switched to a different brand, due to the same issues I’m having. I’m going to give another brand a try.
Thanks again.
If you find something that works better let me know. I’d love to know. Thanks! Michelle
Hi, love your bathroom. I had unfinished, walnut slabs made into a counter for my kitchen island. I cannot take them off to sand or varnish. I have sanded them three times and applied a wood mineral oil and conditioner. I am so unhappy with them. You can’t wash them as it is like raw wood. I have also read that before you apply Waterlox, you should use this conditioner on the wood? Now that they are in place, should I just wait until the weather is warmer, open the windows , board all the animals and proceed with sanding and Waterlox? I have looked at many people’s blogs regards this, but yours is the first I have seen to use Waterlox . Thank you for any help.
I applied Waterlox to some slabs of walnut shelves but it was so cold I had no choice but to do them inside. I put them in a room in our basement, opened a window, applied Waterlox and shut the door. I stunk up the whole basement for sure. So yes, it can be done inside but if it were me, I’d stay at a hotel for the night. Good luck!
Thank you.
Looks awesome! I am just now installing a walnut bath top and am using your formula of Waterlox, but then I realized I haven’t yet planned on sealing where the wood meets the tile wall. Did you guys caulk with anything specific? I don’t want to see a big bead of caulk on the wood, but it seems necessary to have something…
We used a clear caulk and honestly, you don’t even notice it. I can email you a close up pic if you like. Send me an email and I’ll send you a pic. smhinckley (at) yahoo (dot) com.