This week I’ve teamed up with Proctor & Gamble and The Home Depot to bring you a new project and giveaway opportunity. At the first sign of 50 degree weather this year I wasted no time and headed outside to get a jump start on quite a few home projects that have been on my mind all winter. The first was my garage door makeover where I painted trim and glued it up, then I cut some more trim and painted it up to make a frame for my magnetic board, and today I’m showing off my new house numbers project.
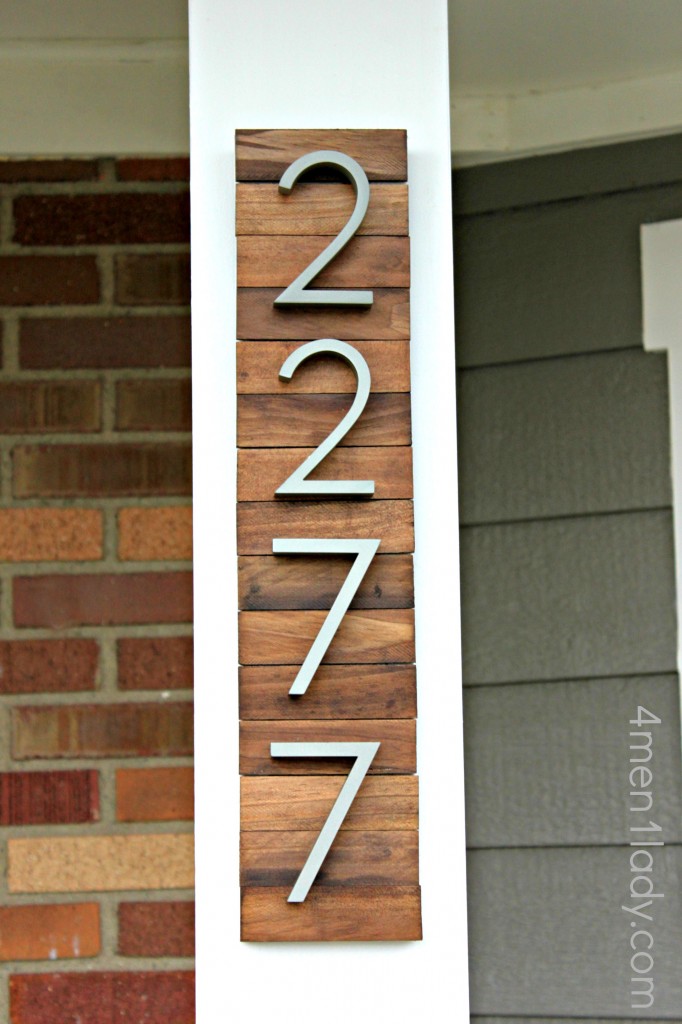
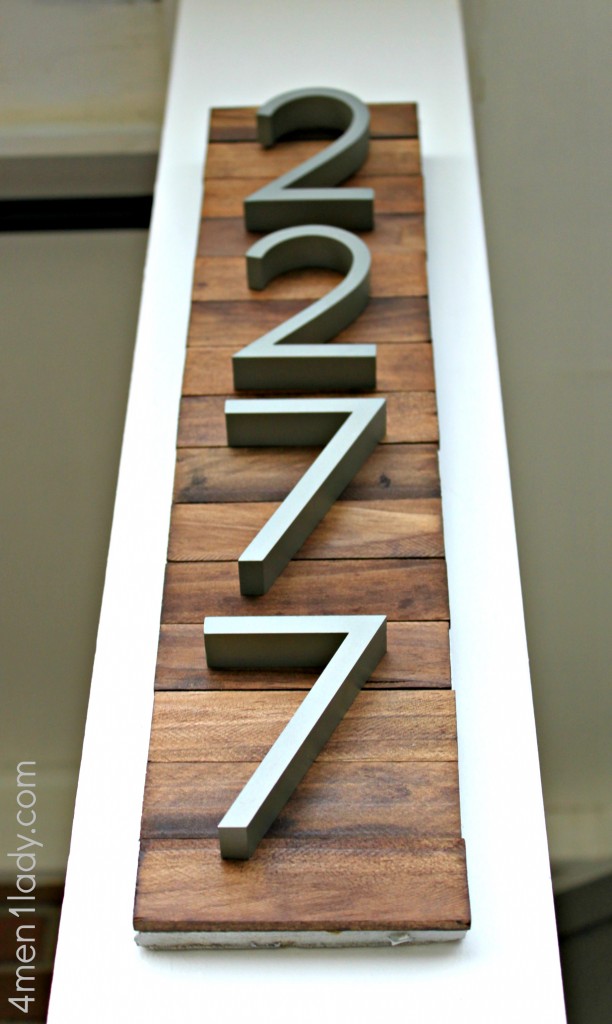
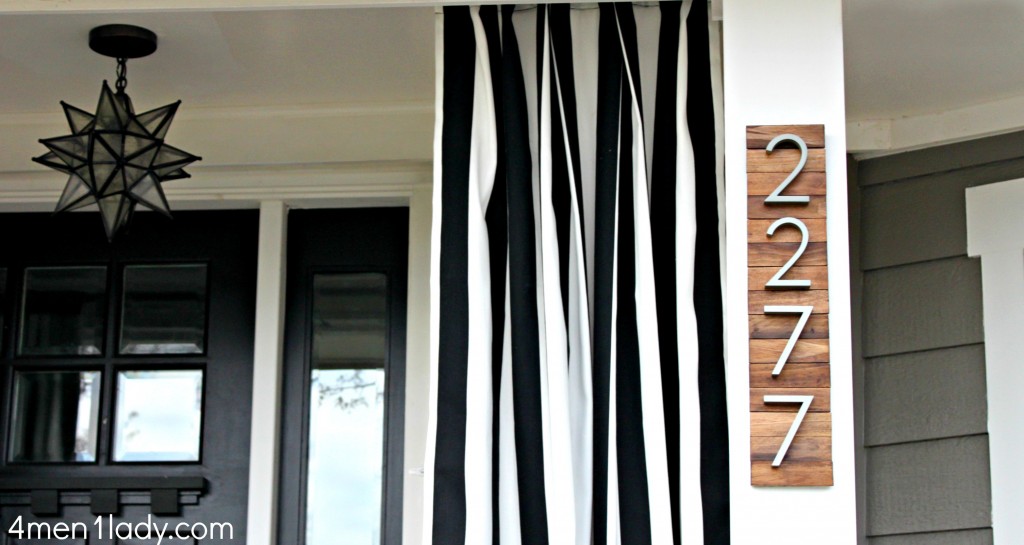
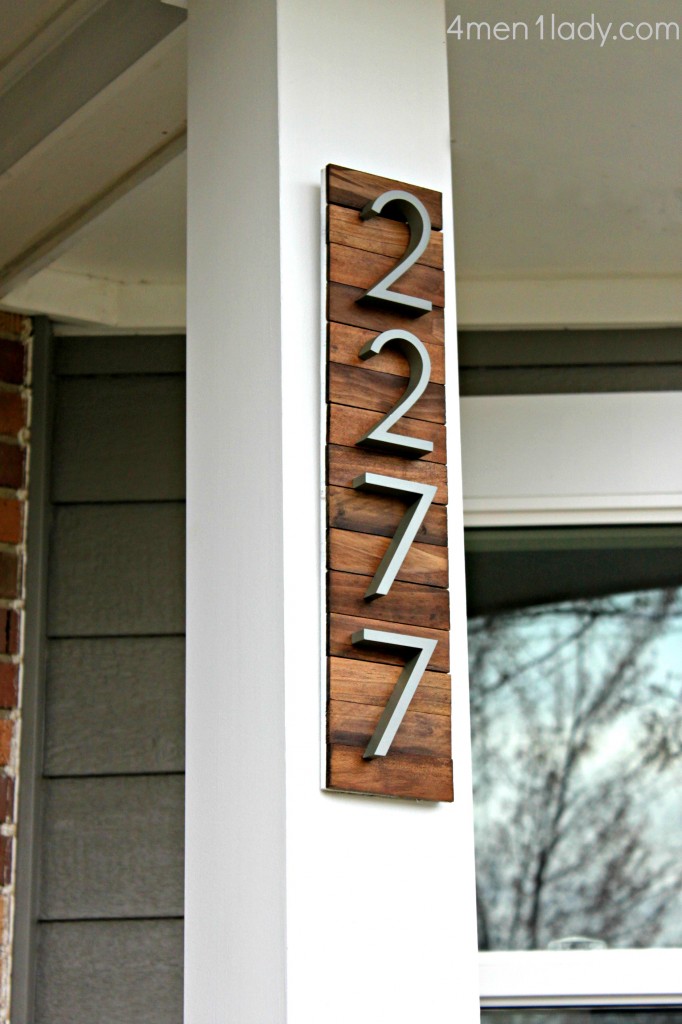
Modern, my house is not but if I had my druthers it would be. To fix that I gave it a little hit of modern with my new house numbers.
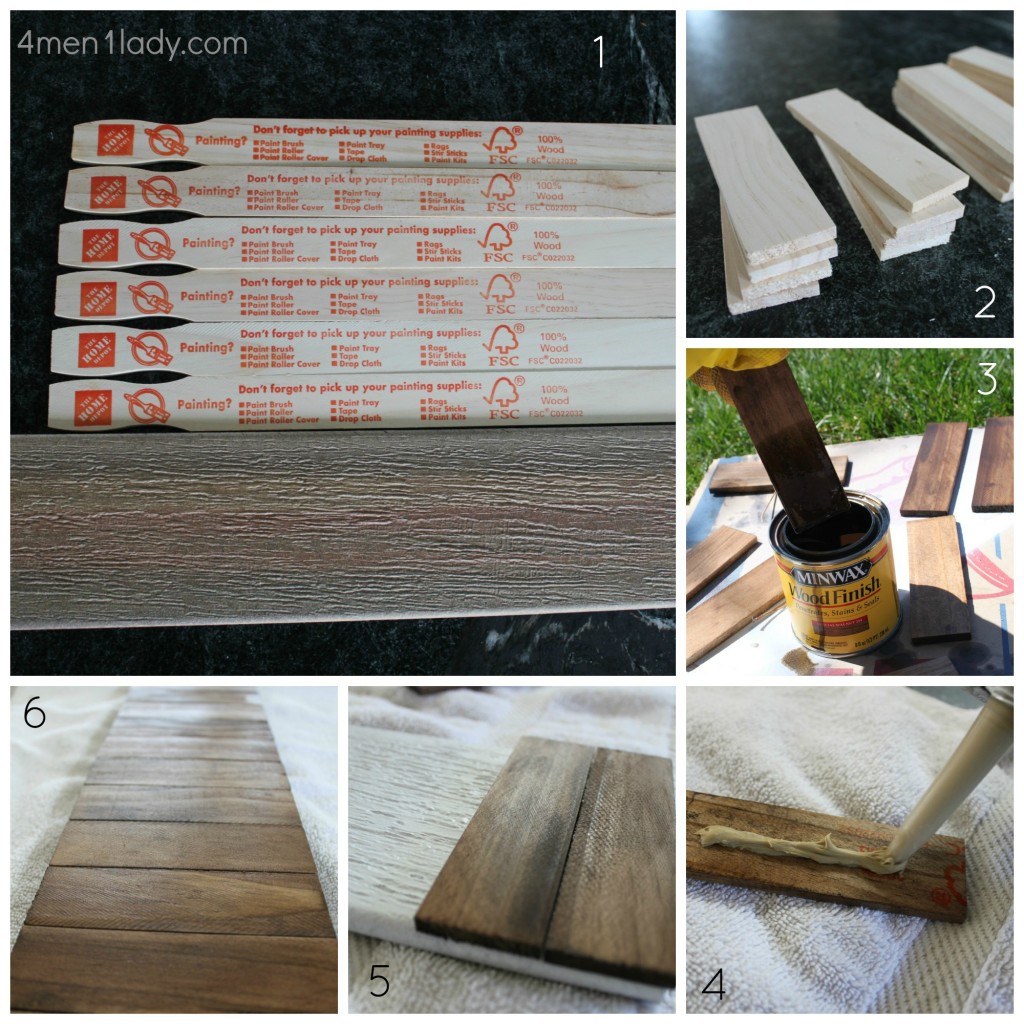
To tackle this project I picked up some (free) paint stir sticks at Home Depot and cut them down to size. Next I stained them and glued them on to a board that I spray painted (to blend in with the white pillar it would lean against). Then I added my house numbers that I found from Design Within Reach and there you have it!
To see more check out this video I did on Studio 5.
Thumbs up? So what does this and all the projects I just mentioned have in common? Sweat, work, mess and paint. The Home Depot and P&G want you to get you ready for your spring painting projects. They’re giving away a Swiffer Sweeper, Mr. Clean Magic Eraser Original and a $25. gift card to The Home Depot. 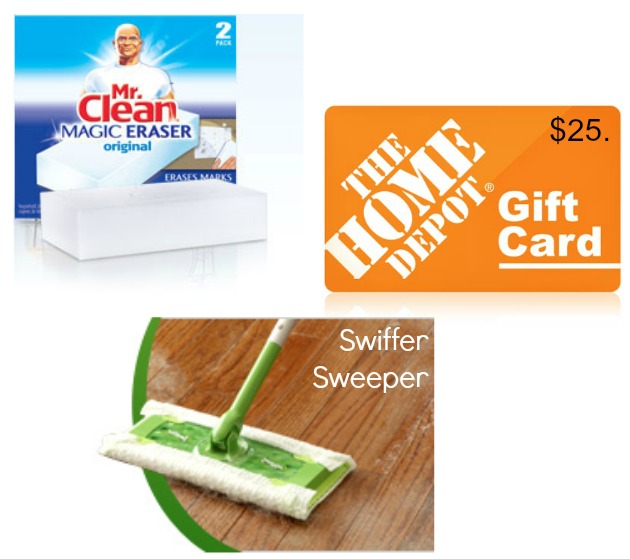 Now I’ll be honest, this ain’t no ipad like I’ve given away in the past but seriously, I use these items daily and several times a day at that. I would be lost (or have a much dirtier home) without them. Plus they are in my arsenal when I do any painting project. The Swiffer Sweeper is SO much better than a broom because it traps those tiny pieces of dirt that usually get left behind making my floors much cleaner. And the Magic Eraser…the are heaven sent! I used to use really heavy, toxic cleaners on my shower surfaces, oven, stove, etc. but the Magic Eraser has replaced all of those. The other thing that is so blessed about this Eraser sponge…remember when I posted about the red stool that has left marks all over my counters from being rammed so many times?
 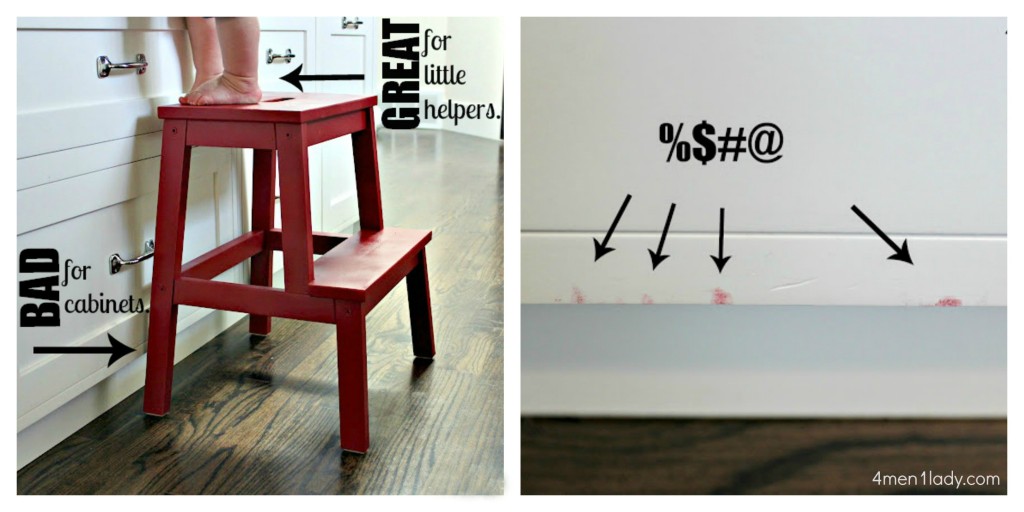 I tried soap, cleaning chemicals, finger nail polish remover and nothing worked, Then I tried the Magic Eraser and it took it right off! Even on marks 6 months old, no problem! “Magic” is an understatement. It’s also great for any little paint splatters.
Good Luck!


 Hey there! I’m Michelle; I’m an Passionate DIY’er and in constant pursuit of how to bring beauty to my house full of men (3 boys + 1 hubby). Stick around and see what I’ve got up my hard-working sleaves!
Love the style of those house #’s 🙂 xo Kristin
Those numbers are amazing. And I love that you paired them with the stained paint sticks. Interesting and modern. 🙂
Thanks Amanda!
Love it! What color is the stain you used?
“Special Walnut”
TOTALLY stealing this idea! 🙂 you’re a genius!!
super clever and cool..but, you always are! lovely idea, and they look great next to your new curtains!
Aww, thanks Emily!
Okay, where have I been?! Your blog rocks! I am so glad I found it and can’t wait to explore around some more! I am now following you on Pinterest!
Yay! Thanks Lisa!
I love the house numbers and your DIY curtains. I am LOVING, loving, black and white stripes outside. Soooo Pretty! Great Job!
Megan
Thanks Megan!
I love your house numbers! What a great idea and a great look!
Leslie
Thank you Leslie!
I am totally digging those house numbers! I think a little punch of modern like that is a great way to update a not-so-modern home, without overwhelming it and looking out of place. Nice job!
-Sarah
Thanks Sarah, I,m quite smitten with the modern touch too! 🙂
Put little bumper pads on the stool!! They will change your life!
Love that house number plaque! You make everything look so easy to make…..sigh.
I am totally in love with those house numbers!!! My husband and I are so sad that the town we moved to does not have a home depot. On any given weekend we would make trips there and now with it being an hour away it would have to be an extra special item for us to want to go there. Which to me is worth it because we love HD so much…but others think we are crazy!
I love this! What a great project! And you can use it inside too, if you have special numbers!
Love this idea! We have a primarily white exterior and this idea is a perfect way to still be able to use nickel numbers without them blending in. Thanks for the inspiration. 🙂
Definite thumbs up! I love this look!
Love, Love the numbers… I’m a newbie to your blog and love everything I see. Just curious is there a picture of your front door with your brick color? We have the same color brick and I’m struggling with coming up with accent colors to go with it from the door to trim ect. Just from the picture of the numbers I think I can see possible green as well?
Love this! I’ve horded away the Home Depot version of these numbers for over a year now, waiting to find a way for the silver to actually show against our light colored house. I’m totally doing this tomorrow. Do you mind if I asked what you used to glue the numbers down?
I used Liquid Nails in the tube (paint isle from Home Depot). You have to use a caulking gun with it. Make sure to use “exterior”. I hope you share your results!
Love this! I made this last weekend and am curious as to how you attached it to your house?
I used a 3M hook on the pillar then I put a nail on the board and used a string to hang it from the nail to the hook. 🙂 Please share pics of your house numbers!
Hey Michelle!
I copied you and did the house numbers as well. Here’s my version..
http://seasonsofluv.wordpress.com/2013/06/05/project/
Thanks for the good idea 🙂
I’m flattered! Thank you. I couldn’t get the picture to load…is it just on my computer?
No, I think I messed it up when I tried to enter the pictures. Oops! 🙂 Okay here is the exact link. Otherwise, try at my blog which is seasonsofluv.wordpress.com
exact link: http://seasonsofluv.wordpress.com/2013/06/05/project-2/
Were you able to see the pictures now?
Love the house numbers, but $24 for each number is a little spendy for me for a DIY project. Stealing this idea, but will be looking for some cheaper numbers. Any other ideas from anyone?
I actually found similar ones at Lowe’s for more than half the price AFTER I had already bought and used the expensive ones. Hope you share pics of your finished project!
Crud. Am I the only guy here? As a closet pinner, I am going to have to do this too. I too like those numbers but as a single dad I can’t see spending that much. I found another set of numbers that are about $8 each on Amazon (The Hillman Group 843213 5-Inch Number). I’m going to check hardware store first while I go pilfer some paint sticks. BTW, glad I read these comments cuz I didn’t realize that you glued the numbers to the wood. Thanks for sharing!
Quick update, checked Lowes.com and those same numbers are $4.50 each. Just in case there are others out there pinching your pennies.
Thanks for sharing! I actually glued the stained paint sticks on a board then pre-drilled and screwed the numbers on. 🙂
I purchased the same numbers as you, however can’t figure out how to get the numbers to screw all the way down? The screws my numbers came with are fairly long, and once screwed in they leave a gap between the numbers and the board:( can you share how to fix? Thankss!
Yes, we actually had to size and purchase new screws at Home Depot that would be the perfect size for our boards. Then we screwed a hole through the back of the boards and fit it right in. You can also purchase screws that you can break off according to the size you need. Hope that helps!
That worked great thanks!
Hi there! My husband and I were wondering what you cut your paint sticks with? Thank you! 🙂 such a great project!
I used a miter saw however, you can ask Home Depot to cut them for you. 🙂
i would love to feature your project on my blog if this would be ok with you please let me know
lauren
That would be great…just please link back to the actual post.
Thank you!
I posted the feature and you can check it out here.
thanks
lauren
http://westfurniturerevival.blogspot.com/2013/07/revival-monday-121.html
Coolio! Thanks Lauren!
What a fantastic project. I’ve posted this idea to Pinterest/homedepot on the “Doors & Windows” pinboard. Thank you for the inspiration.
This is FAB! Very high-end looking. I’m Pinning 🙂
How did you physically attach the house numbers to the wood? do they come with small screws or is this a glue situation?
Oh sorry, I just saw that they come with mounting hardware. Great idea! Can’t wait to try this
Where did you get your light fixture for your front porch? I LOVE IT!
Pottery Barn. 🙂
Love it and am planning on replicating it myself soon! What are the dimensions of the board underneath and the length of the cut paint sticks?
Board is 4 3/4 x 21.
What is the cut of the paint sticks? Thanks! Beautiful job btw!!
Not sure what you mean by the cut? Do you mean what is the size? The size will be determined by the width of the board behind them. Hope that helps. 🙂
So beautiful! I love the numbers!
2 questions: WHat glue did you use & how did you adhere the sign to your house?
Great job! I bet you are the envy of everyone on your street!!
xo
Thanks Goldi. I used an outdoor glue that comes in those tubes you have to stick in one of those accessory guns. To attach to the wall I just used a nail and picture hanging hook. Hope that helps! 🙂
This is exactly what I have been looking for! Our house desperately needs a address number make-over and this is perfect! Love the use of paint sticks-genius! Thanks for the inspiration! Pinning this one for sure!
I love your idea, where did you get the numbers?
Design Within Reach.
This is also a great accessory for frequent travelers.
The plastic injection molding method defined This process is carried out
using a special machine which is known as an injection molding
machine. Although levels of fine detail within darker regions are fine, there was noticeable
fringing among light and dark areas of the assessment picture and additionally the colours were rather
unsubtle. The Kyocera FS-3800N printer using Kyocera FS-3800N toner cartridge ( is an innovative machine that
offers a networked printing solution that is
quick and eco-sensitive. This has been achieved by separating the drum and the
toner cartridge. MAKERBOT ships off DIY-“Do It Yourself”-kits (MSRP $775)
that let anyone put together a machine (“bot”) that will “print”
3D models into real 3D objects. Essentially this
means, that the air purifier may reduce its strength or increase it,
depending on the air quality in the room it is being used.
The Rise gets better indoor reception than, for
example, the PCD Chaser I recently tested. In an Ecosys printer, the drum is separate from
the Kyocera printer toner cartridge ( When the toner is depleted, only the cartridge is replaced.
Here was much trigger for celebration on a day in 2009, since the company is well known as a global chief
inside its industry.
they look awesome , Iam going to tell my husband,
Hi. I saw the tv program a couple of days ago online where you showed how to do this, but now I can’t open it. I just wondered if you would reply with the brand of waterproofer you showed on the tv show.
Thanks!
It’s called Waterlox.
have loved these house numbers from 4 Men, 1 Lady for a while. If you didn’t see them when they made the rounds on Pinterest, here is an up
Hi there – wondering what the “board” is that the wood is glued onto?
It’s actually a piece of Trex board. 🙂
Thanks! Can’t wait to complete this project.
Let me know how it turns out! Michelle 🙂
This is awesome!! Do you have any suggestions on how to adhere the sign to brick??
Have you tried the 3M Command Strips?
I’ve had this pinned forever and am finally going to do it! I’m just wondering if you can tell me the length at which you cut your paint sticks?
4 1/2″ wide. Good luck!