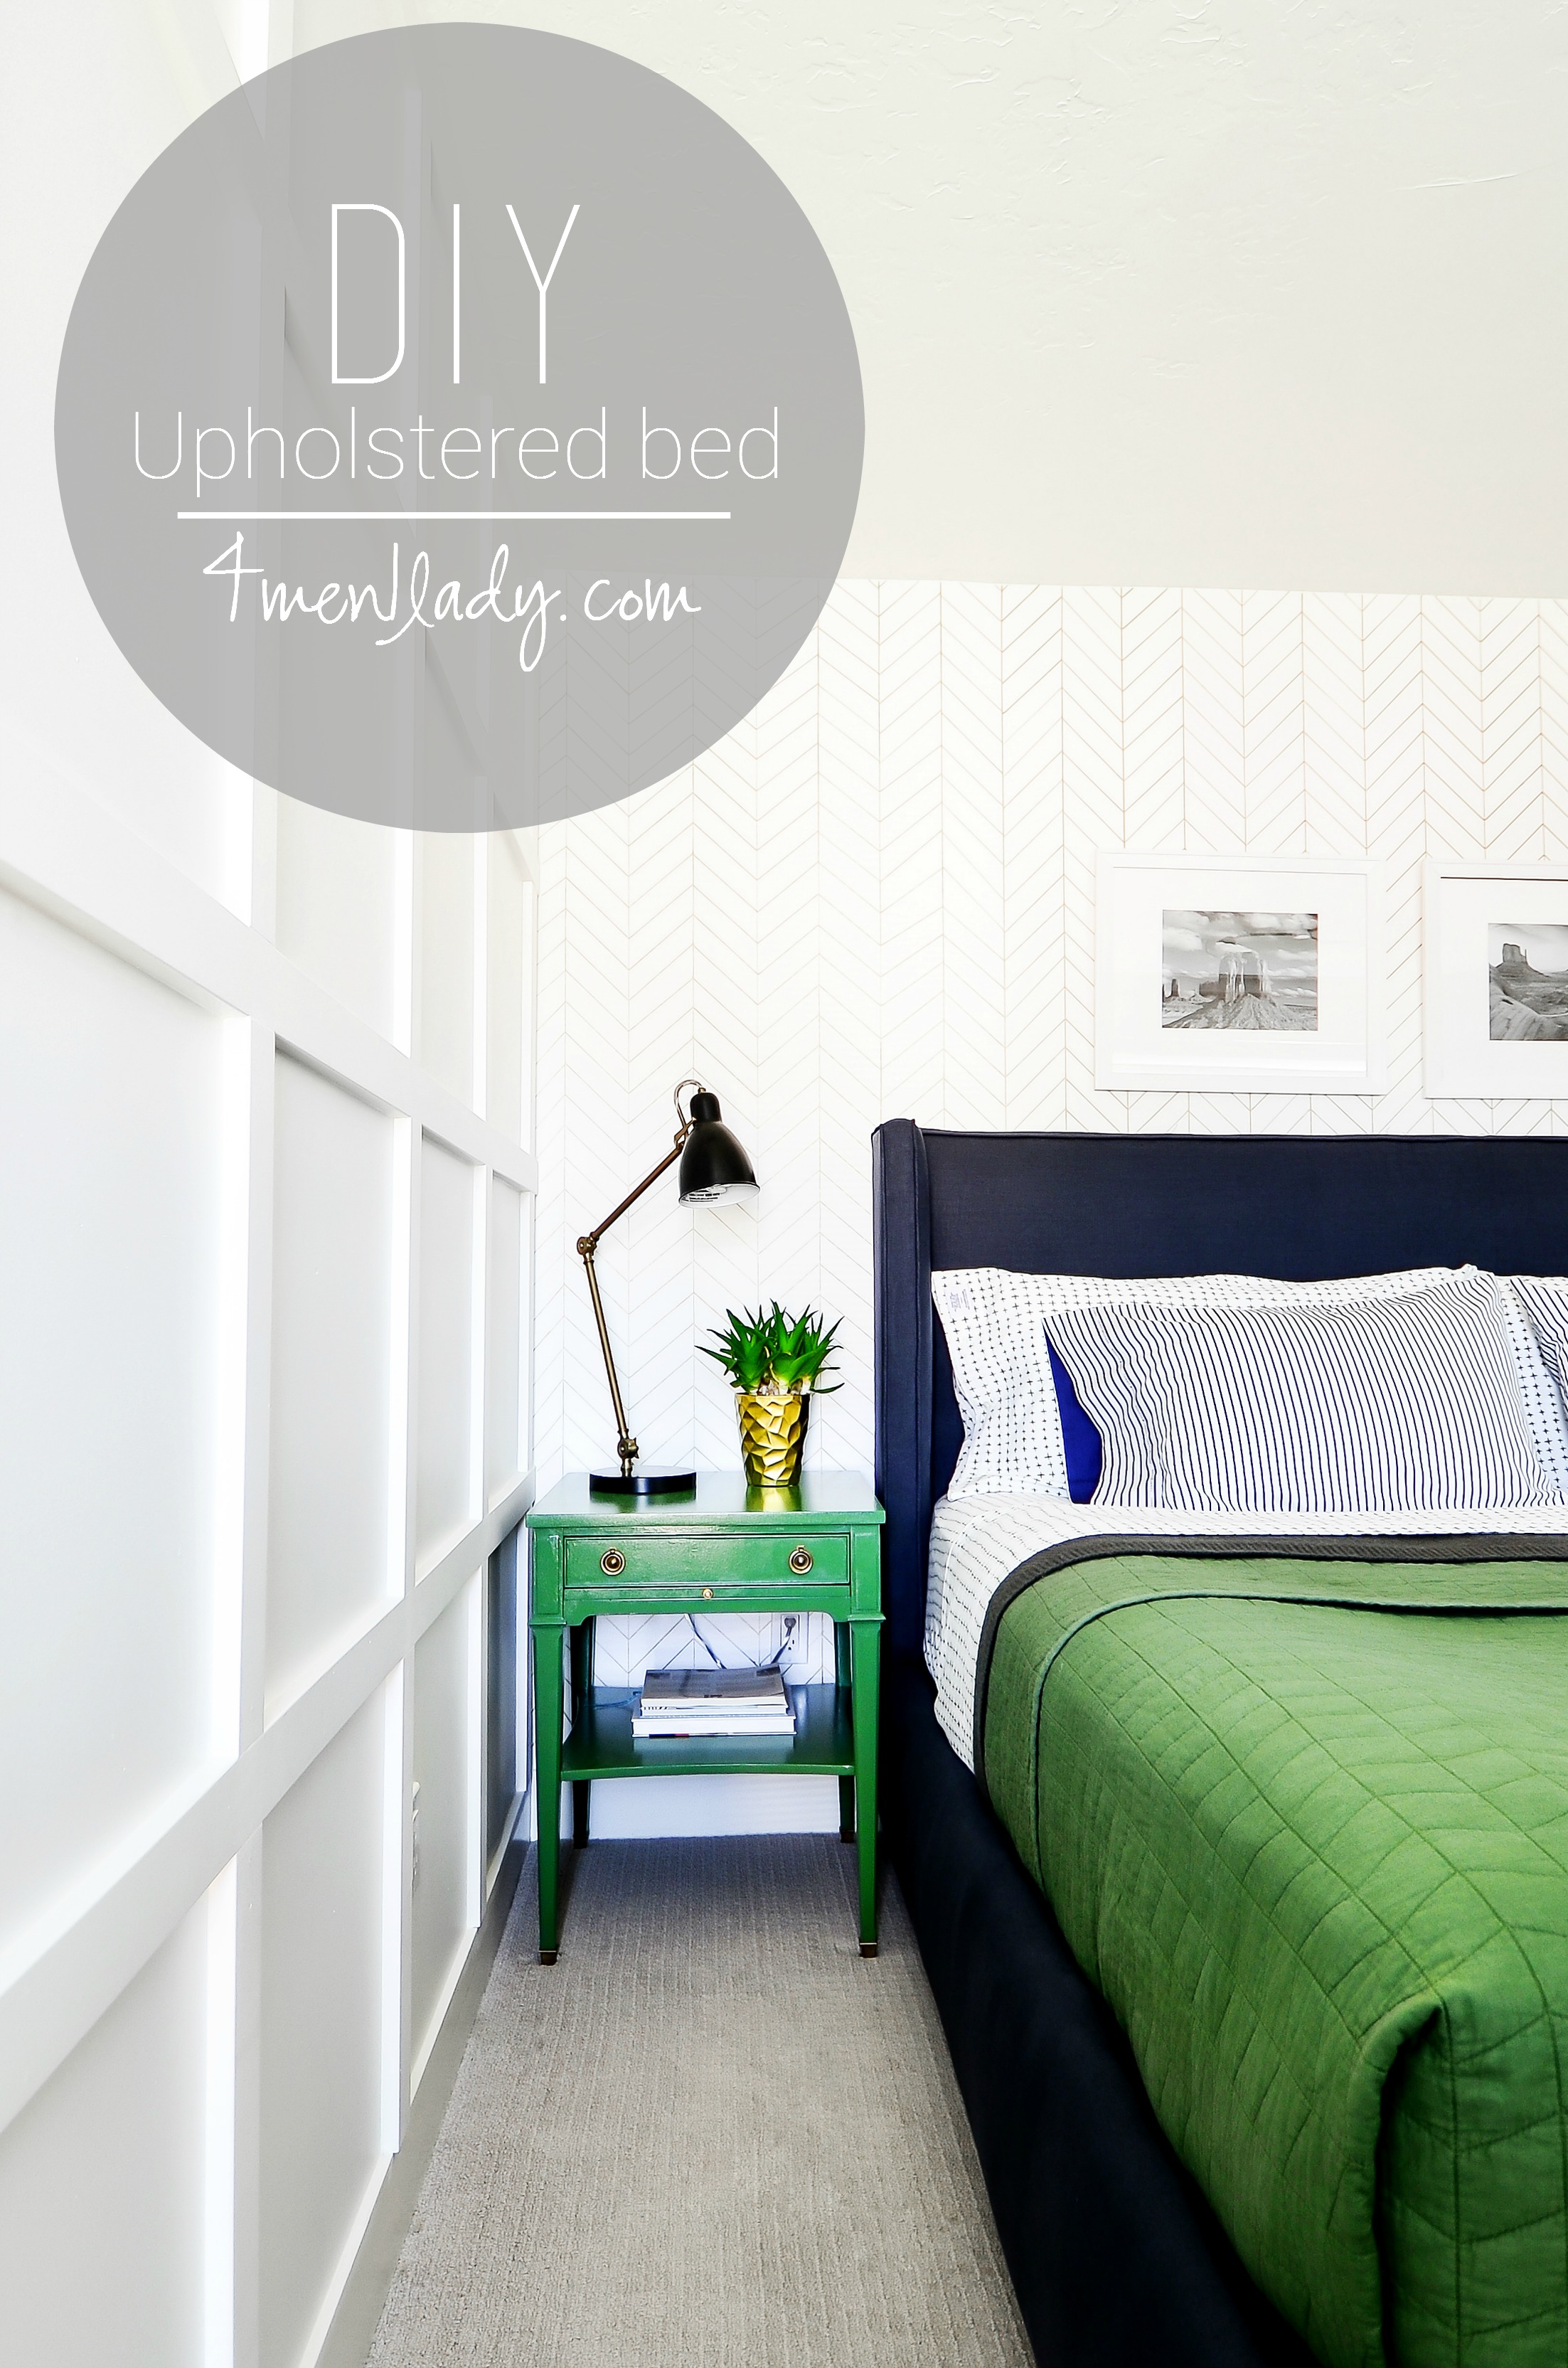
You’ve been asking and asking for our Upholstered wing bed “tutorial” for over a month.
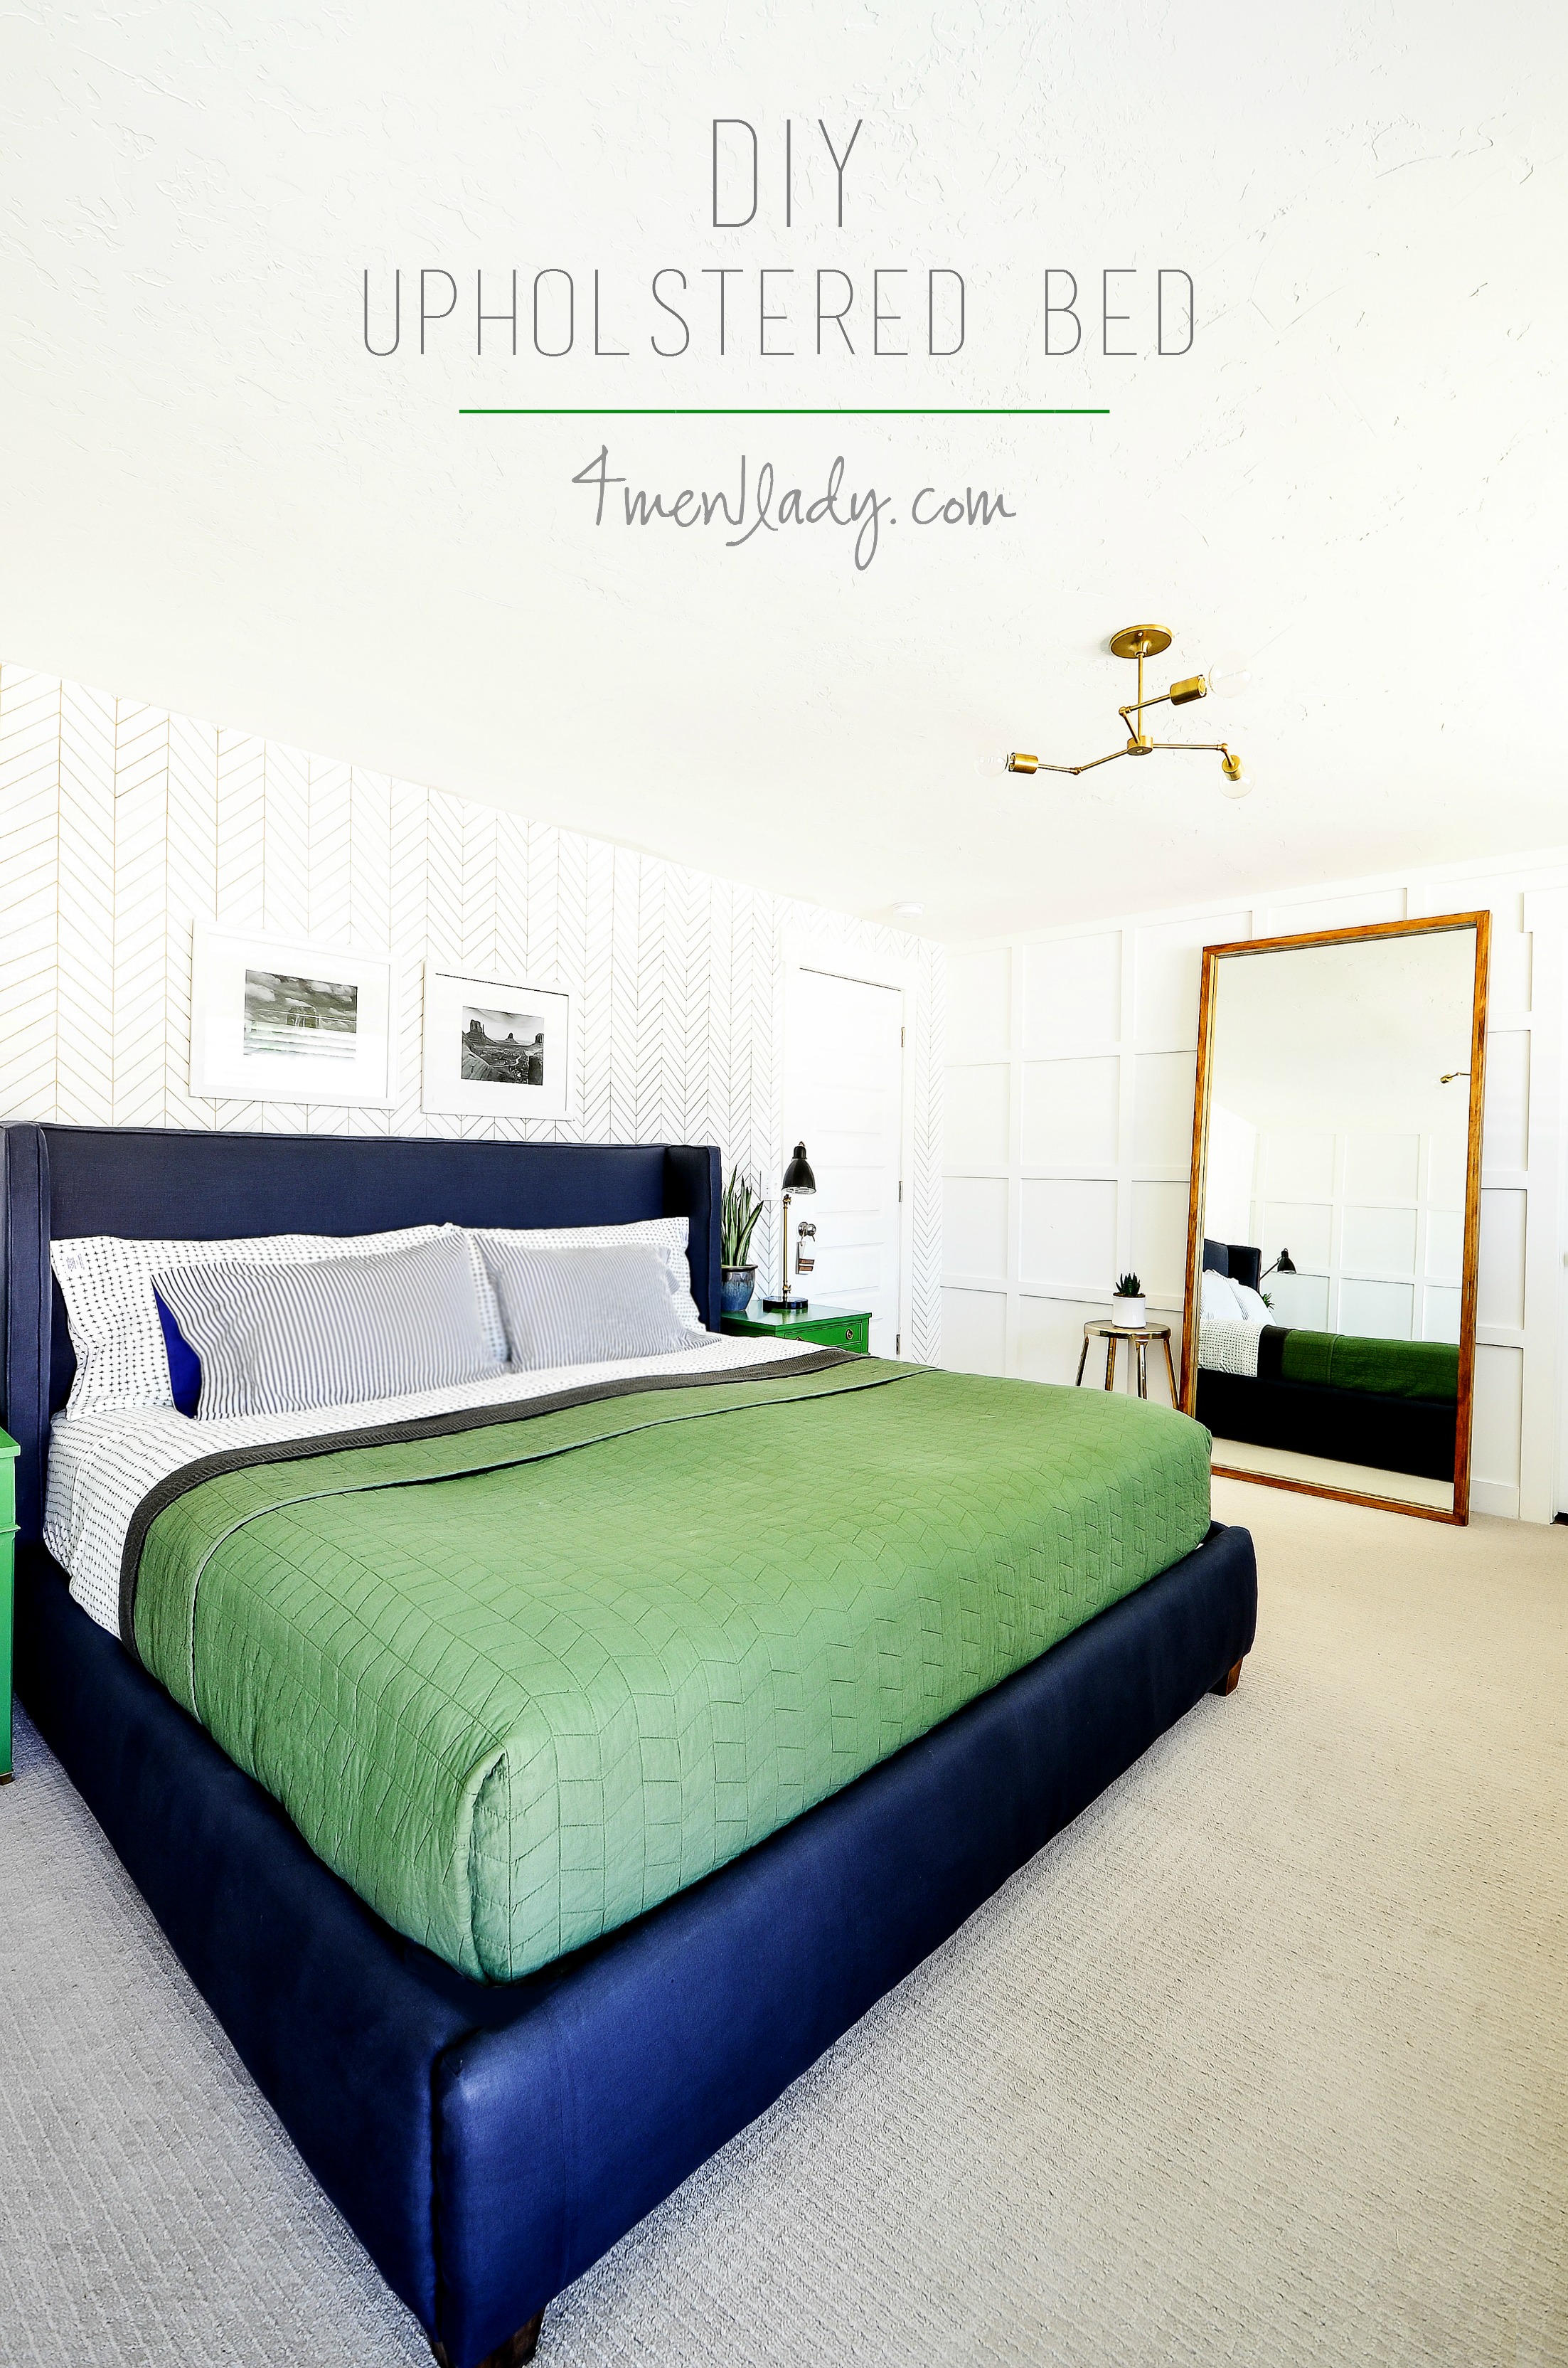
There’s a good explanation why we waited so long to post the “tutorial”. Notice every time I mention “tutorial” I’ve put it in quotations? I’m pretty darn sure a professional bed maker would read our “tutorial” and call our bluff on knowing what we were doing. So I have to preface this whole “tutorial” by saying this was a learn-as-you-go project for us. There are probably 10 much better ways to correctly make a bed but hey, ours hasn’t broken yet. This is a project that is somewhat involved but you CAN do it. And, if you improve upon our instructions I won’t be offended. We also had a lot of help from the world’s most talented mom. She has creativity and drive pouring out of her as well as being fiercely entertaining. She was the real captain of this project and I was the first mate. Thanks Mom.
Getting Started.
Probably the most difficult thing about this whole bed was designing it. I was practically in tears out of frustration after 2 hours at Home Depot and the design not coming together with materials available. (That sounds insane typing it outloud…hey, I get passionate when it comes to design). I wanted to completely hide the box spring…figuring that out was tricky. Figuring out the wings was a stumper. Making sure the middle didn’t sag was an engineering feat. To begin, here’s what you’ll need for a king sized bed (all beds vary a bit so measure your bed first):
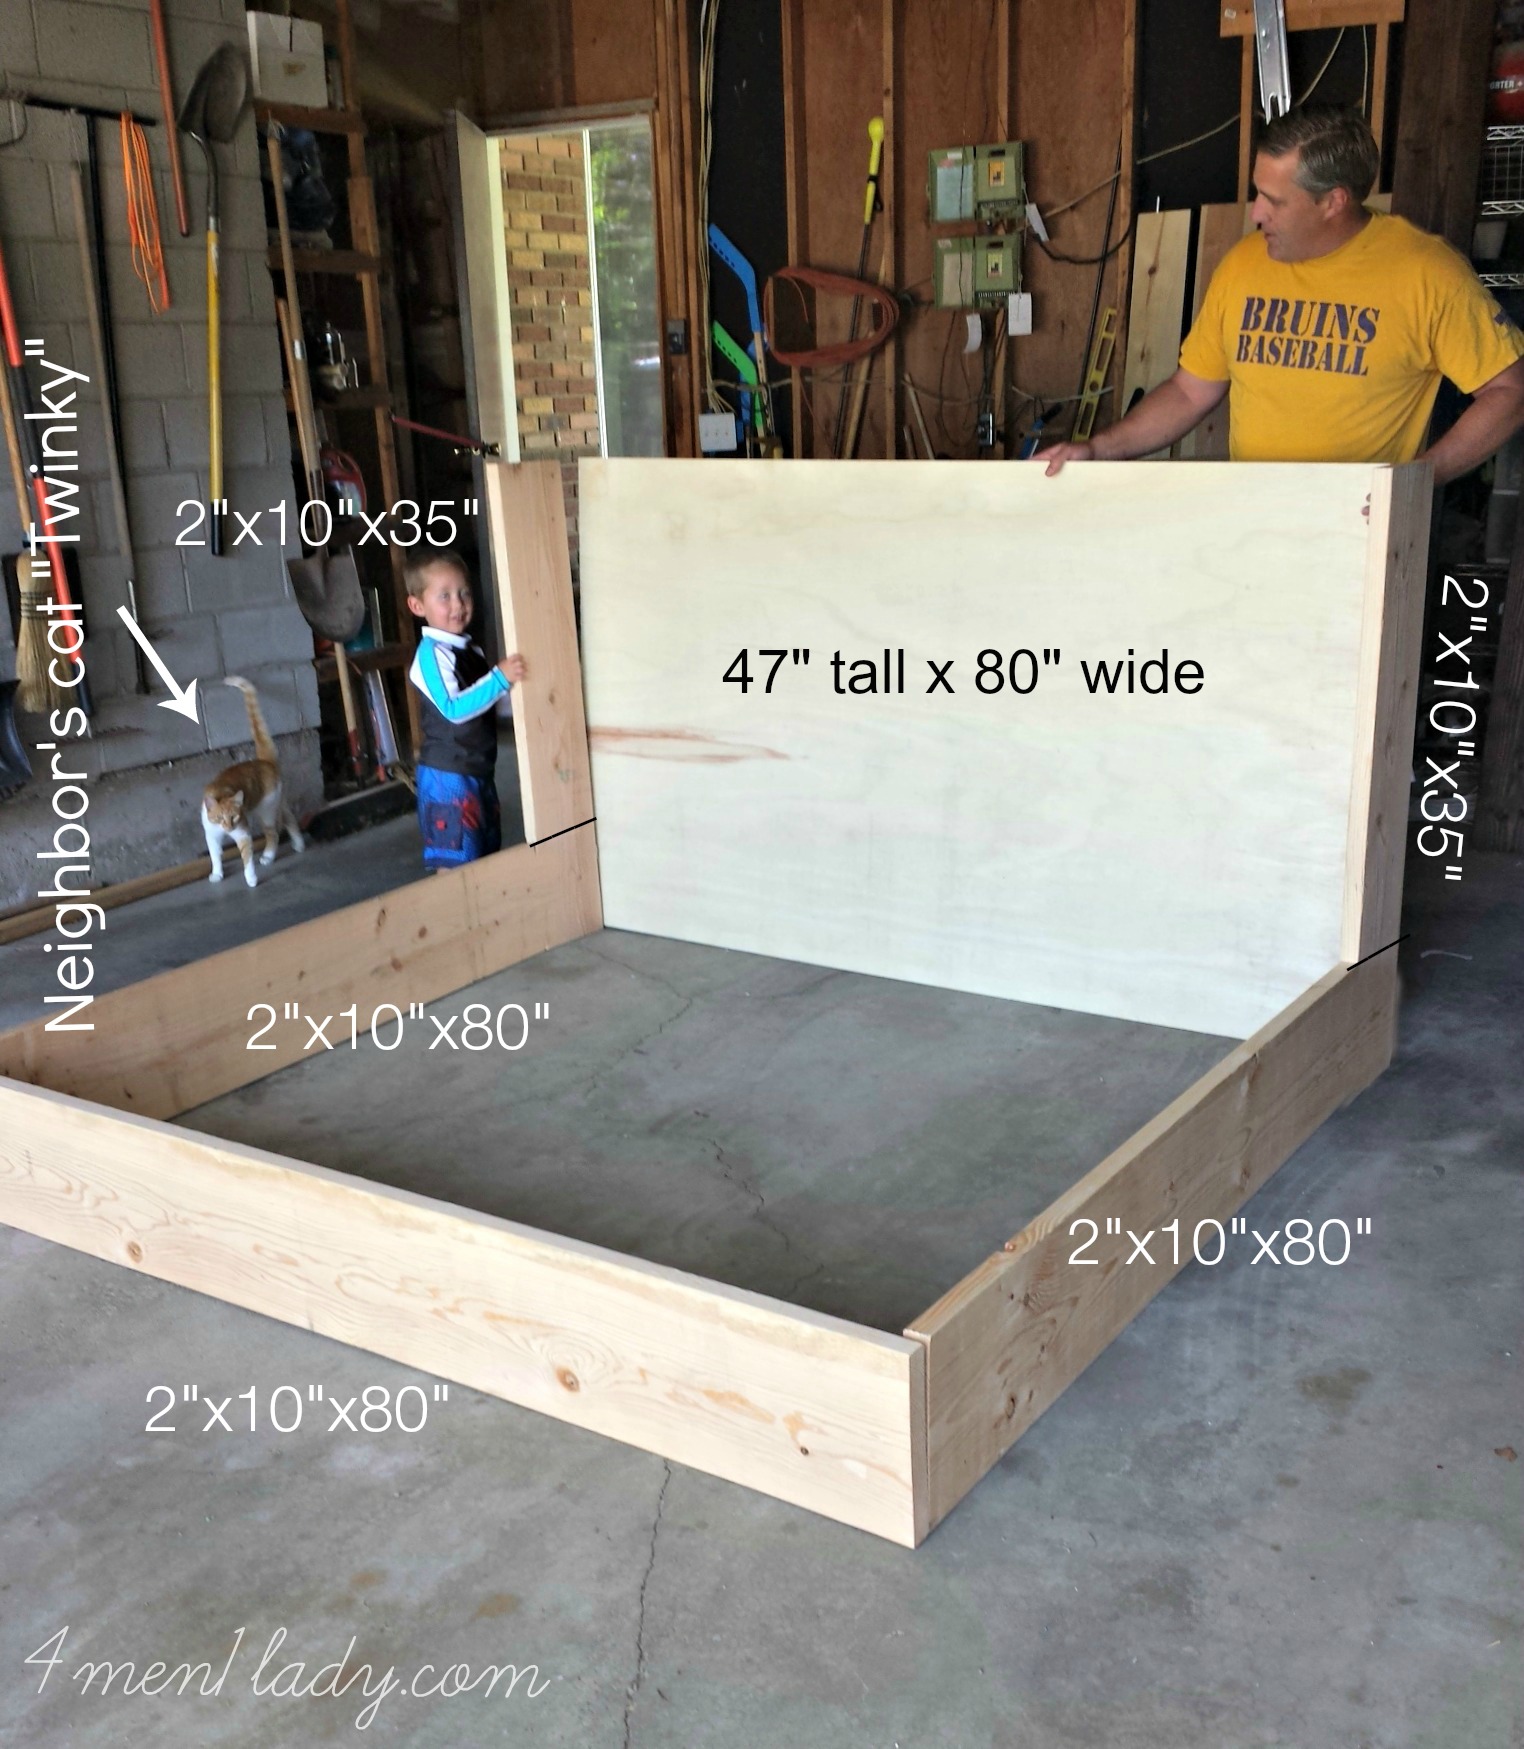
From Home Depot I picked up:
-3 boards measuring: 2″X10″x80″ (These will be the foot board and two rails).
-2 boards measuring: 2″X10″X35″ (These will be your wings).
-1 board measuring 47″ (tall) X 80″ (wide) (This will be your headboard. We used MDF but use any board you like). Note: Because the headboard was quite thin we used some scrap boards we had laying around and attached it to the edges of the back of the headboard to make it appear more substantial. I think it only added barely an inch but that inch goes a long way in the look of the headboard.
Once all said and done our king sized bed fit perfectly with these measurements. However, if you want a little more space on the sides of your box spring and mattress to be able to tuck your bedding in or under, add an inch or two to the 80″ measurement.
Next step: Apply foam and batting.
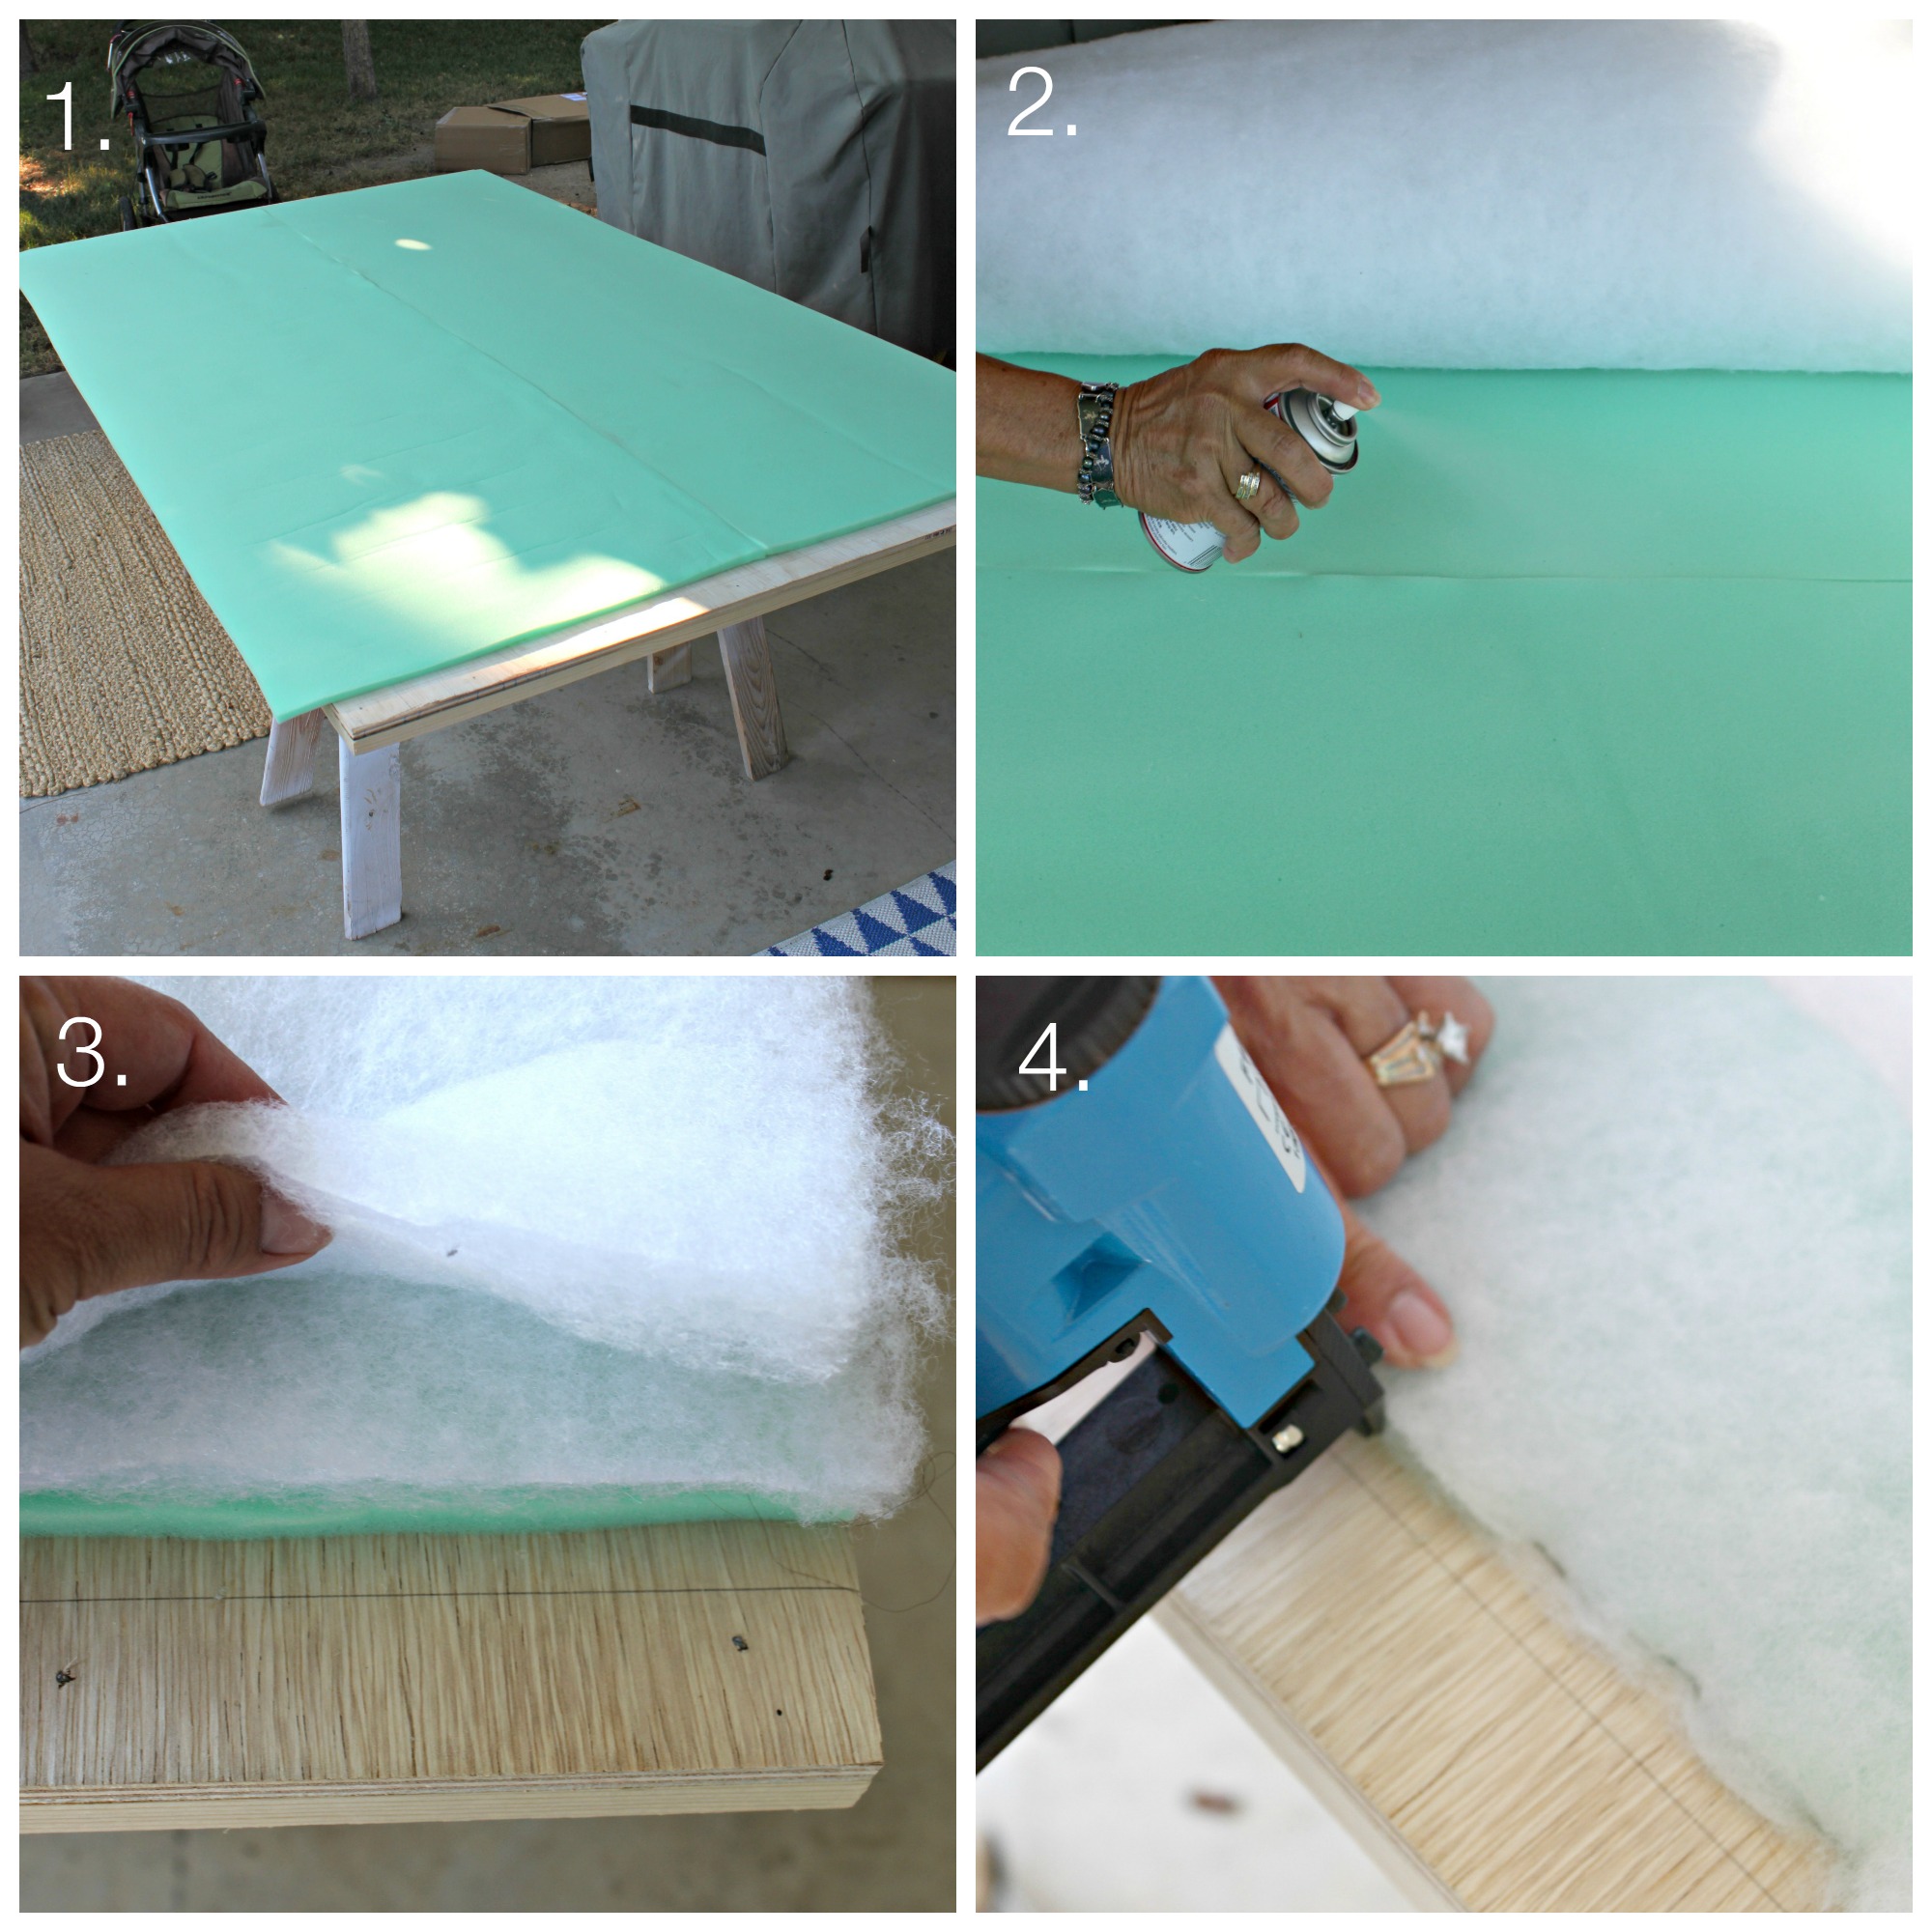
Spray your board with spray glue and apply a layer of foam. Cut off excess. Repeat this process with quilters batting (I bought glue, foam and batting from JoAnne’s). We used two layers of batting. Mom used a staple gun (that attaches to an air compressor) to secure all the layers down at the edges. (You can use a hand staple gun but in my experience, they don’t put the staples all the way down in to the board plus your hand will be numb after about 25 staples). Now you’re ready to upholster.
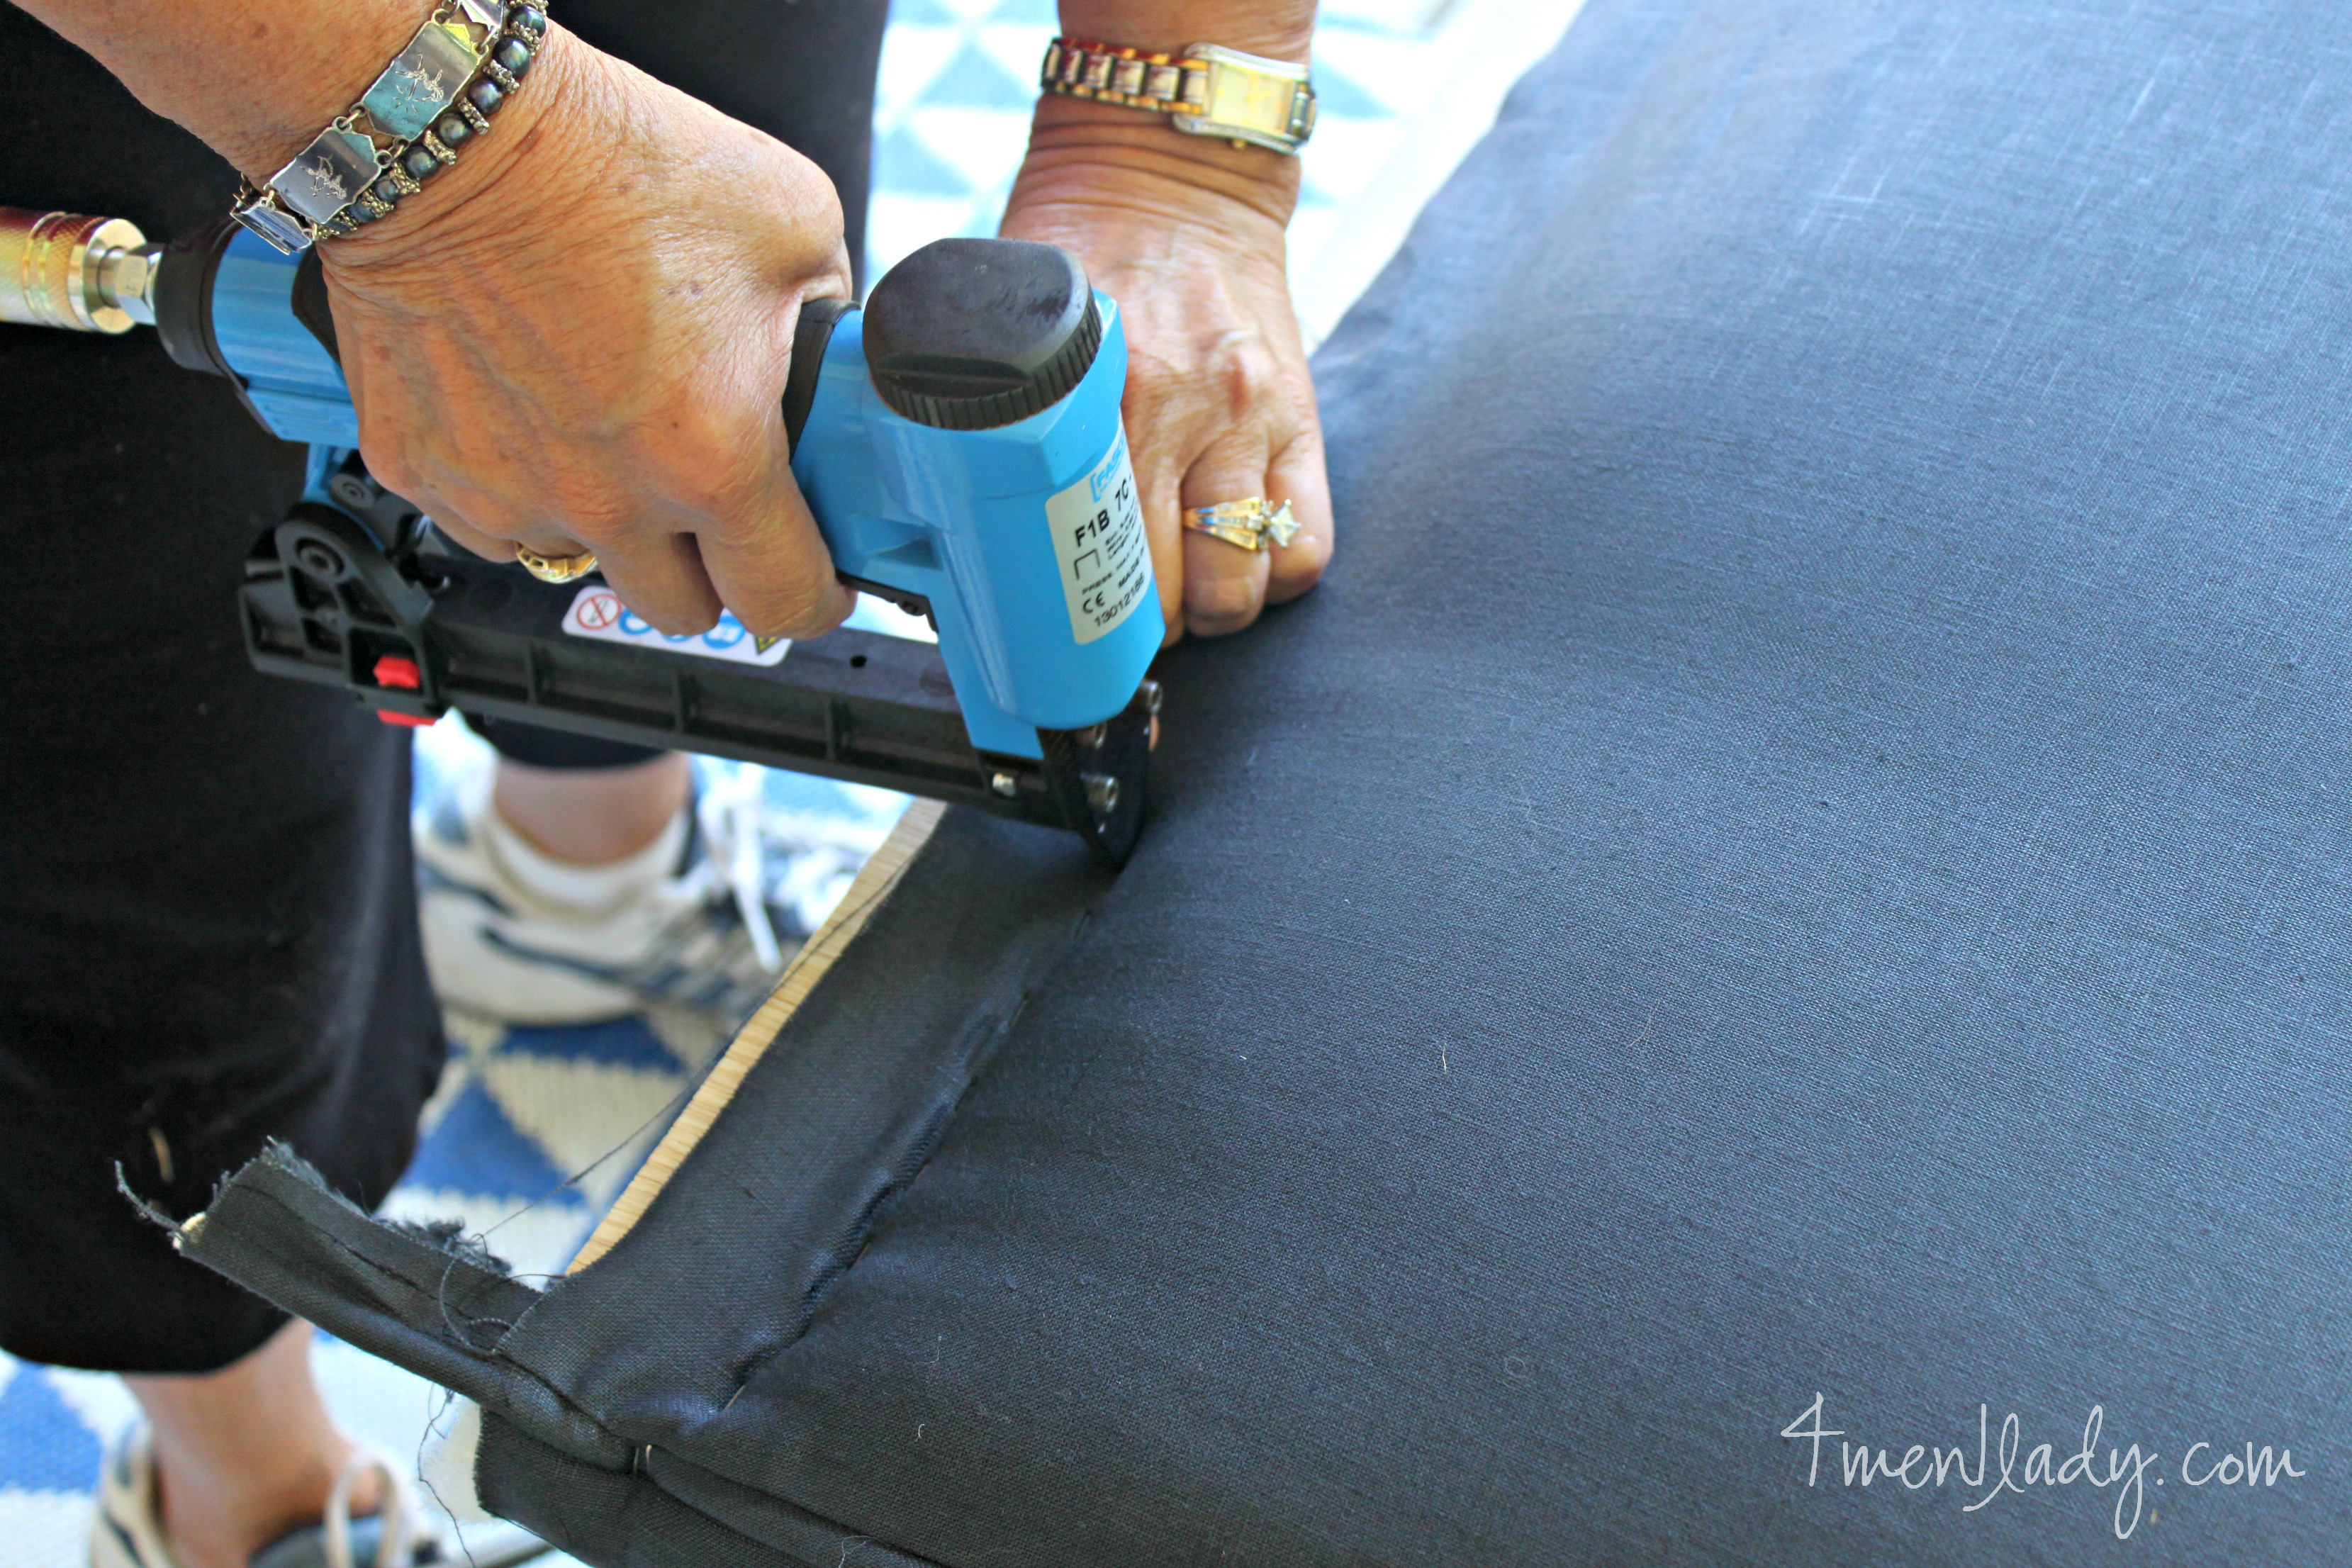
Upholstery.
We upholstered each board individually then put everything together like a puzzle afterwards.
Upholstering isn’t rocket science. The easiest and most common method is start in the middle and work your way out by pulling the fabric taut then stapling it to the side or edge that doesn’t show. If not done well it can look “DIY” so my mom used cording wrapped in fabric to pipe the edges.

It takes a ton of time but is well worth the effort. I’ve finished my boys headboards like that before but I’m not going to attempt to give you a sewing “tutorial” on that here. Google it if you want to go that route.
Putting the bed together.
Butt the side rails to the inside of the foot board and inside of headboard as shown:

Use corner brackets in each corner to attach frame together.
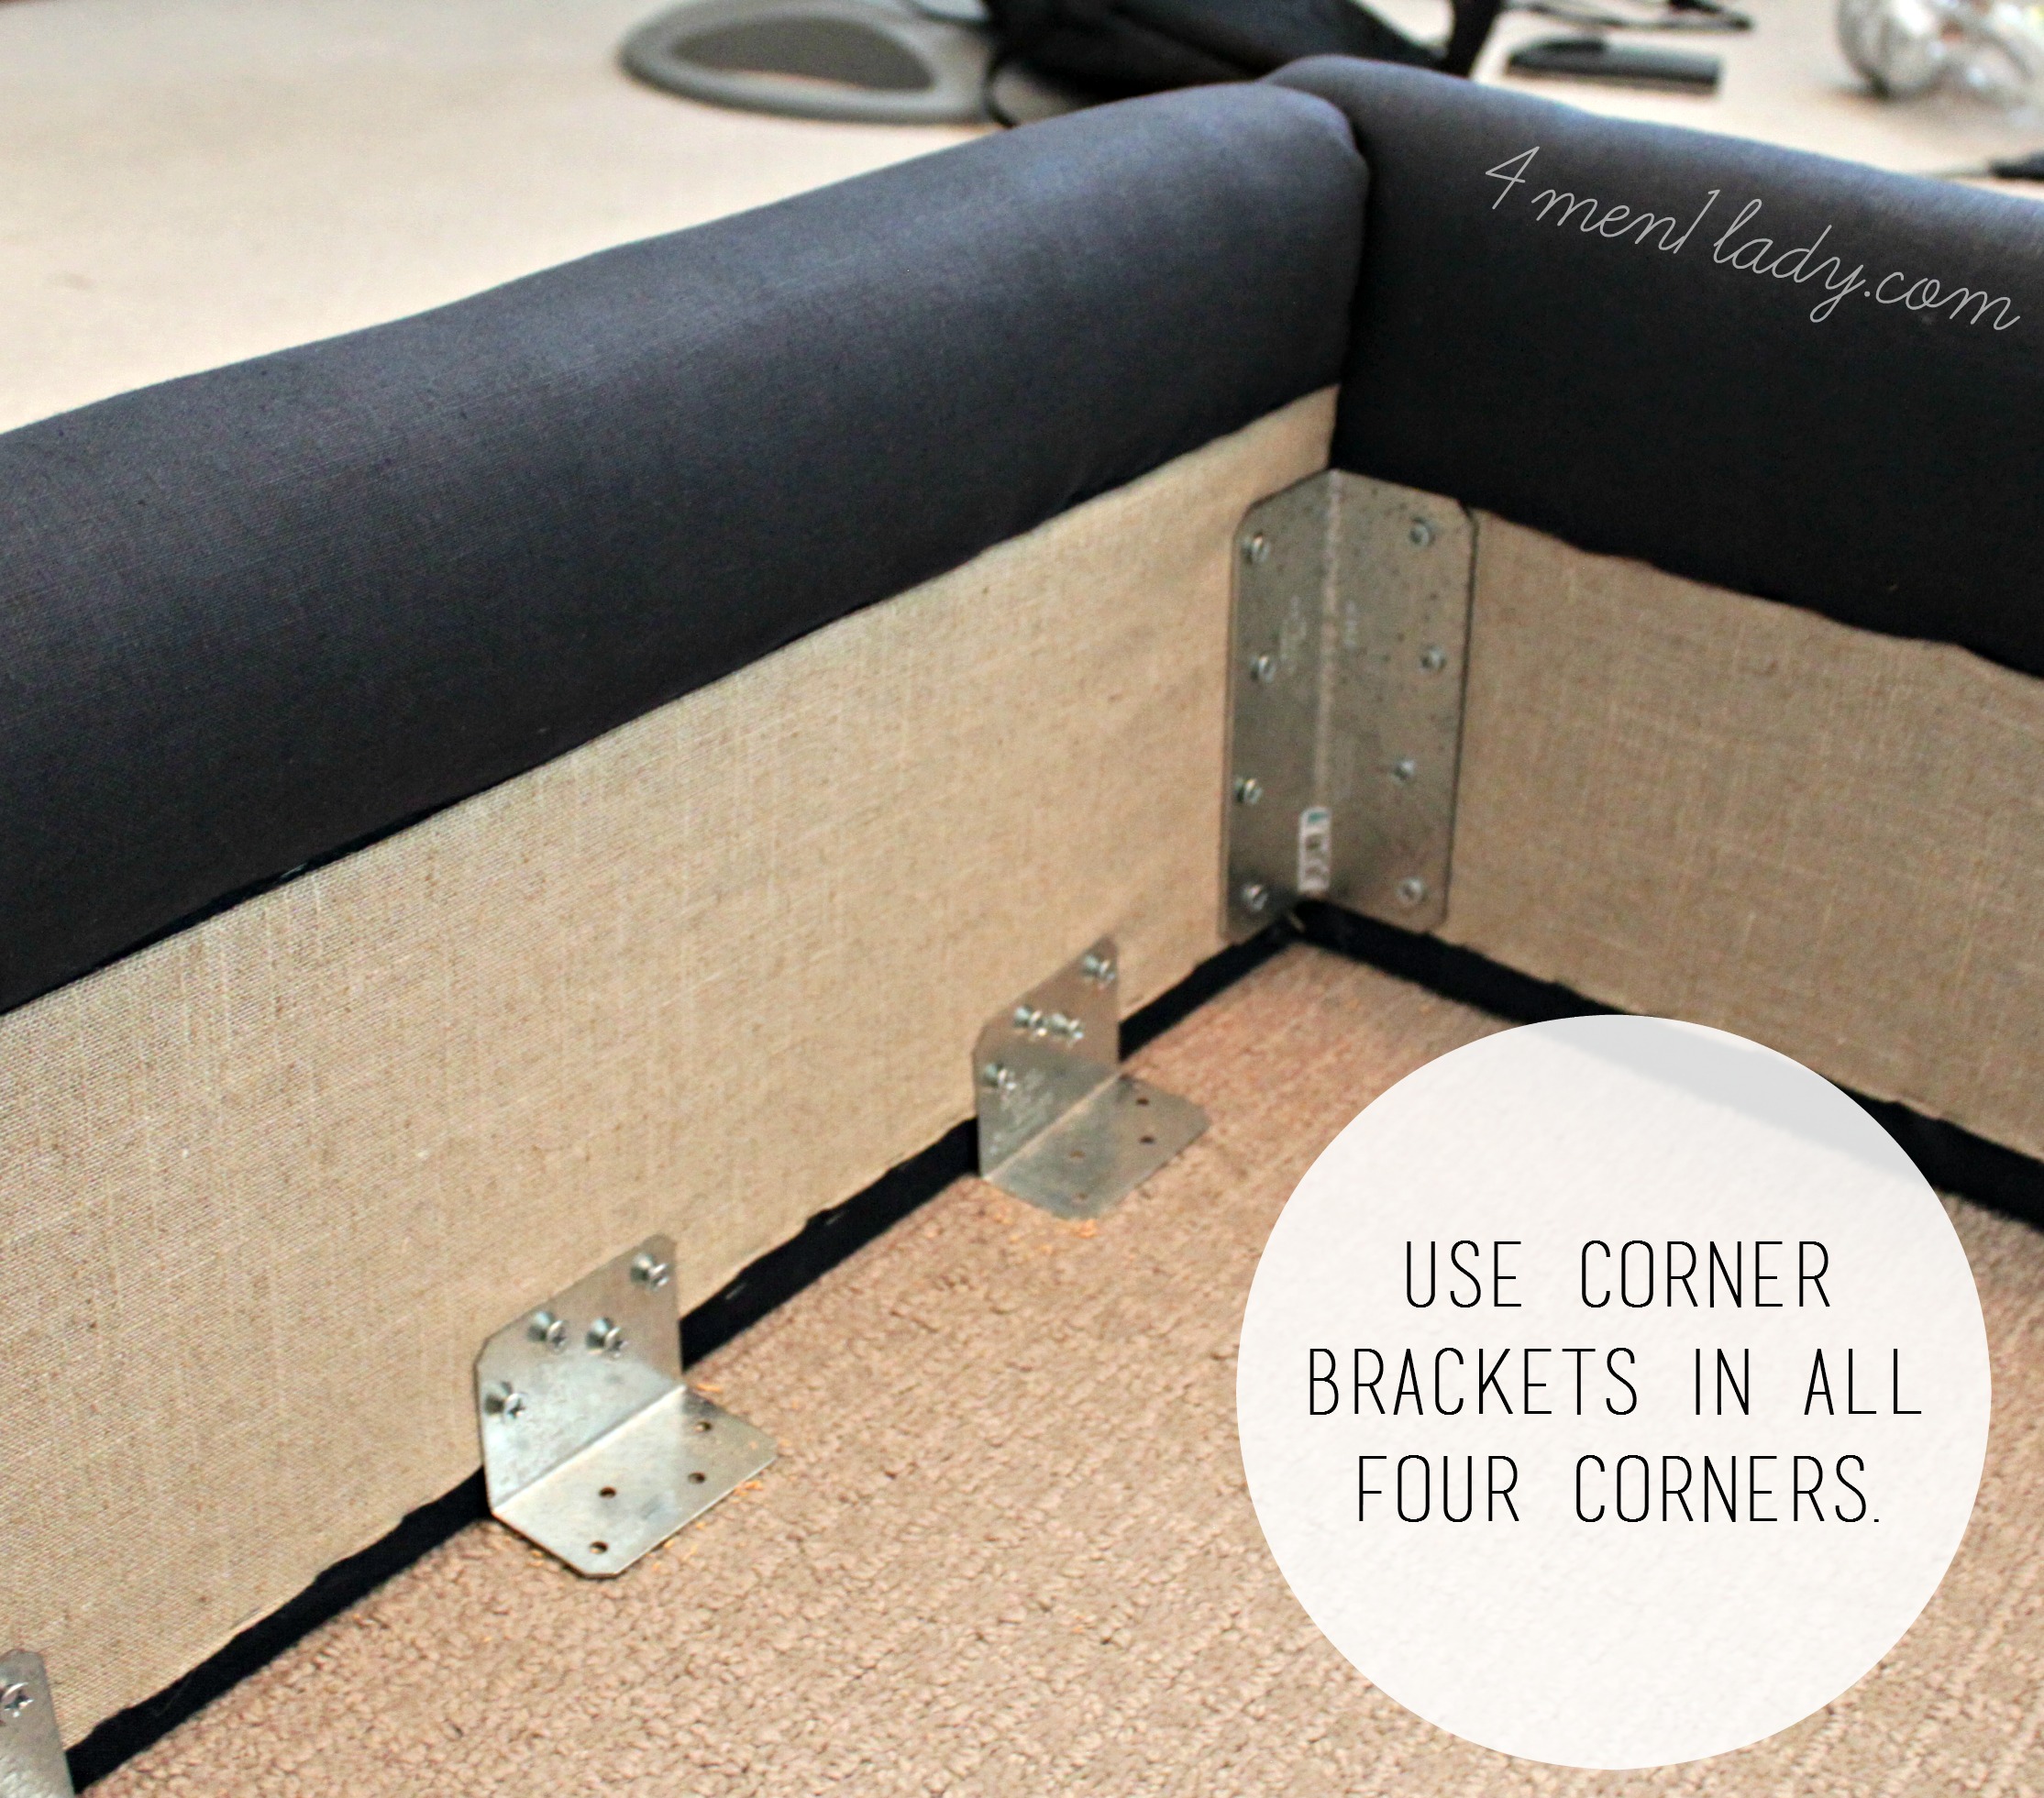
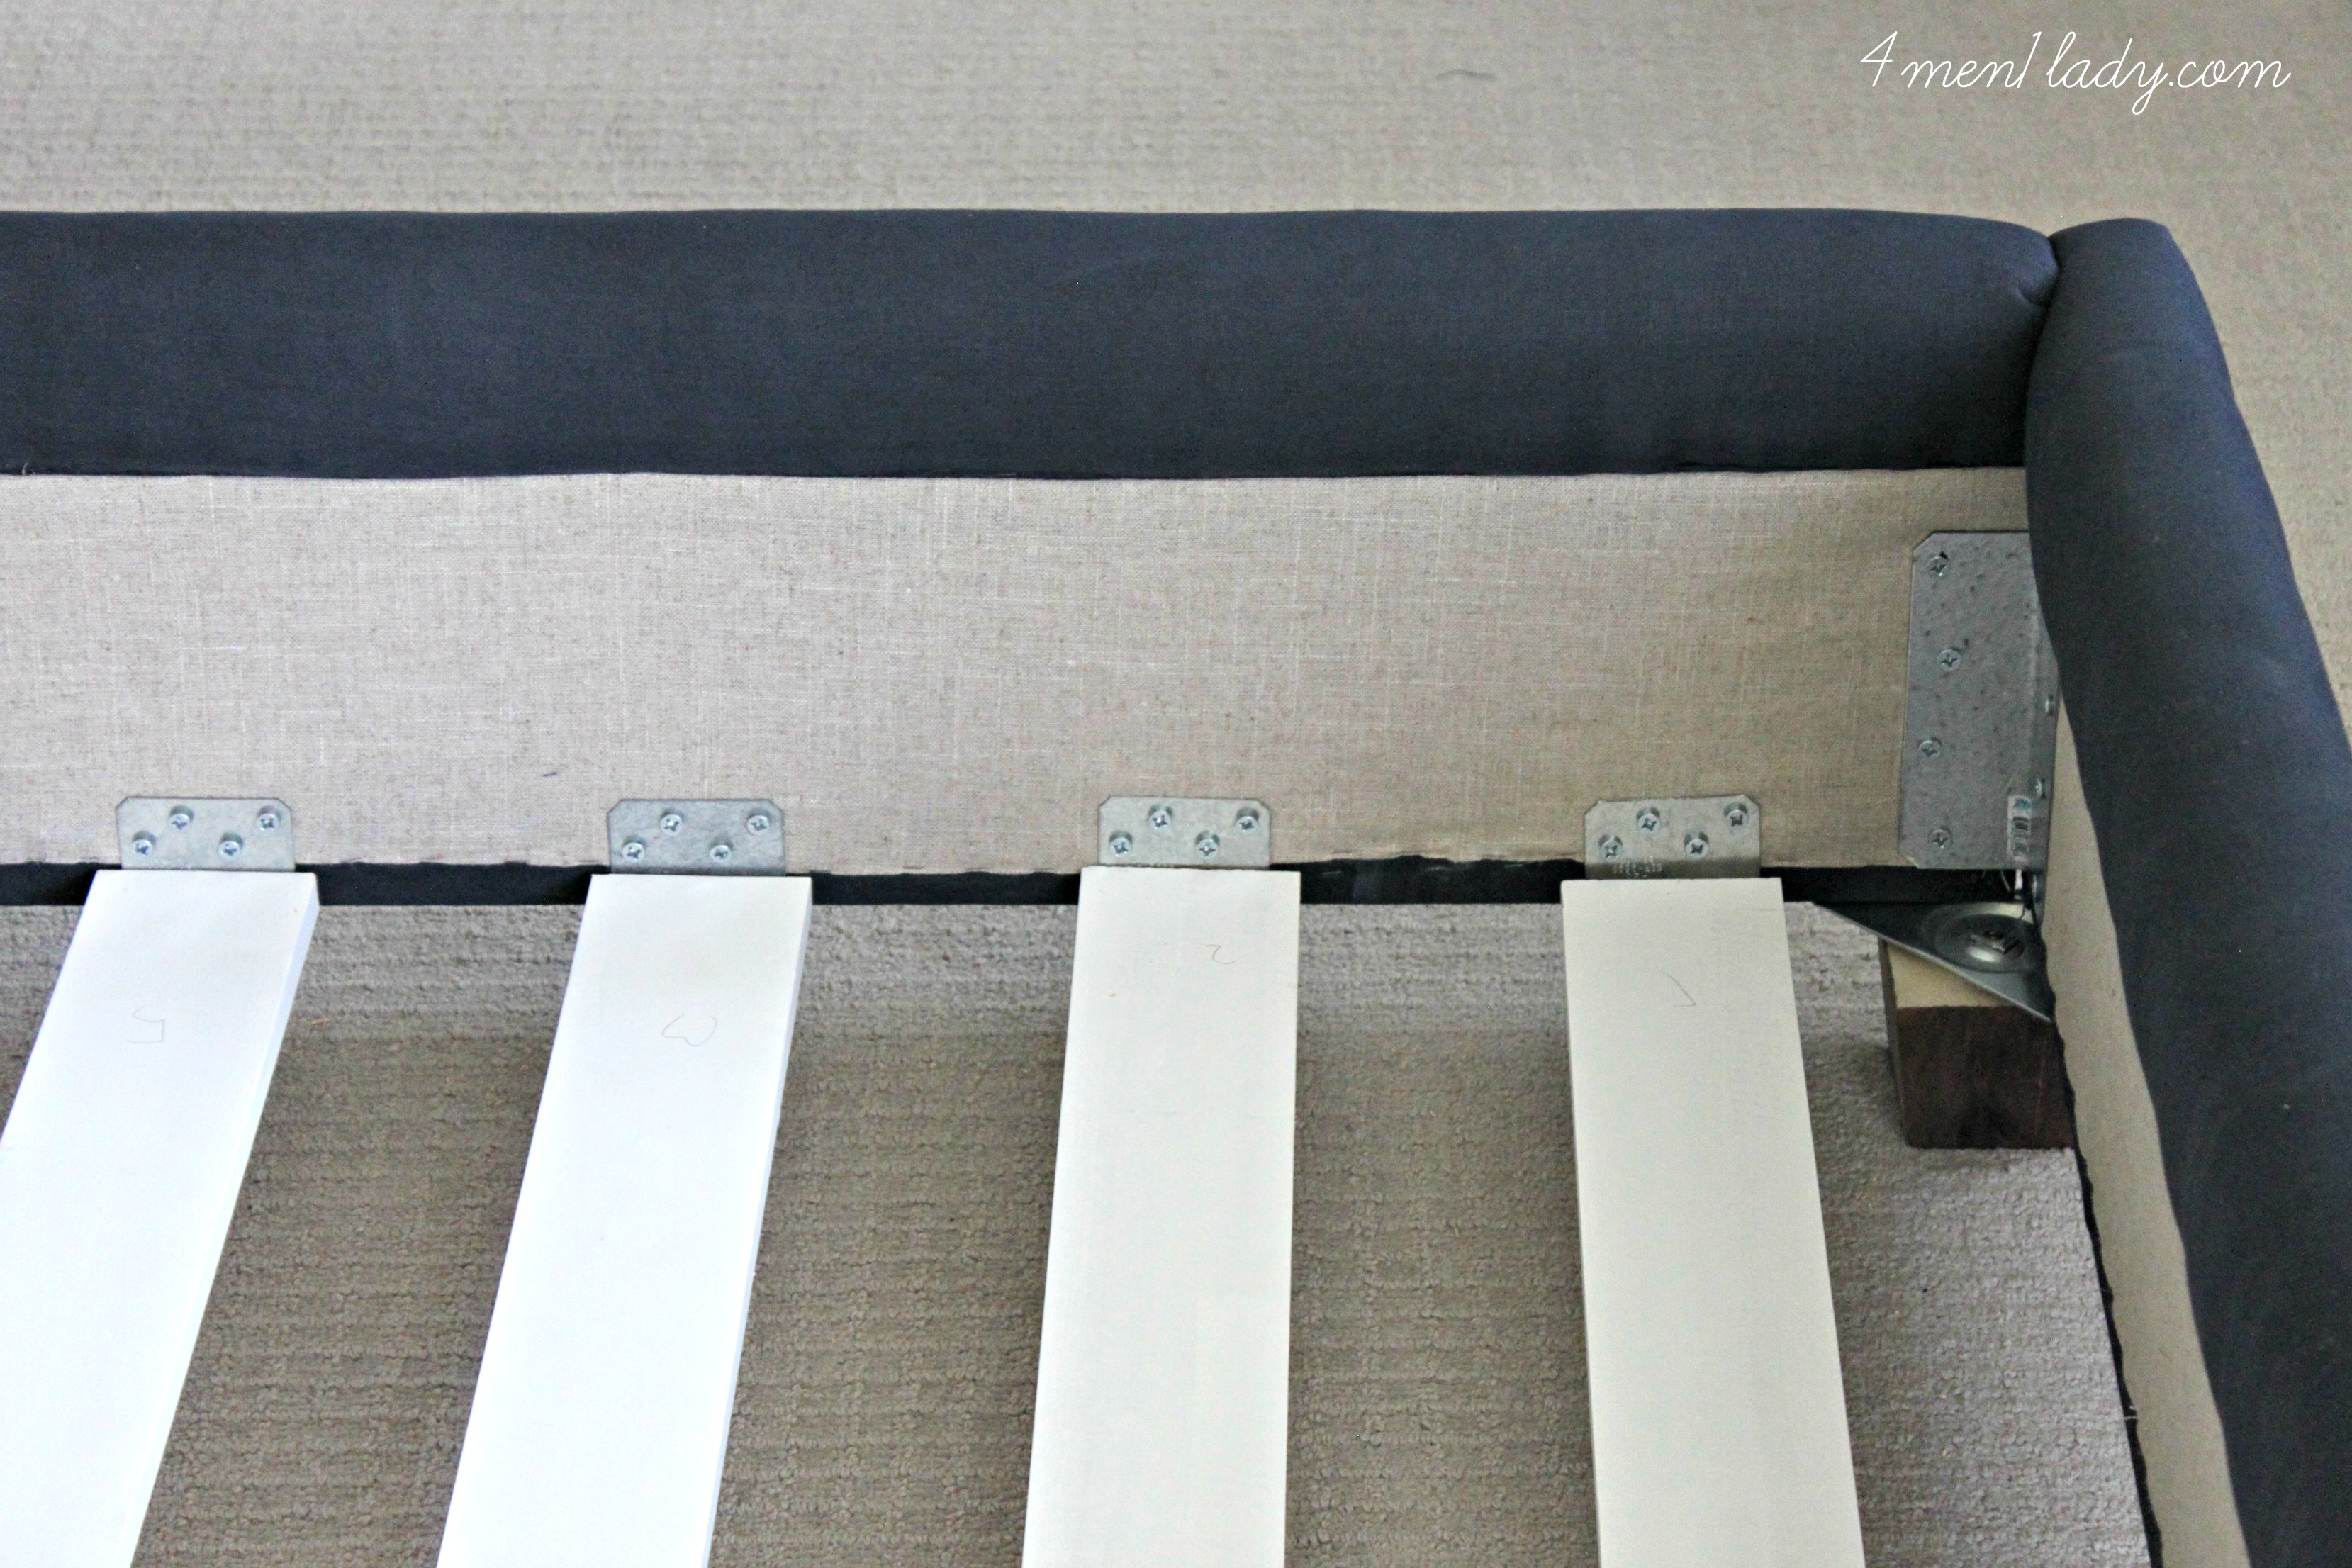
We then applied “L” brackets to the inside side rails every 6-10 inches or so they were even with the floor. Remember, my goal was have the box spring be completely hidden so we had to make sure those brackets were level with the floor.
At this point you’ll want to attach the feet. I picked up 4 triangle plates and furniture feet (which I stained) from the Home Depot.
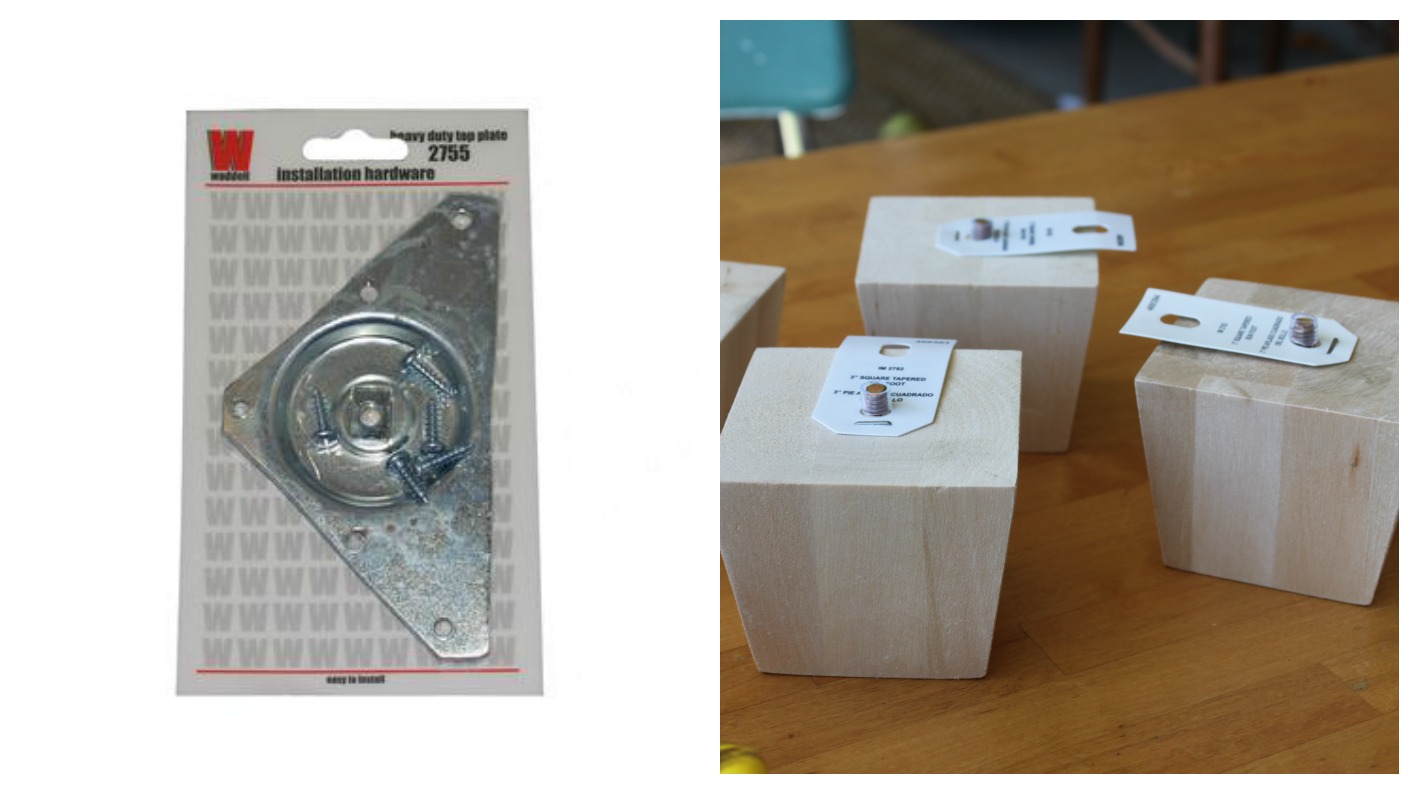 Attach the plates to the corners of your bed frame then simply twist the feet in.
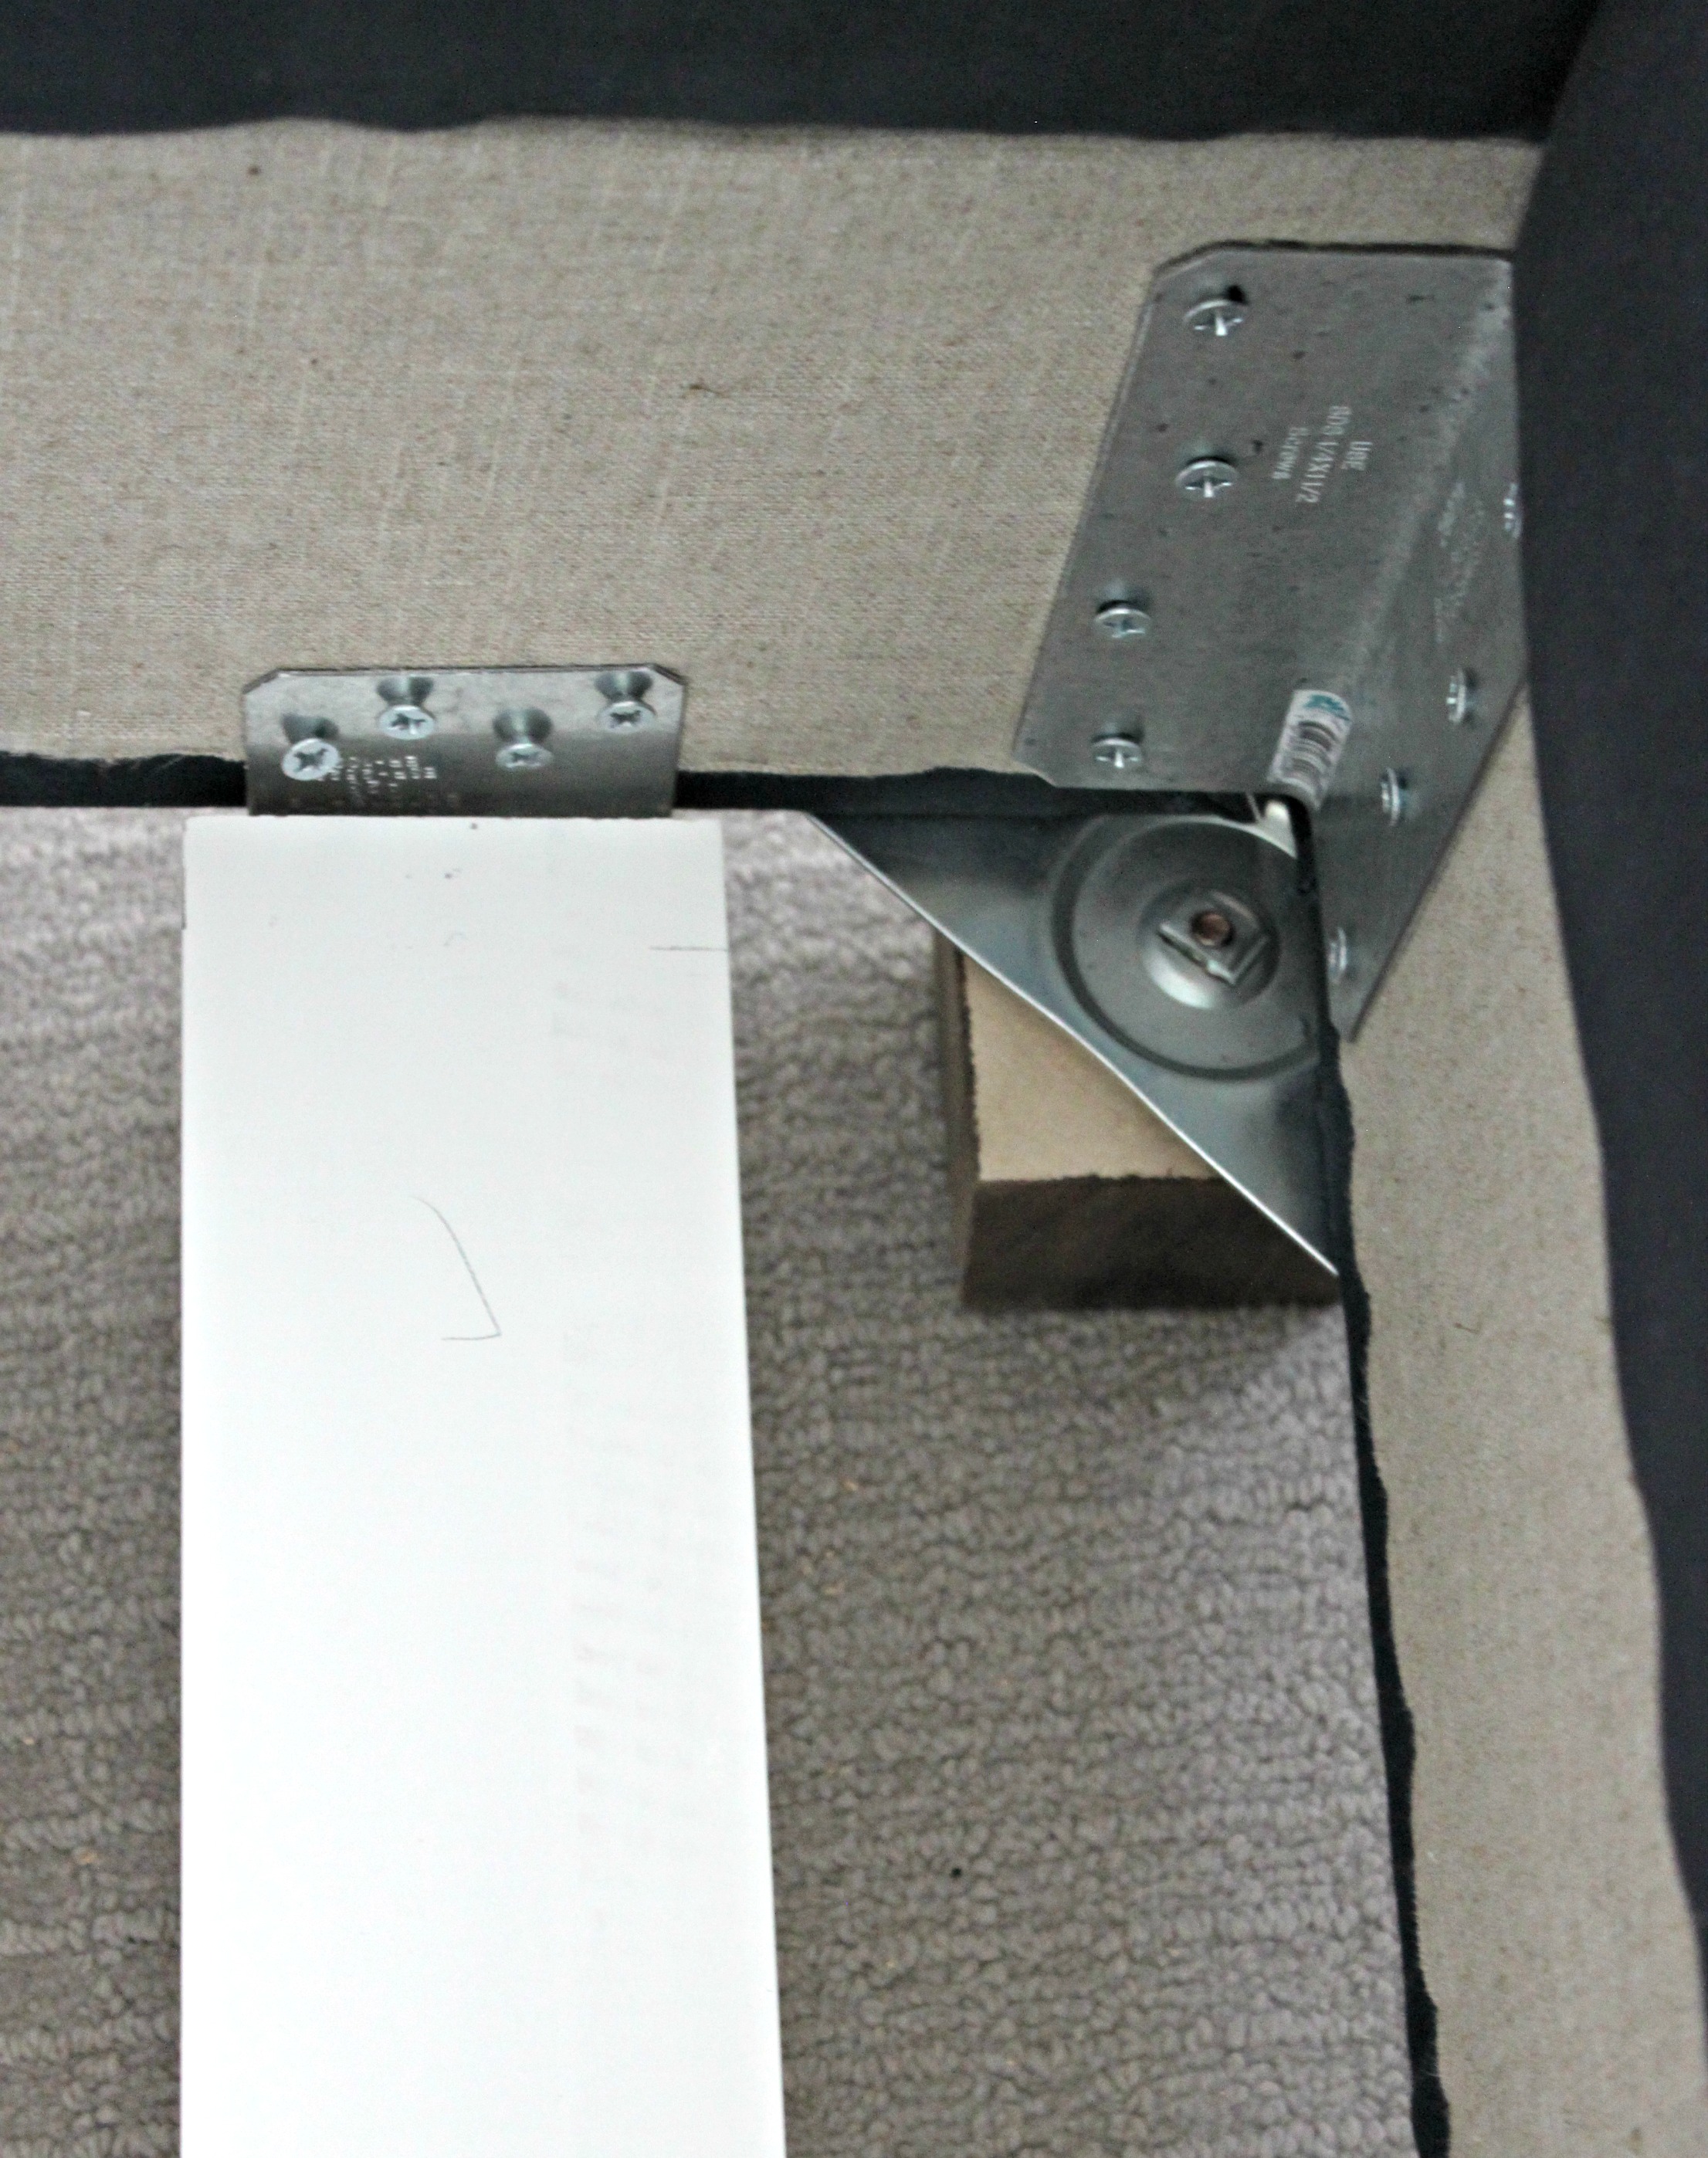
Once the feet are securely attached you can now attach the support boards to the “L” brackets that will run the width of the bed. I was originally going to get the cheap-o boards in the Lumber Department but they were all pretty twisted and warped. The pre-primed boards were much straighter so for a few bucks more we went that route (plus they look nicer). Lay the boards on the top of the L bracket and attach with wood screws underneath.
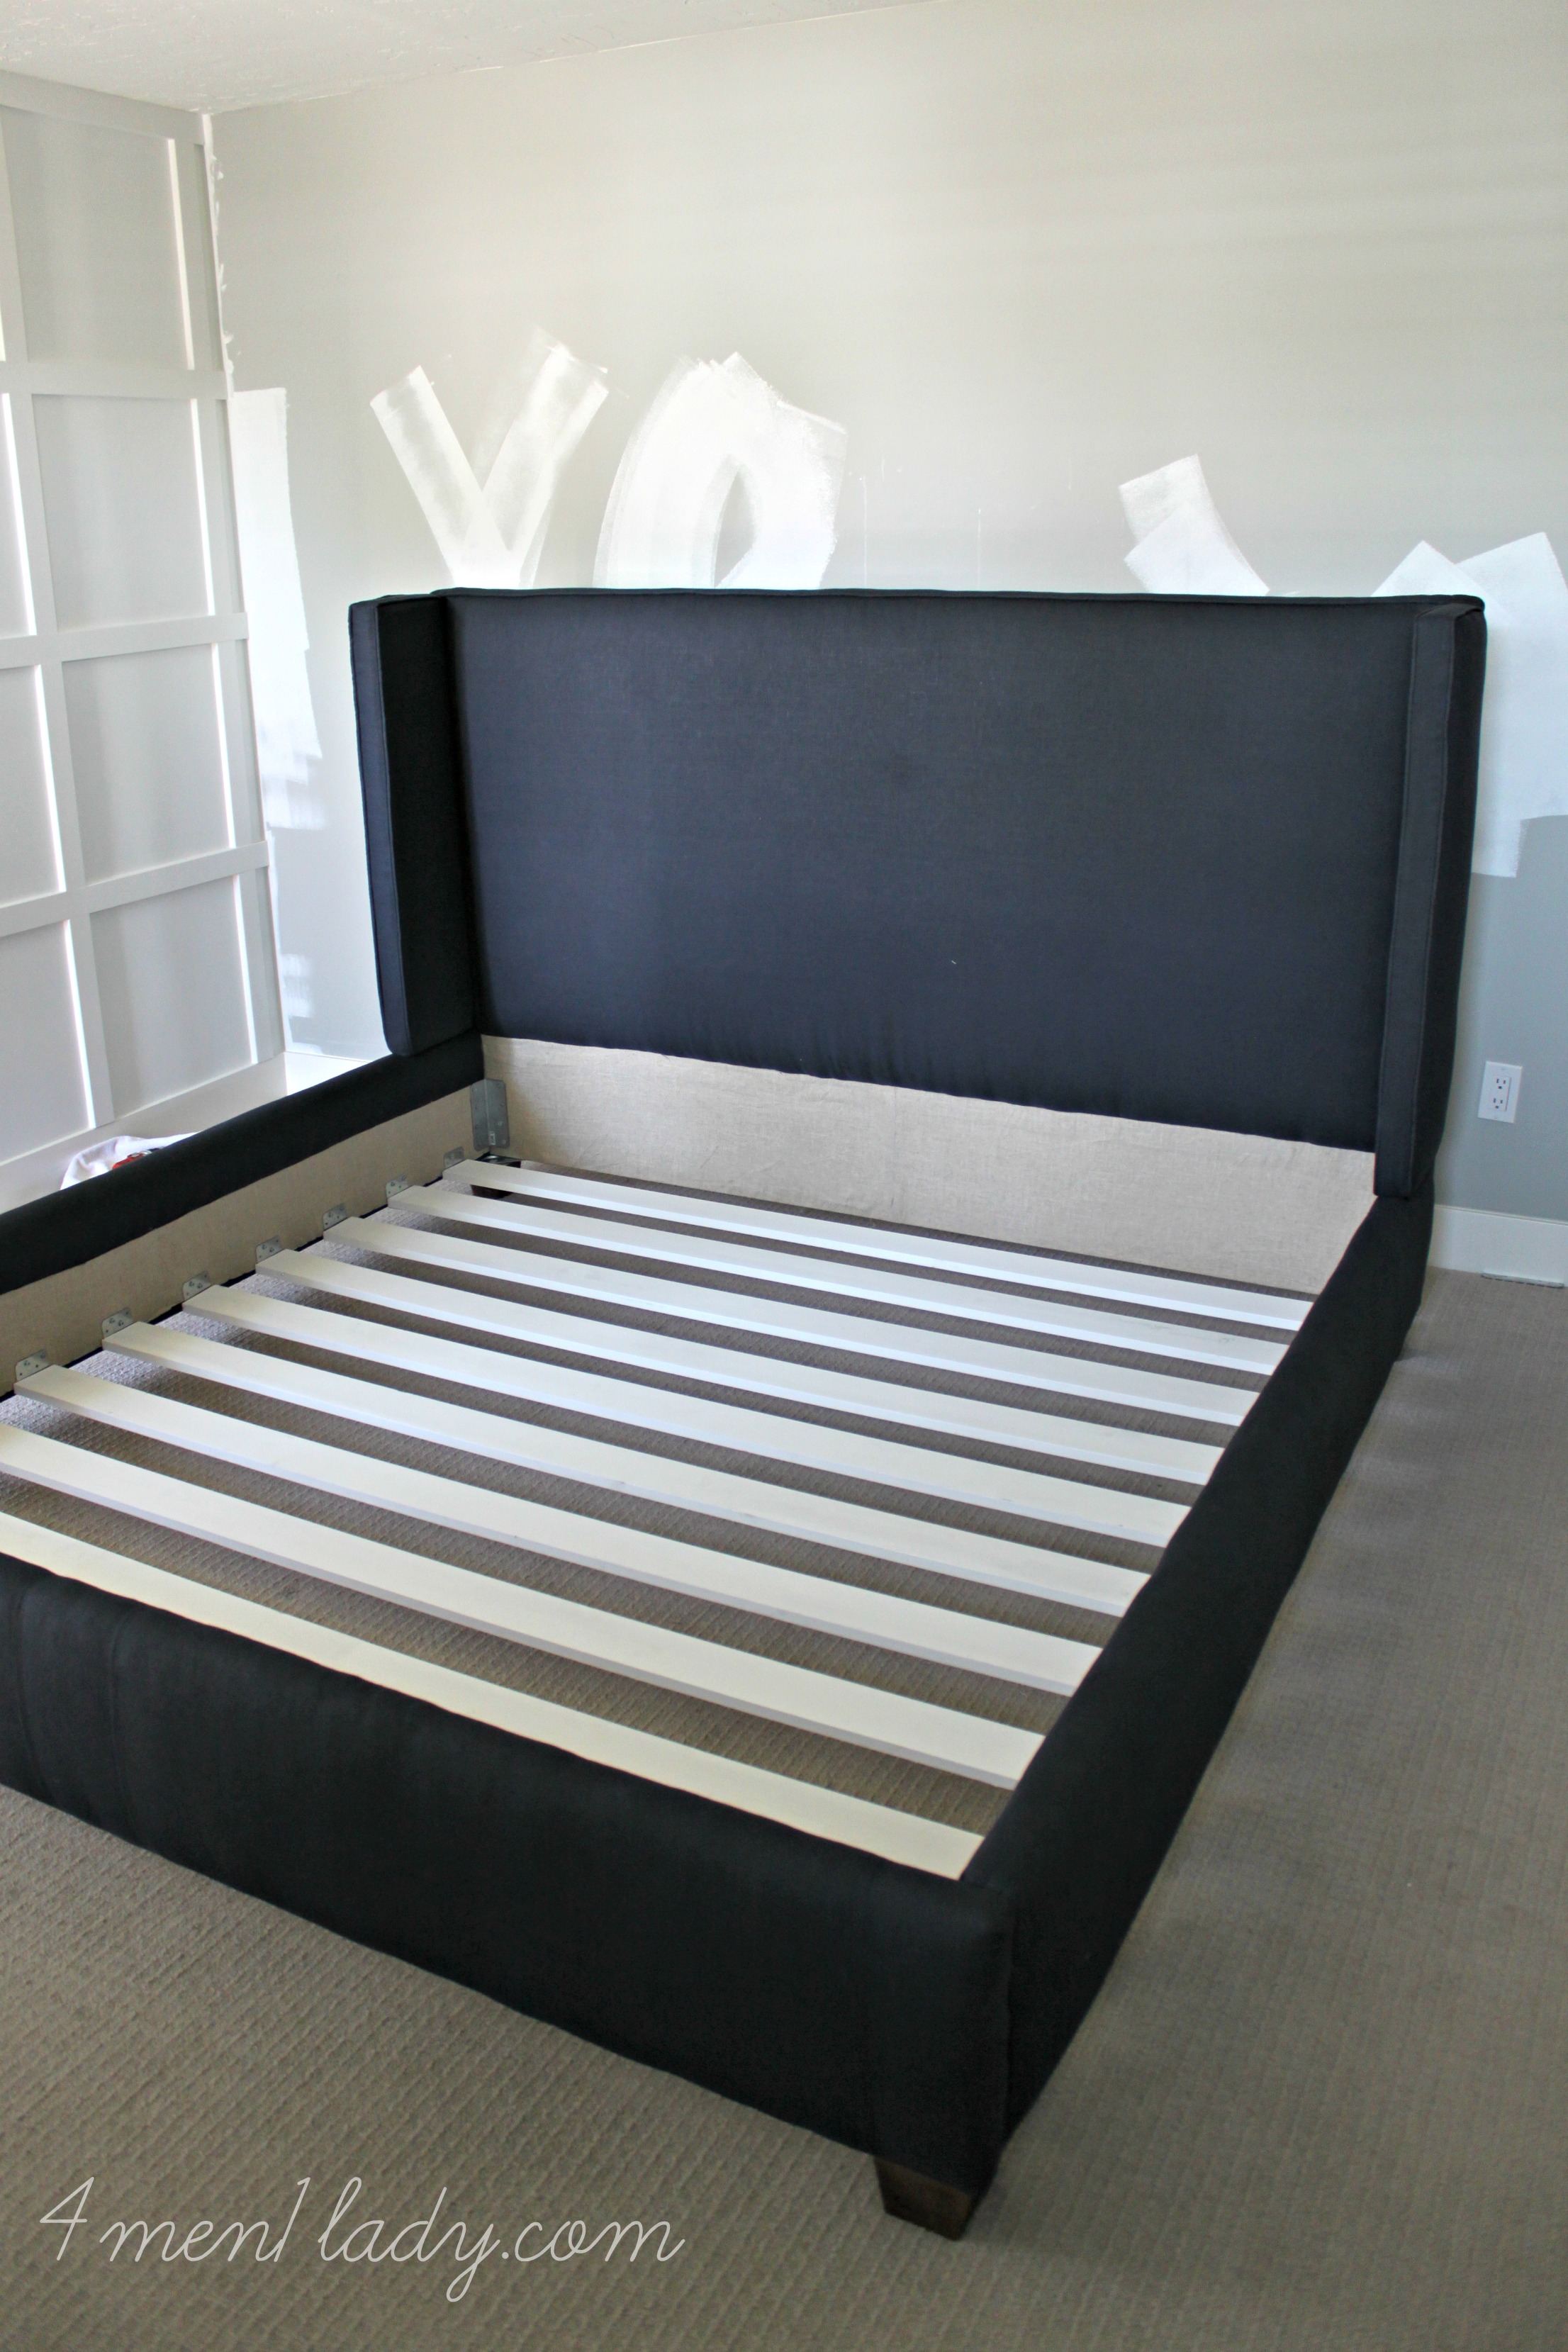
Once all the boards were installed we then needed a support to run under the length of the boards so they wouldn’t sag. We found that a 1 x 2 stood on it’s side was almost perfect. We ran two of them under “his” and “her’s” side. This is where we had to do some finagling.
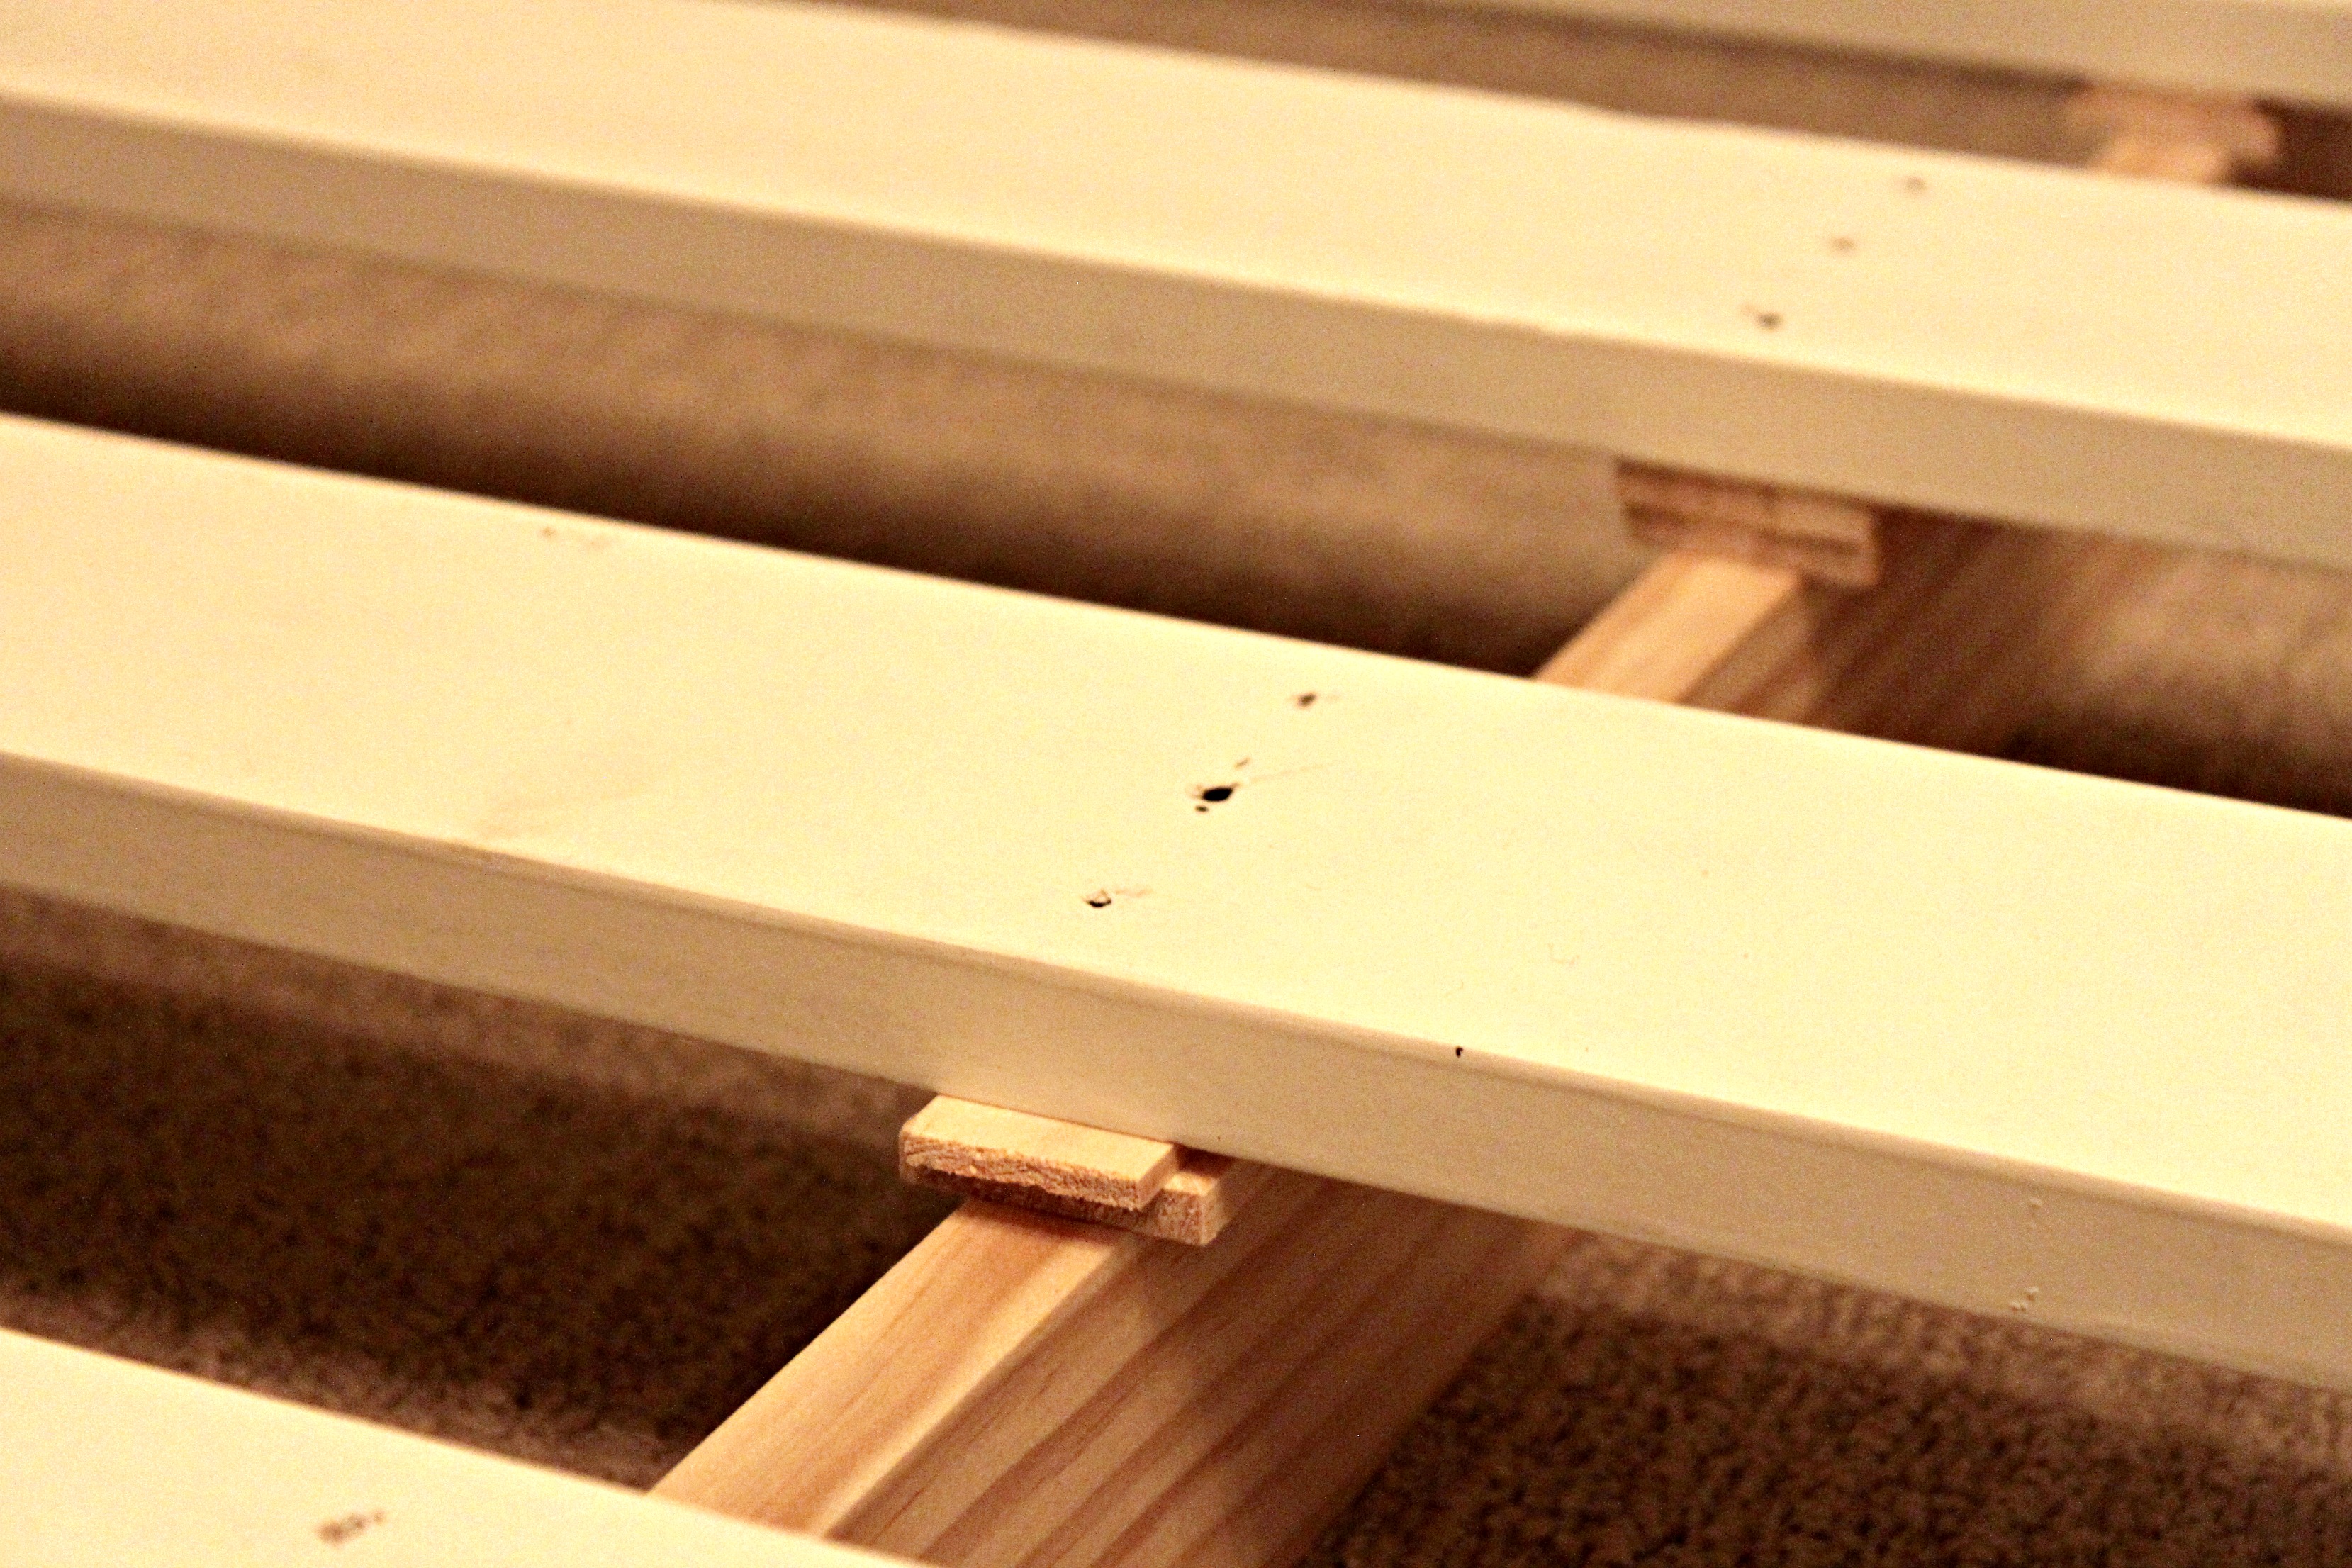
In some spots it was a perfect fit, in others there was a gap. When we picked out boards we had to hand pick the straightest ones…finding perfection was tricky though which is why some boards needed a little adjustment with a shim. I found that if I cut a paint stir stick down and shimmed it between the boards then shot a nail in them it worked out great. That’s what we call, “making do”.
That last piece of the puzzle was attaching the wings.
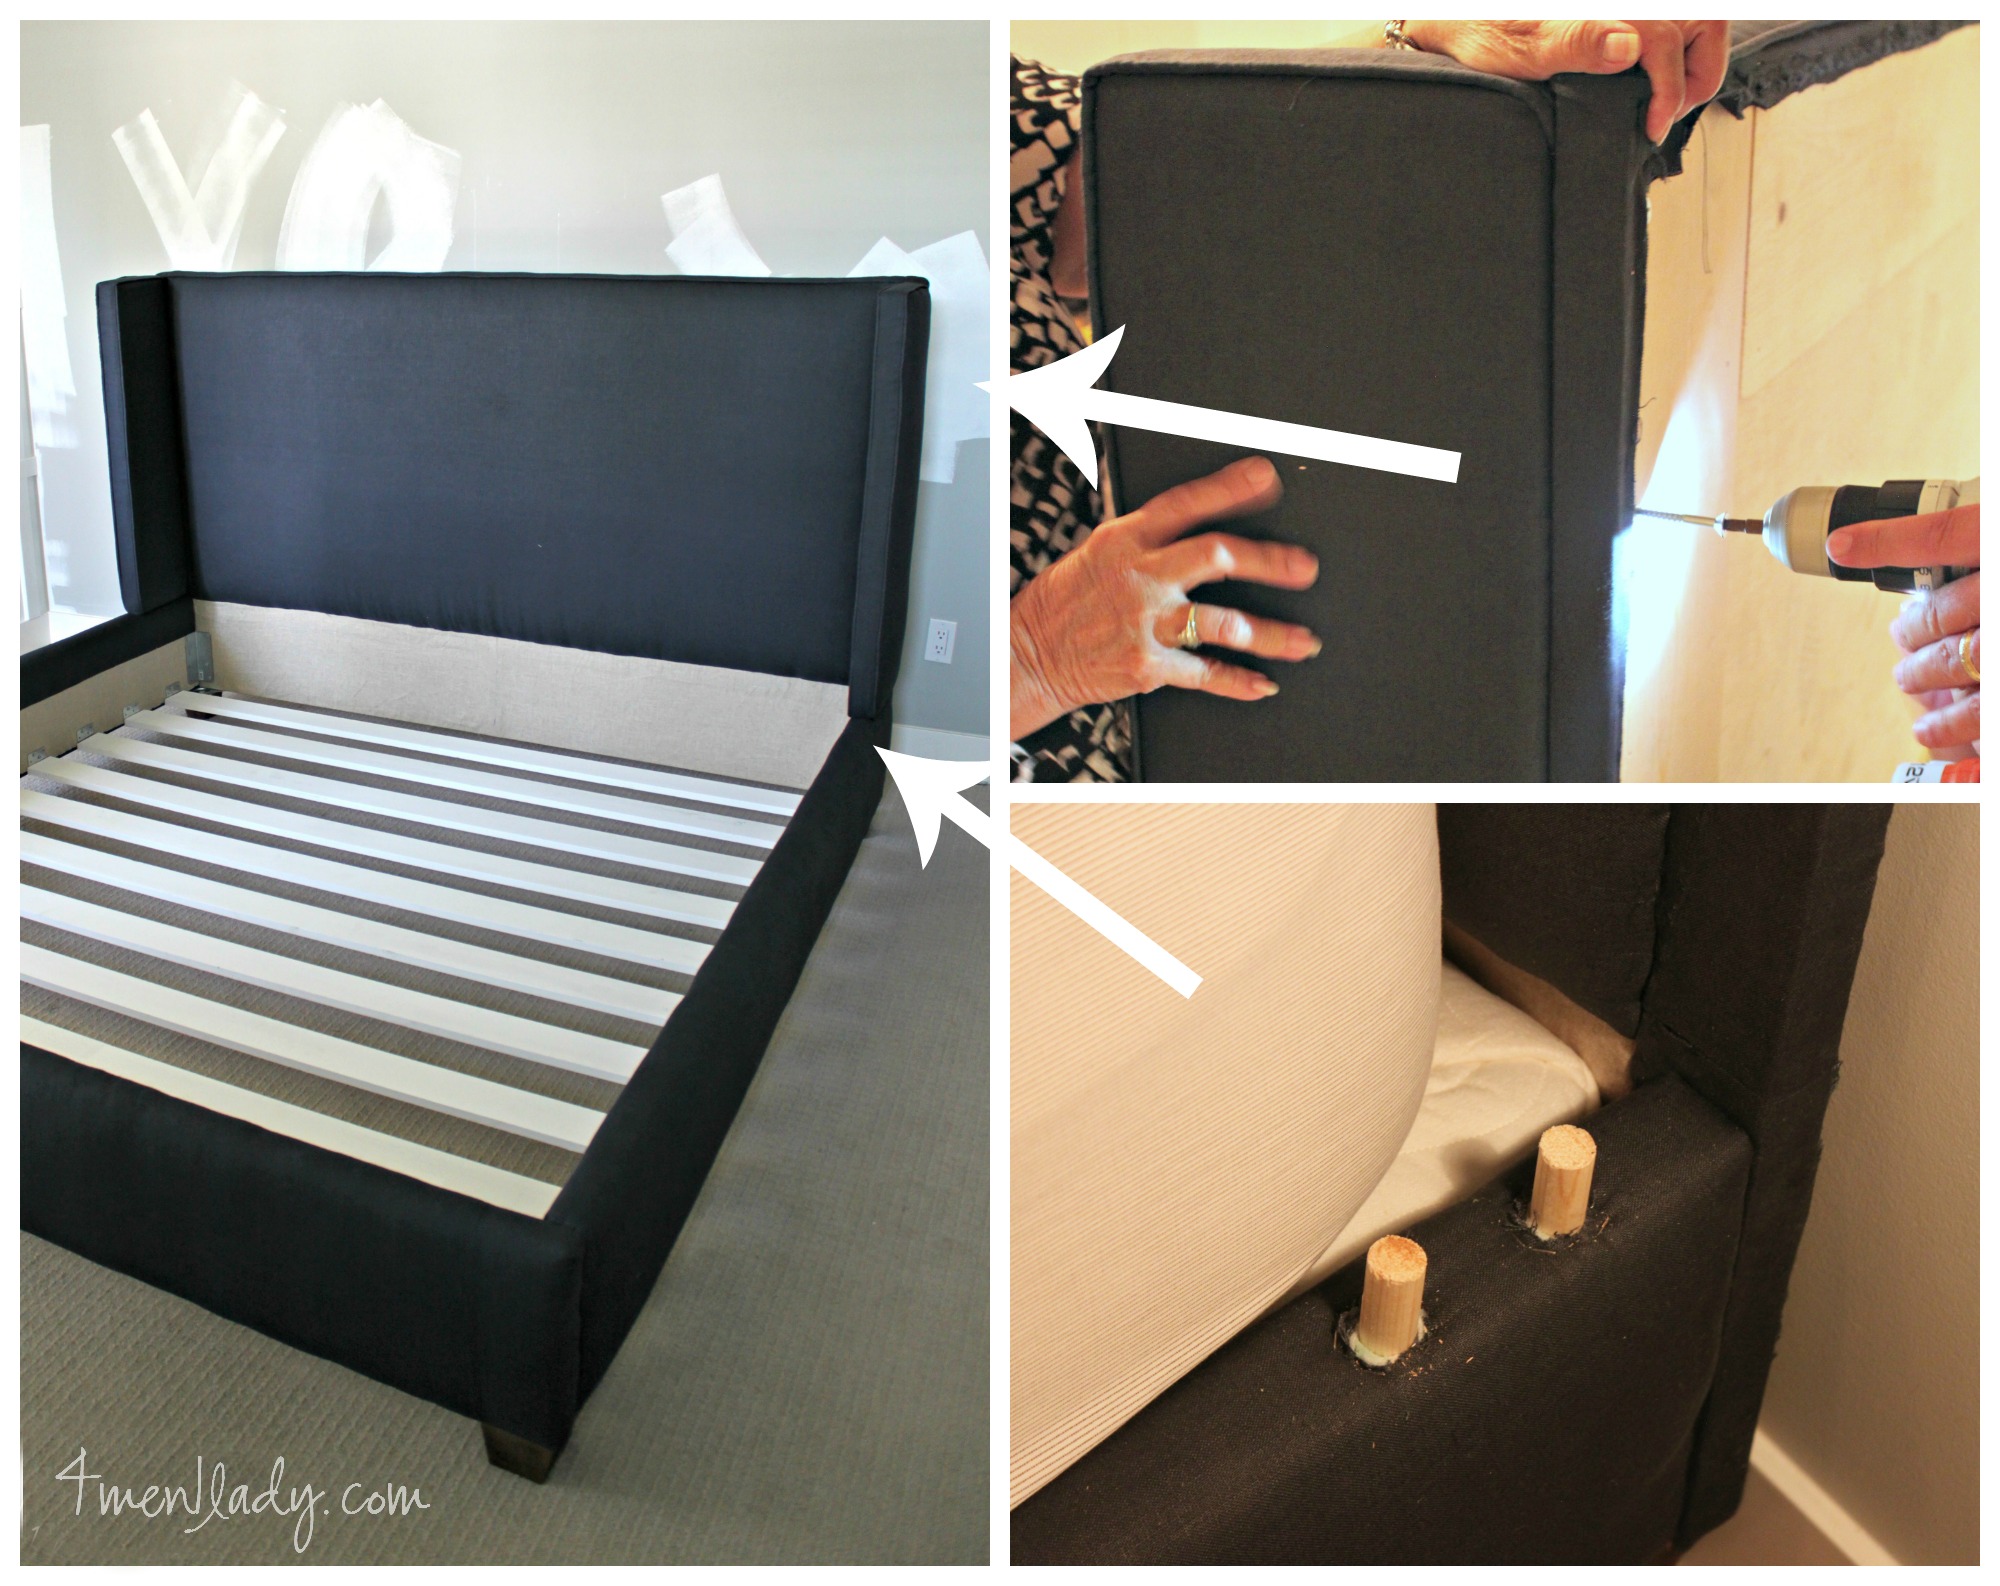
At first we rested the wing on the top of the side rail and drilled several screws in from the back of the headboard in to the back of the wing as pictured. That would have worked fine if our bed was only used for peaceful nocturnal slumbering. During the day our bed is transformed in to a WWF ring where our three boys wrestle. One body slam and it’s bye-bye wing bed. So the Mr. took the wing off and re-inforced them by putting two wood dowels in the top of the side rail and drilling out a space for them to fit underneath the wing. Now that wing was double secured and ready to take a hit.
There you have it! Next up…we need a new mattress. Too bad we can’t DIY that.


 Hey there! I’m Michelle; I’m an Passionate DIY’er and in constant pursuit of how to bring beauty to my house full of men (3 boys + 1 hubby). Stick around and see what I’ve got up my hard-working sleaves!
It looks great! I never would have guessed that it was a DIY at all. What fabric did you use to upholster it?
It’s actually just a navy linen that I found at Home Fabrics. Thanks AnnMarie!
LOVE this bed, Michelle!
Is there any way you can give an estimate on the cost of your DIY? And do you recall the thickness of the foam you used? I believe this comes in several different sizes. Overall, is this a project that you would do again? We are in the process of moving and need a bed for our king mattress–I’d love to give this a whirl! The hubs on the other hand…? Not so sure he’ll be on board. : )
Thanks so much!
Gah, I’m so bad at keeping track of the cost of things. My inspiration bed from Williams Sonoma is $3350. I want to say we spent under $500. to DIY it. Would I want to do it again…no. Would I do it again to save almost $3000.? Heck ya! You know how projects go…they always take longer than you originally anticipate. 🙂
I want to say the foam was about a half inch thick. I forgot to mention that we put a 1×2 on the back of the headboard to make it look more substantial. So even though the foam may not have been that thick we amped it up by using another board. Hope that helps!
Please share pics if you tackle this project!
It looks so good and professional! I was so intimidated to build a bed so we ended up buying an upholstered bed recently. If I ever decide to do it in the future though I’ll definitely reference this tutorial! Thanks for sharing!
Awesome, thanks friend!
The bed is amazing! Will you please send your mom to Colorado!!
Love watching your house come along!
Thanks Heidi! 🙂
Gorgeous!! I have been wanting a bed like this for as long as I can remember. Well done!
Awesome job! Plus I love the green nightstands. Can you share the paint color for those?
This is by far the most professional looking tutorial I have seen. Do you have any detailed pictures on how you finished up the upholstering on the frame with the lighter colored linen to make it look store bought? Thanks!
Thanks Angela. Unfortunately I got carried away and didn’t get pics of that process. It was actually very simple though. We just turned the lighter fabric under itself and stapled the edges. Thanks again for your kind words! -Michelle
Have you ever had to take apart this bed before to move it to another location? If so, would you say it is not so bad to take apart in order to re-use the whole frame? I want to do this to my 3 year old daughter’s bed and I figured that I will keep her bed this way until she’s goes to college or something. I know that she and I eventually will change her room to the many cartoon character’s and theme’s throughout the years that I will also want to change the fabric around the wood.
We made the bed so we can take it apart if needs be. 🙂
I spent many months researching different companies that sell a french style upholstered bed. I finally made the decision to go ahead and buy the Chelsea upholstered bed. Extremely pleased with my decision. Below is a link to the product page. Good-luck with your upholstered bed shopping.
http://www.thelondonfactory.com/products/chelsea-french-upholstered-beds-headboards
Beautiful job on the bed and the room! I am wanting to make a similar bed. Do you remember how much fabric you used?
I noticed the wings are piped as you mentioned above. Can you tell me how you piped those or give me a link for a tutorial? I know HOW to create the sewed piping but not sure of how to incorporate that into the wings.
Thanks!
Random question – can you tell me the measurement from the floor to the top of your mattress? I love my king, but it’s so high so I’d like to build a frame exactly like this, but making sure the bed is at a decent height. Thanks in advance!
This bed is awesome! I am wondering how you connected the 1 X 2’s that support the cross rails? Are they nailed, screwed, or did you use L brackets also?
Thanks Kelly! We used L brackets on the cross rails. Hope that helps! Michelle
WOW! You did an amazing job! Thank you for the step by step.
Thanks so much Teeya! 🙂
Hello. Love this!! What size mattress does 5his fit?
King size. 🙂