My dad is an avid sailor. Preparing the boat to sail includes hoisting the mast. While my dad was standing there using all his strength to hold the mast my job was to thread the awkward pin that held everything up. I would often drop it while my dad was sweating bullets trying to hold the mast. Later my dad told me that sailors named it the “damn-it” pin because it was such a pain. Upholstery tacks are much the same.
I started with a piece of pressboard from Home Depot which they cut for free to your dimensions. Mine is 59 in X 40 in.

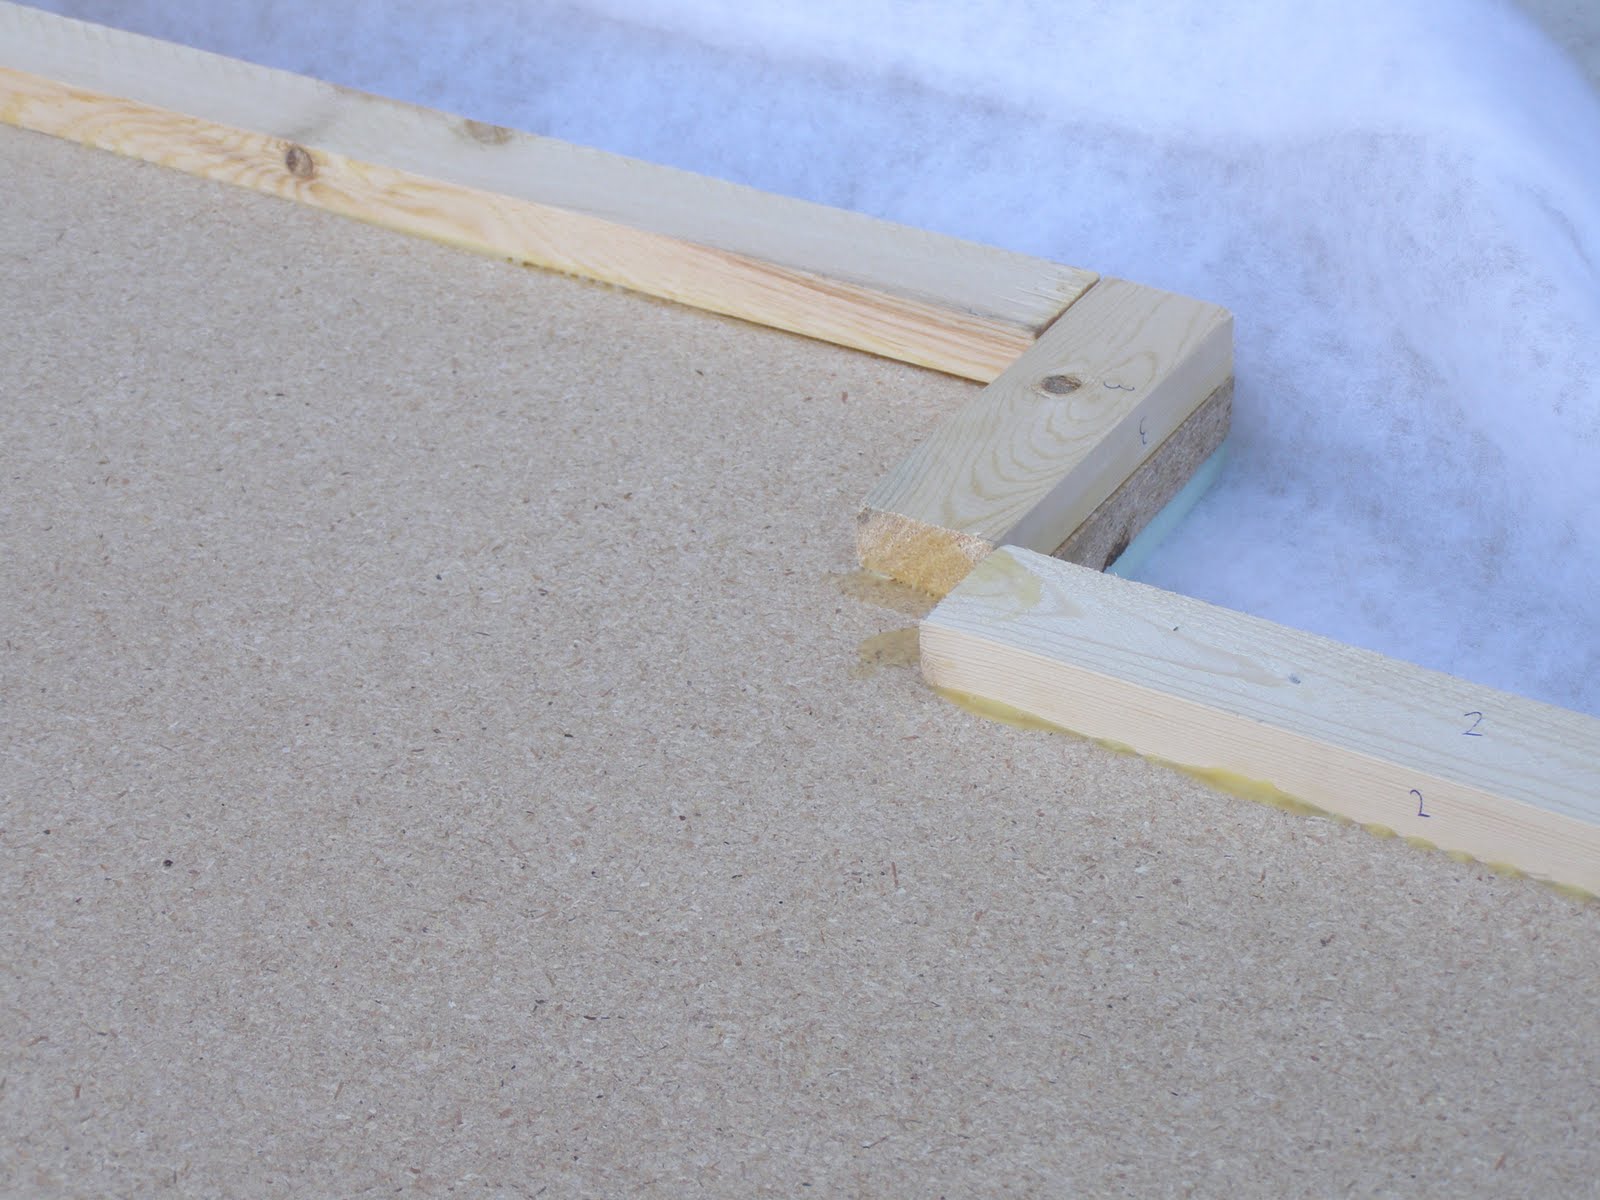
I normally like to use a thick piece of foam but because I knew I would be nailing tacks in it I wanted it to be thin. Instead I purchased this 3/4 X 1-1/2 wood and cut it down with a hand saw to my dimensions. I simply glued it to the back of my headboard with wood glue so when I wrapped the material around it, it looked more substantial and thick.

I don’t have any fancy clamps to secure the glued boards in place but I discovered that food storage cans full of wheat and rice do the same job nicely.

I started by adhering foam to the front of my headboard cut to size.
Found it at Hancock Fabric (don’t forget your 40% off coupon).

I used spray adhesive to attach the foam to the board.

Cut it to the same size as your board.

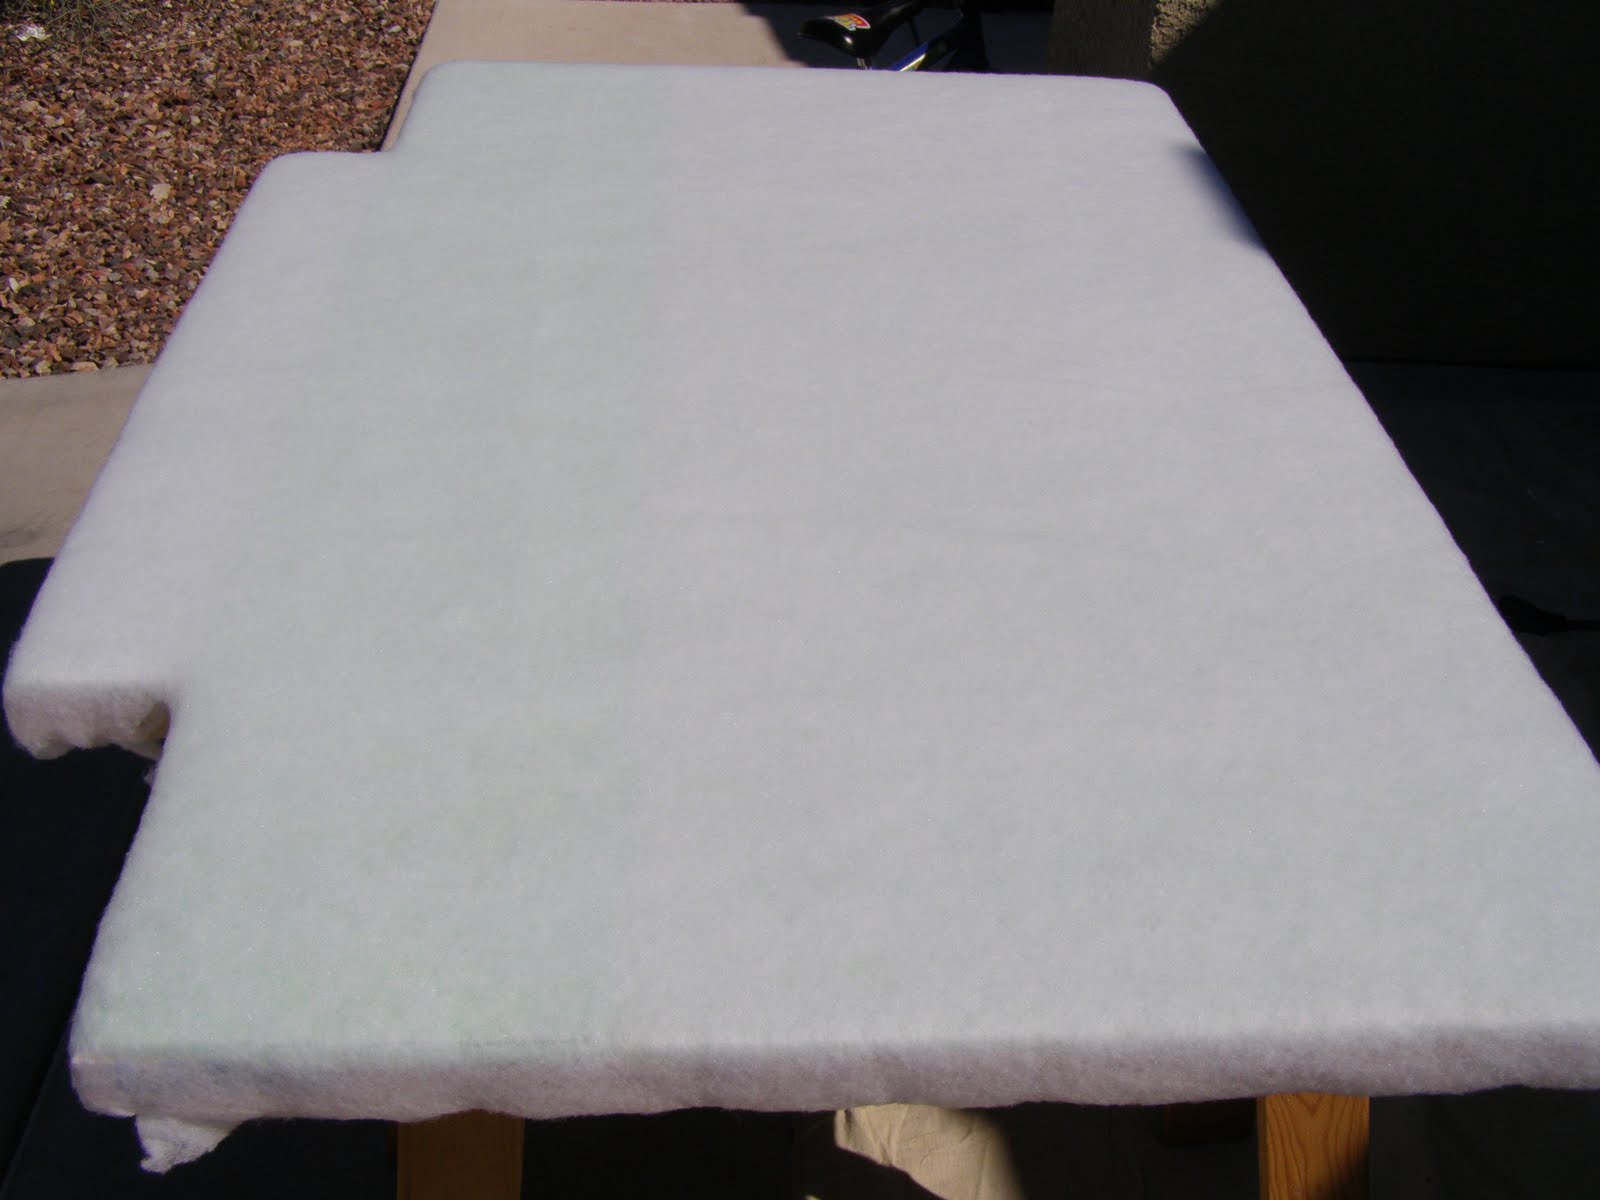
After the foam is secure wrap the entire front of foam and board with batting.
 Should look like this.
Here’s the back side with staples.
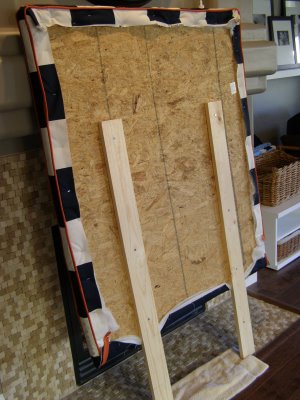
This in not the same headboard but I’ve had so many questions about how I attached the headboard to the wall I thought I’d show you an example of a different headboard I’ve done before.


![]()


 Hey there! I’m Michelle; I’m an Passionate DIY’er and in constant pursuit of how to bring beauty to my house full of men (3 boys + 1 hubby). Stick around and see what I’ve got up my hard-working sleaves!
I am so inspired! I love the fabric you used for the curtains and headboard. Great job! I too hate those tacks. I cannot get them in a straight line to save my life.
wow! I am duly impressed by all of your work! It is beautiful! The entire room is beautiful! Great job and thanks for sharing.
That looks amazing! I love the color combo and the tacks on the headboard! Beautiful!
Absolutely gorgeous, like all of your projects! I was just telling my son last night that my grandpa used to cus all the time because he had to cus at the mules when he was planting his garden back in the day. I had to laugh when I saw your title!
Have a fabulous day!
Jenn
{www.redberrybarn.blogspot.com}
Love it!Love it!Many many times! =)
The headboard looks great! I am getting ready to try nailhead trim for the first time on a new project. I bought one of these spacers on Ebay (http://jamiltonupholstery.co.uk/products/NailSpacer-Hammer.WebPic.gif) to help keep the nails straight. I haven’t tried it yet but I am hoping it will make things easier!
Thanks for the tutorial! It’s so beautiful. Great job!
And I’m loving that color…when I was 13, I had my room painted a Chartreuse very similar to that. haha!
You did a great job….. Thanks for the pictures…..
xxx
CEO
Oh my I am in love with this, and the color is fabulous! Thanks for the step by step!
I love what you have done in this room! I can’t wait to try out some of your tips & tricks at our house!
Next time get that 7 buck tool I told you about
Wonderful job! Kudos to you!
xoxo Pattie
Looks amazing and love the color and nailheads! Janell
Looks amazing and love the color and nailheads! Janell
Looks amazing and love the color and nailheads! Janell
Looks amazing and love the color and nailheads! Janell
Looks amazing and love the color and nailheads! Janell
I’ve done a similar project but left off the tacks. They do really add a finished look, though!
It looks amazing! You did a wonderful job. I can’t wait to try something like this!!
Michelle thank you as always for your insight into projects like this. I am shortly going to be tackling this for my daughters room.
I love it.. so beautiful & well done!!
Thanks for the DIY — I absolutely adore all these upholstered headboards, but not the price especially since it seems like you could get a similar look for a fraction of the cost by doing it yourself. Thanks for helping me screw up my courage to give it a go!
you can buy a guide that’s supposed to save you some of the hassle with nailheads, like this one: http://www.nagusupholsterysupplies.com/productDetail.asp_Q_catID_E_110_A_subCatID_E_132_A_productID_E_217
i have one for a chair i’m reupholstering, but i haven’t gotten to the nailheads part yet…i’m sure there will still be plenty cursing involved 😉
Great job! It looks like something out of Trading Spaces. I love the old look of those tacks, I will have to look around for a piece I can upholster… thanks for the tips!
I just found your blog yesterday and I have to tell you that you have totally helped me out of my non-creative rut. I have a ton of projects and not very much time to do them, which left me feeling sad. The weather is warming up here in Colorado & I am ready to finish some of those projects! Thank you!!!
I’m confused. Did you lay a single layer of 1/2″ foam over both the wood edging and the field or did you build up the interior so that you have two layers–one inside the edging and one covering all the way to the outside edges?
Thanks!
I’m a new follower as of today but I can already tell that you will be a daily read. I absolutely love the color and style of your headboard. I def want to try this out!
leeanderin.blogspot.com
You make it look SO easy! And it looks fabulous!!! I’m definitely planning on copying you 😉
Thanks for the instructions. Adding this to my inspiration file for my bedroom.
Love the color combination and the design on the headboard.. Way to go!!!
Love it! I am going to try to make one for my son’s new ‘big boy’ room!
Michelle..absolutely fantastic job! You should feel very proud…oh and the patience involved with those tack..my my…youve got a good hand thats all I can say. Looks fanatastic! x
WOW! What hard work but it paid off:) Beautiful.
Thank you so much for taking the time to show us how you make all of this stuff! I’m going to give this one a go 🙂
Lorax,
I only covered the front of the board with the 1/2 inch foam, not the edges. After I glued down the foam I covered the entire front and edges with batting then covered that with my fabric.
I don’t think I’m following why the thin wood border is glued to the back?
I don’t think I’m following why the thin wood border is glued to the back?
I don’t think I’m following why the thin wood border is glued to the back?
I don’t think I’m following why the thin wood border is glued to the back?
I don’t think I’m following why the thin wood border is glued to the back?
Fantastic. You “nailed” it–ha ha.
Great job! I did my headboard, so I know what a task it can be. Again, great job!!!
Wow! it turned out spectacular and you can definitely see how much time and effort you put into it….but so worth it!
This is sooo COOL. The tacks give it a really CHIC look for sure….great job. :))))
love the tutorial. i would love to make a headboard someday. if i do, i will for SURE follow your instructions.
your guest room really is AWESOME!
great to see food storage being put to good use! ya know–besides taking up space in the basement…
🙂
As I was reading this post I was going to suggest you have a look at my most recent post where I used continuous nailhead strip for my dining chairs,(They came up a treat) but then I read that you were aware these were available and preferred the look you have gone with. The headboard looks absolutely fabulous, your hard work has paid off!!
Angex
Good work!!
Kisses from Spain!!
Just AMAZING! Thanks for the tutorial. I have been looking for a good one forever!
Can I have one? Pretty please? With tacks on top? Heehee. Seriously, I admire you so much…and wow, the talent you have…not to mention the patience…AMAZING!!! Awesome work, as usual! 🙂 ~M
Thanks for the great how-to! Bookmarked for future reference. I just love what you’ve done with this room – the pattern particularly. It’s somehow delightfully unisex too – anyone could feel comfortable!
love it. now all i’m wondering is how you got the line so straight!
I love the fabric you chose for the headboard. We have a duvet with that exact color green and have been looking for fabric to coordinate. Would you mind sharing where you found the fabric? What brand and color? Thanks!
You’ve done it again Michelle!! It looks stunning.
That is amazing. I will have to make one when we get our new king sized bed…
Yikes.
I’m scared of the tacks.
Your patience is remarkable and so is the fact that you only said damn it!
http://40daysof.wordpress.com/2010/04/11/the-transformation-of-my-breakfast-room/
First of all, I love your makeover on this room. It’s beautiful and the headboard looks amazing. You are a far more patient woman than I. I would have totally gone the easy route, with the strips!
Also, thank you for posting about your sis-in-law’s design business. I just got a makeover on my blog and I love it. Swing by some time and check it out if you get a chance!
Lindsay
{www.aisletoaloha.blogspot.com}
Bride,
I found the fabric at JoAnne’s. It’s duckclothe for around $7.00/yrd. I don’t know the name or make. Good luck!
AMAZING job! you do amazing things! love it!
This headboard looks amazing – the shot (I think in the other post) about your bedroom is so beautiful! I love the greens and the browns. I also love that they are dark but the room doesn’t seem weighed down at all.
oh wow!
Just found your blog and Im in love!
you are super DIY woman! can you come to my house and teach my mother how to decorate? we need help!
LOVE your ideas and the results!!
Wow! I love the color combination and that you took the extra step to cut a design into the board. Makes it very unique!
Amazing! You are so talented. I can barely keep my house clean, let alone complete beautiful DIY projects. I love getting inspired by your blog!
Thanks for the tutorial, I love how the headboard turned out!!
oh my god YES, I just tried re upholstering with tacks for the first time, they suck big time.
I ruined half my supply and my fingers are shot
LOVE the headboard and room … it the trellis print a sheet set??
this is fabulous!! i’ve been looking for good instructions on how to make one — and yours is very straight forward and i love that you explained all the details and included pictures! i’m ready for the challenge! and of course i want to make these harder on myself because i really want to have a curvy top. thanks for sharing!! you really need to have your own show on HGTV!!!
Hi, this is great, i have a friend who has been asking me for ages to help her make a padde head board, now i know how.
a great idea, thank you.
Susie from
I Just Love That Fabric
OMG what a lovely Headboard. I love the pin tacks in it, very elegant. I am going to put a link to your blog on my Blog, everyone should see this.
Great tutorial – I linked it to my “headboards – upholstered” project post too!
Sorry in advance for the dumb question, but regarding the 1×2 boards on back, does that mean the headboard isn’t attached to the bed OR the wall? I’m probably missing something…!
Marzetta,
I don’t have my headboard attached to the wall. I find that it does just find sandwhiched between the bed and the wall. You absolutely could attach it to the wall if you wanted it sit higher or just wanted the added security.
I am trying to make this headboard now. I have done all of the steps up to adding and stapling the batting. The problem I am having is making the fabric taught at the cutouts. How do you do that without having it gather or pucker. I had 3 people helping me and none of us can figure it out. Did you have to cut it and sew????? I am going crazy! Thank you in advance for your advice!!!!
Mitch,
So sorry you are struggling. I nearly tore all my hair out trying to figure that darn headboard out too. I actually ended up having to sew a little flap of fabric on one each of the edges in order to make it wrap around. Hope that helps. Good luck and please share pictures when you complete your project…I’d love to see how it turns out!
Hi! I love your web!! You have inspired me so much with this headboard that I did it myself!
http://keepcalmblog.blogspot.com/
Thanks very much for shearing all your ideas!!
Did you put the green foam on the entire front, or just at the top like it shows in the picture?
Thanks!
Beautiful fabric, and thanks for the clear, concise steps! I’d love to try this with some leftover upholstery fabrics. Thanks for sharing!
I know this post is pretty old, but I’ve had it saved on my computer to do since you posted it (can you believe that’s how long I’ve been procrastinating LOL)! Just wondering how many inches you left from the edge of the headboard to the nails?
i am doing the same shape headboard and was wondering how you did the fabric in the L corners. when i attached my batting i couldn’t figure out how to cut and staple without leaving a hole. thanks!!!
I ended up have to stitch on an extra little piece because I ran in to the same problem.
I love the green color you chosed for this upholstered headboard. Nice job.
Thanks!
I love the color you choose and you did a really nice job on this. I am in the process of the same project and although I pretty much knew how to do it I am now just checking for shape ideas. I have already made my drapes and surprise they are the same color that you chose for your headboard.
Yay! Please share pics. I’d love to see how it turns out!
I am on a strict budget with two little kiddos and I am dying to start redoing my whole house with your inspiration! Starting with your headboard ideas. oh yeah and I also happen to be carting around a 100 pound vacuum that barely sucks up dirt (circa 1980)and was graciously donated by mother in law after ours broke down. So yes I never win anything but I would desperately like a lightweight effective Dyson before Christmas when I will ask for a new vacuum lol.
Great job on the headboard. I have read that it’s tough to hammer those nail tacks through the foam to the wood. My headboard is already made with thick foam right to the edges. Would I have trouble getting those tacks to stay in? Thanks,
Magilligan
It actually wasn’t that hard to hammer the tacks in through the foam and wood. The part that was the most difficult was trying to line them up straight. I had to pull out and re-hammer several in straight. There is definitely a learning curve to it. 🙂 Michelle