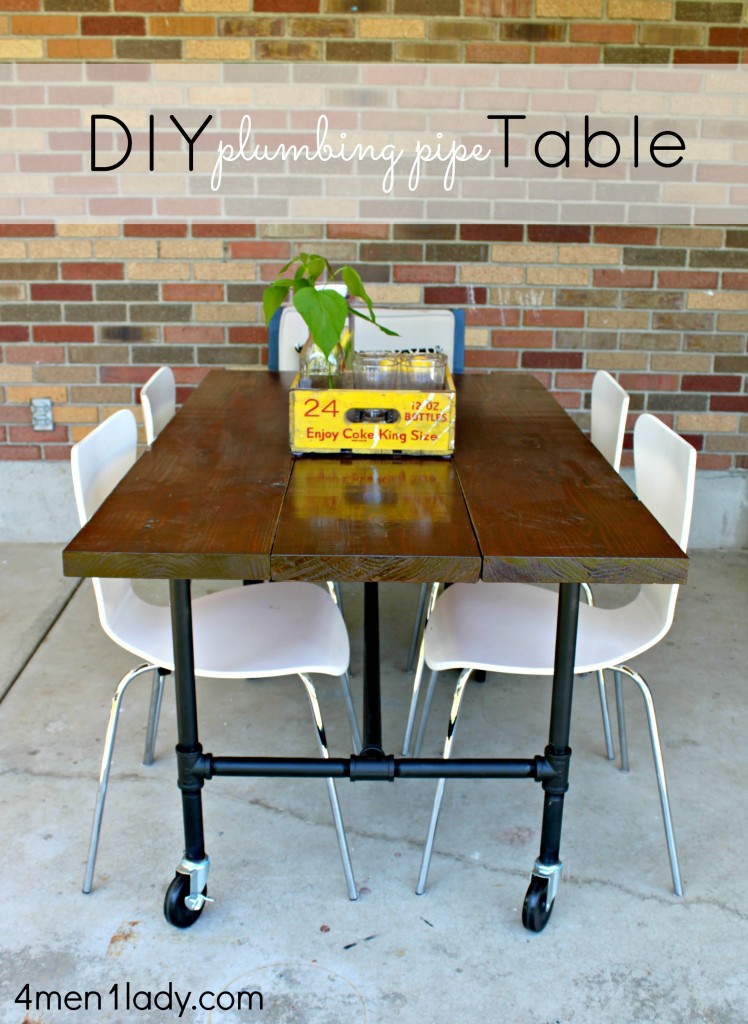
I’ve been shopping around for a patio table but just couldn’t seem to find the perfect one. When you can’t find one, make one! As promised I’m back with the tutorial for making your own table made from some boards and plumbing pipe that I featured in my recent patio makeover. I found all my supplies (except one little piece) from Home Depot. That one little piece was only because I wanted to put my table on casters and have it be mobile (completely optional).
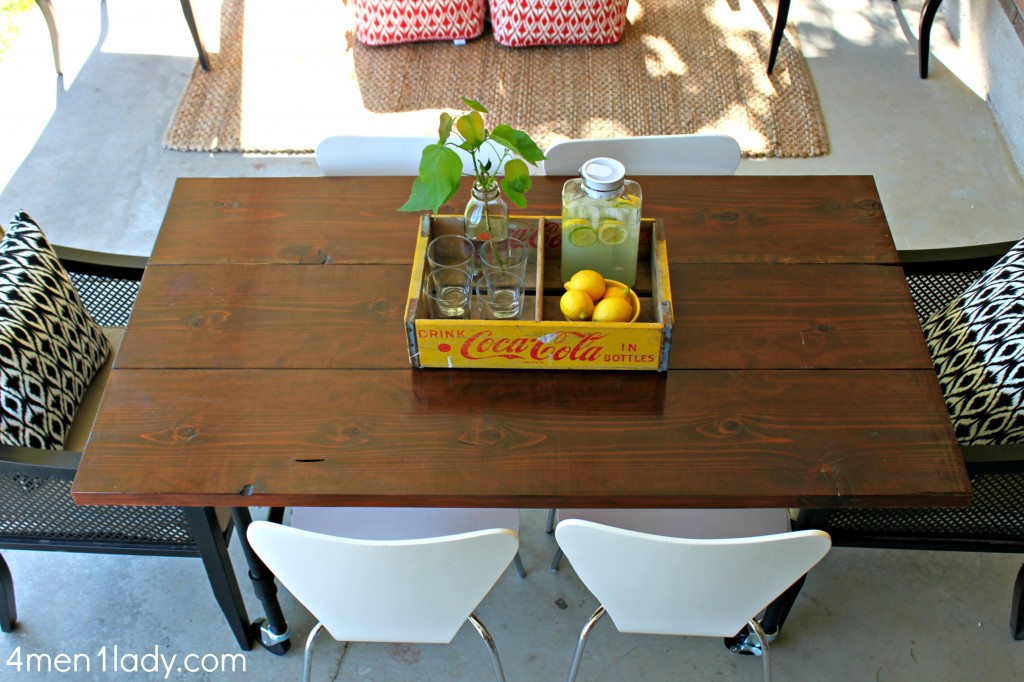
I first started by purchasing 2 – 2 x 12 x 10 boards (which if you measure them, they are really 1-1/2 x 11-1/4). I had an employee cut the two boards in half (for free) so I had 4 boards which measured 60 inches long each. My plan was to use all 4 but the table was too deep for my liking so I opted to use 3 of the 4 instead.
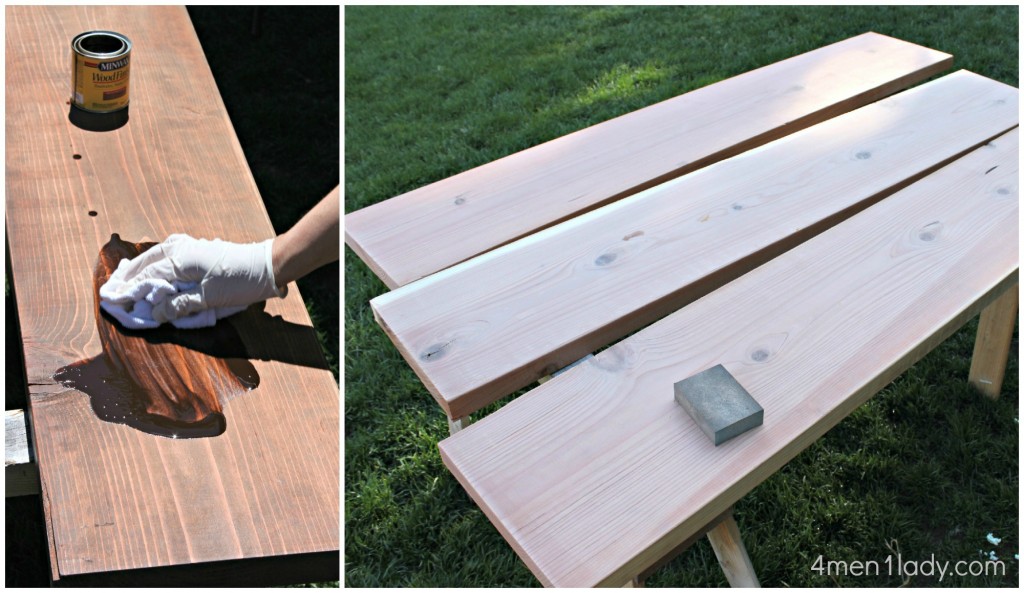
I gave them a light sanding with 220 grit sand paper to make sure my surface would accept the stain evenly.
Next I applied my stain. My first coat I applied with a sponge brush ever so carefully. It took FOREVER so on the next coat I opted for what I call the “dump and wipe” method. It was much quicker and I learned I didn’t need to be quite so careful.
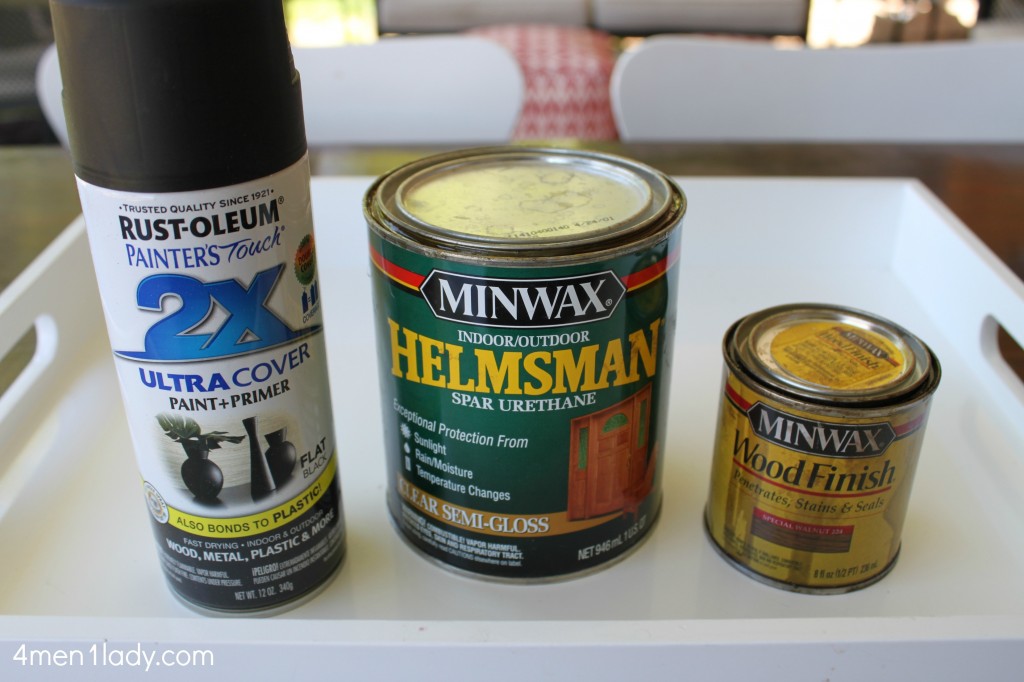
(Products I used).
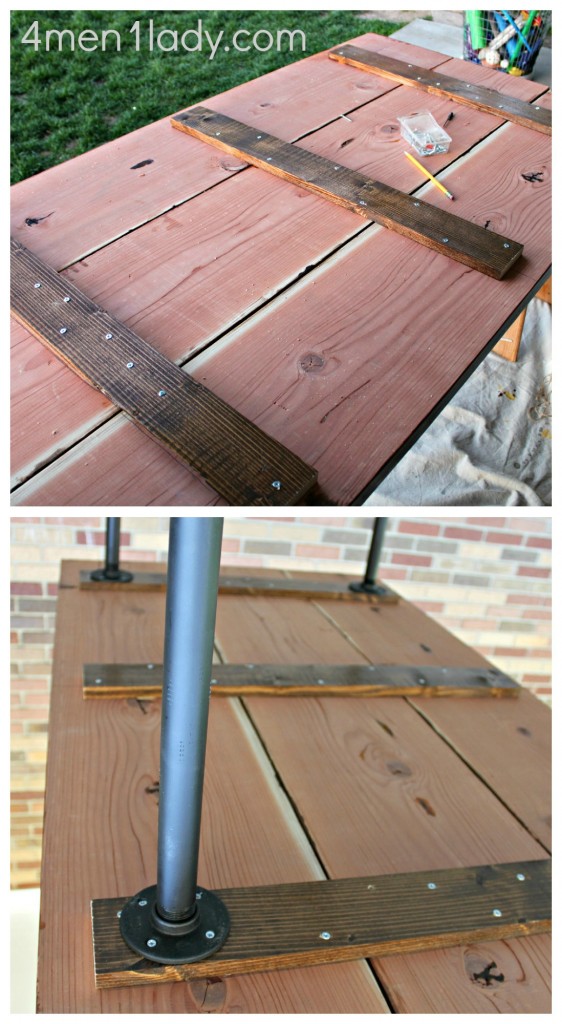
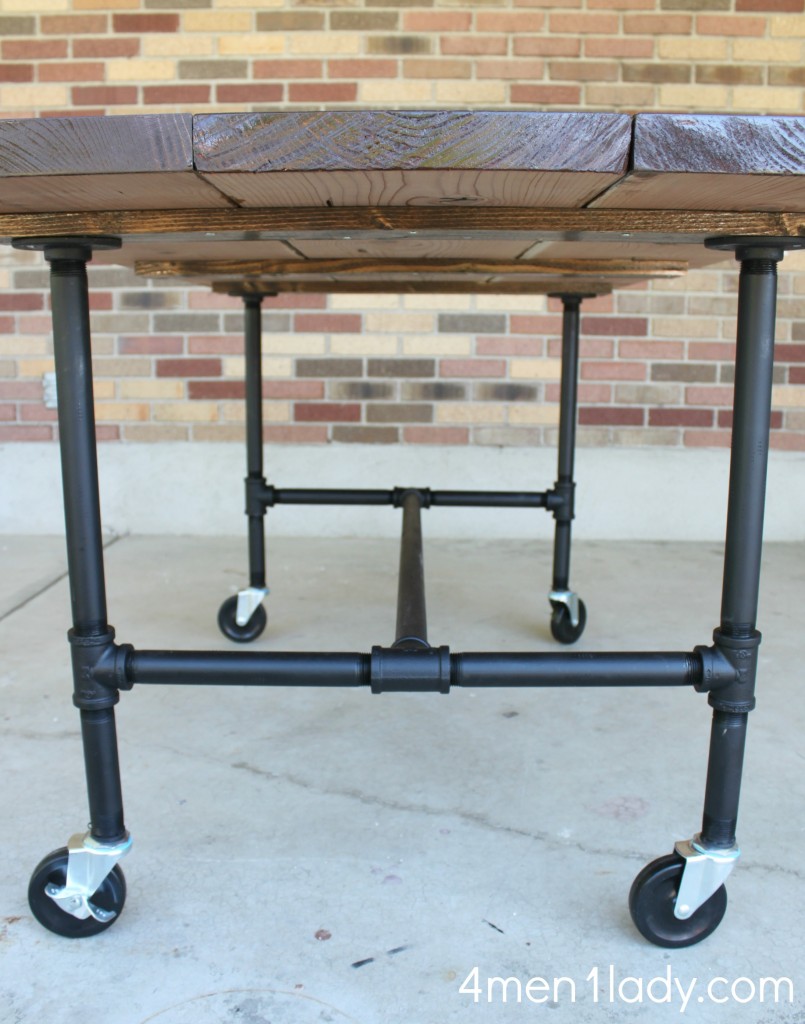
To secure the three boards that would be the table top I (the Mr., I mean) attached 1 x 4’s on the underside with screws. Then the pipe base was attached to the 1 x 4’s. I also stained and Urethaned the 1 x 4’s on the bottom just because I wanted to make sure if you caught a glance it would be an ugly, unfinished board that stuck out.
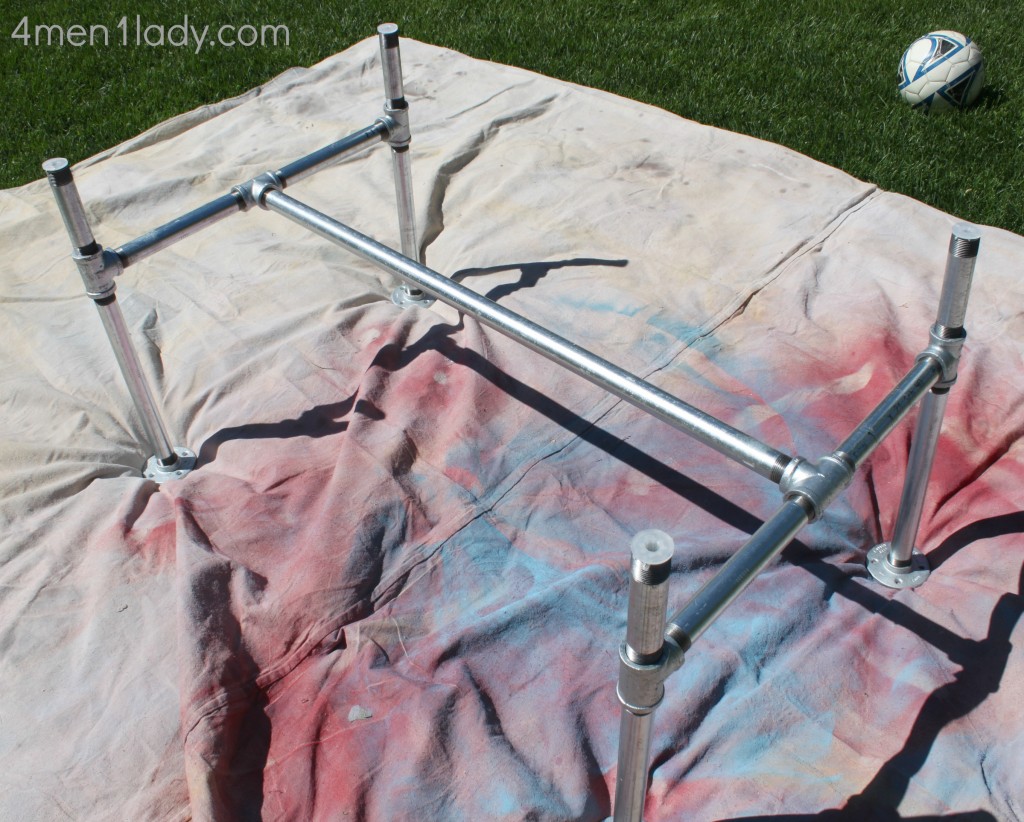
Once all the pieces were put together this is what it looked like. It was SUPER EASY and actually kind of fun. The Mr. told my 5 year old the pipes were one big giant puzzle that needed to put together. They put the pipe base together in about 20 minutes. You’ll notice that my after picture shows the pipe in black, not silver as pictured here. Home Depot actually sells black pipe but it’s not suitable for outdoors and will rust. Instead, you need to get the silver pipe and spray paint it (if you so desire).
Another tip regarding plumbing pipes: Home Depot will cut all your pipes and thread them for free. Make sure to test the cut and thread by twisting it into a flange or t-joint. If it doesn’t twist on easily, either have them adjust the cut of the machine or have them re-thread the pipe which should also do the trick.
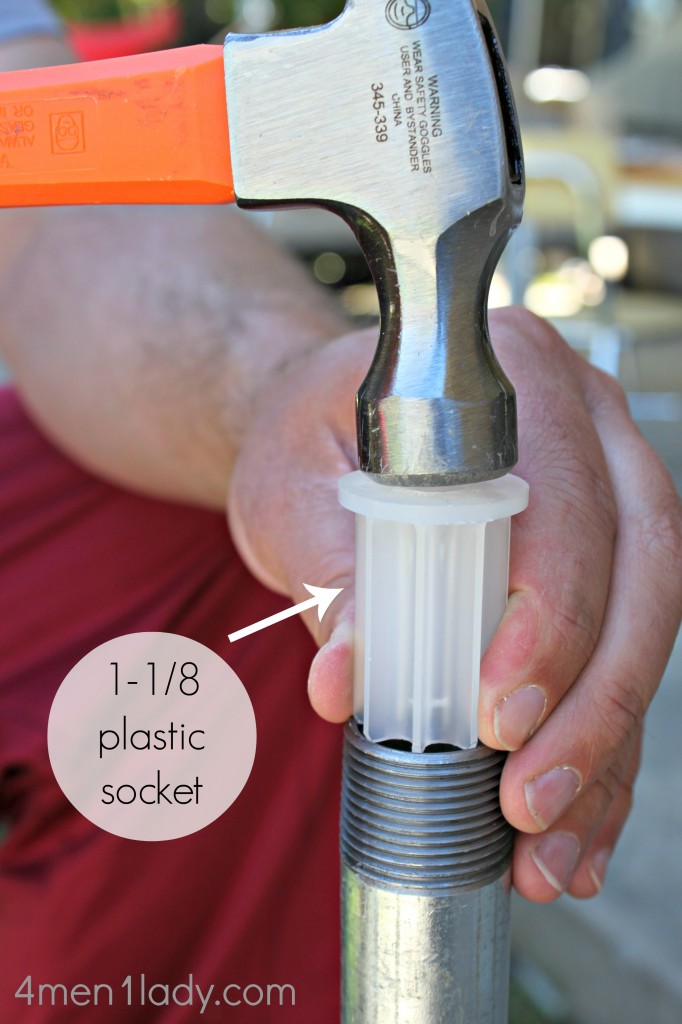
This is the only piece I didn’t get from Home Depot. Because I put my table on casters I needed a fitting that would accept the threaded stem of the wheel. It’s a little plastic
1 -1/8 socket that you hammer in to the 4 pipes. I found it at A1 Casters and they were $1.00 each. The casters fit almost perfectly. Nothing that a little epoxy over night couldn’t perfect. Casters found here. Plastic socket found here.
TA-DA!
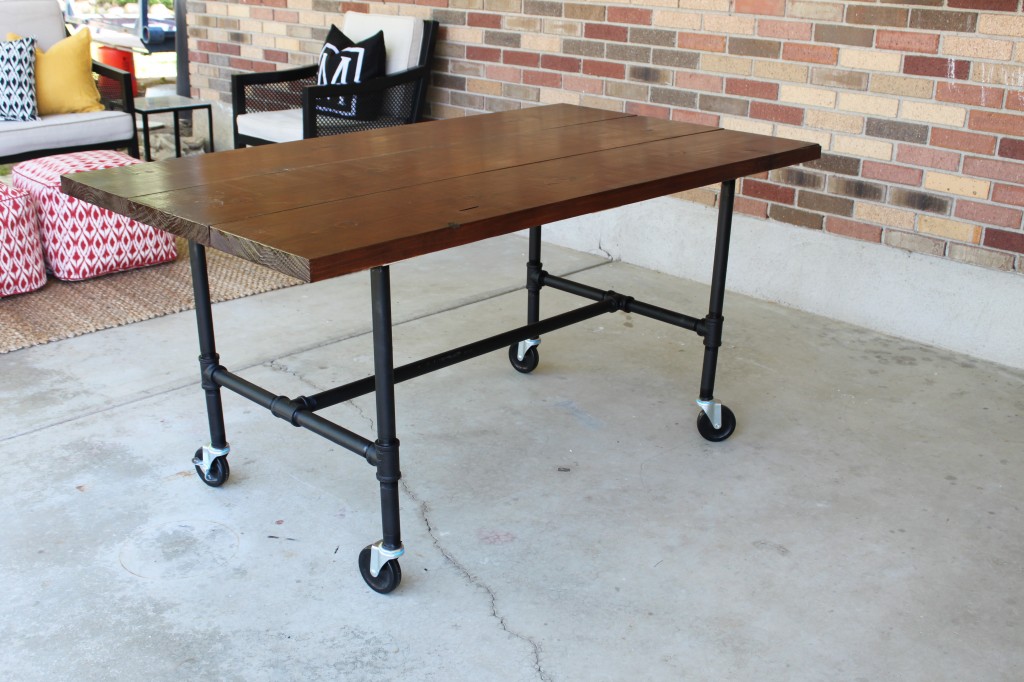
I can’t tell you how much I’m loving this table! We eat ALL our meals on it, roll it to the side when we’re done then spray off the patio with the hose.
Talk about the perfect scenario with kids!
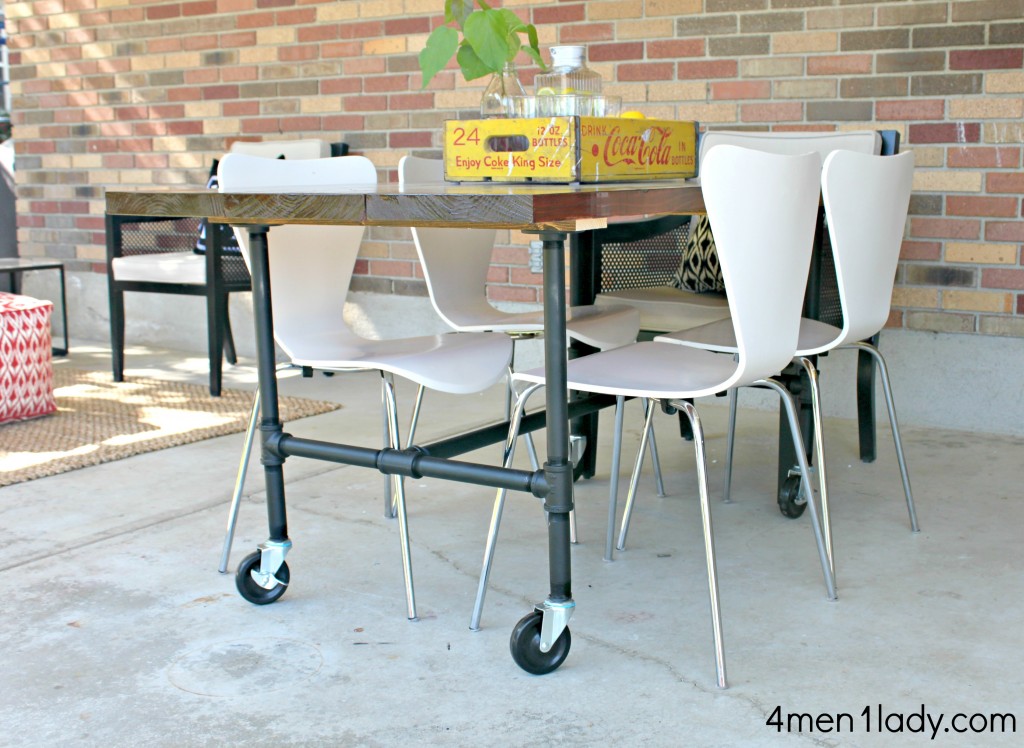
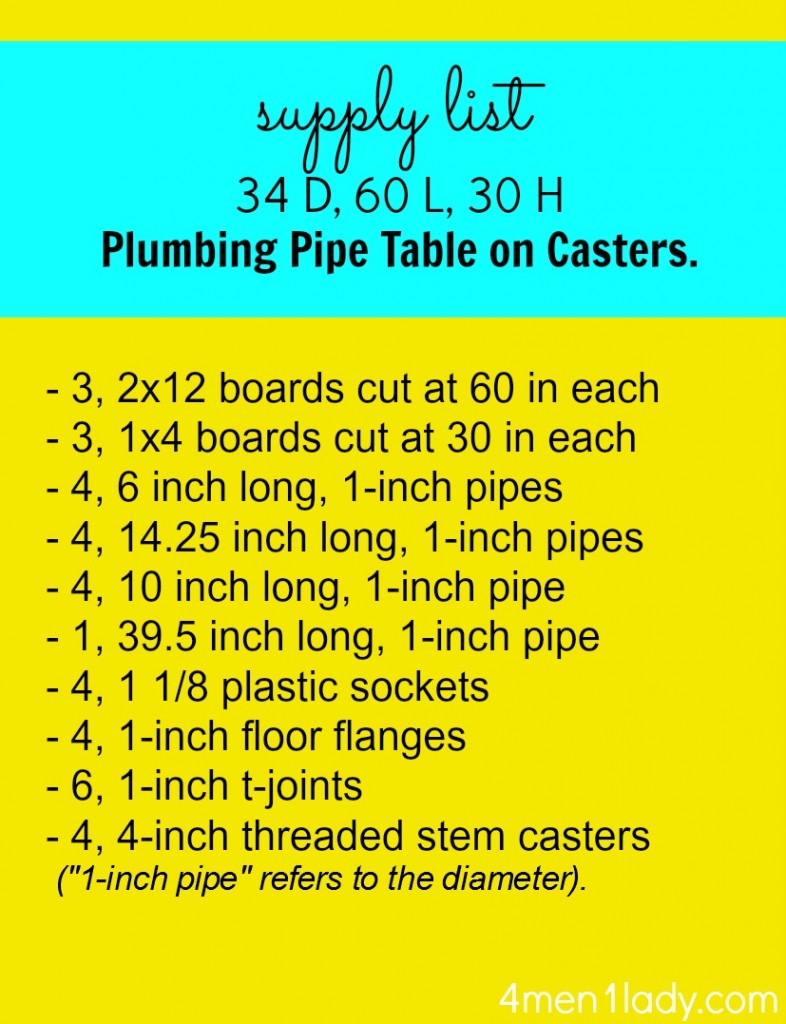
*If you decide not to put your table on casters you’ll need to compensate the height of your pipes (or whatever you opt for table feet) approx 5 inches.
*I made this a 6 person table. I wanted at least 6 inches of overhang on both ends of the table to accomodate a chair each. If however, you just want your table to be a 4 person table you could expand the 39.5 inch long pipe to approx 50 inches, thus giving the four more leg and elbow room.
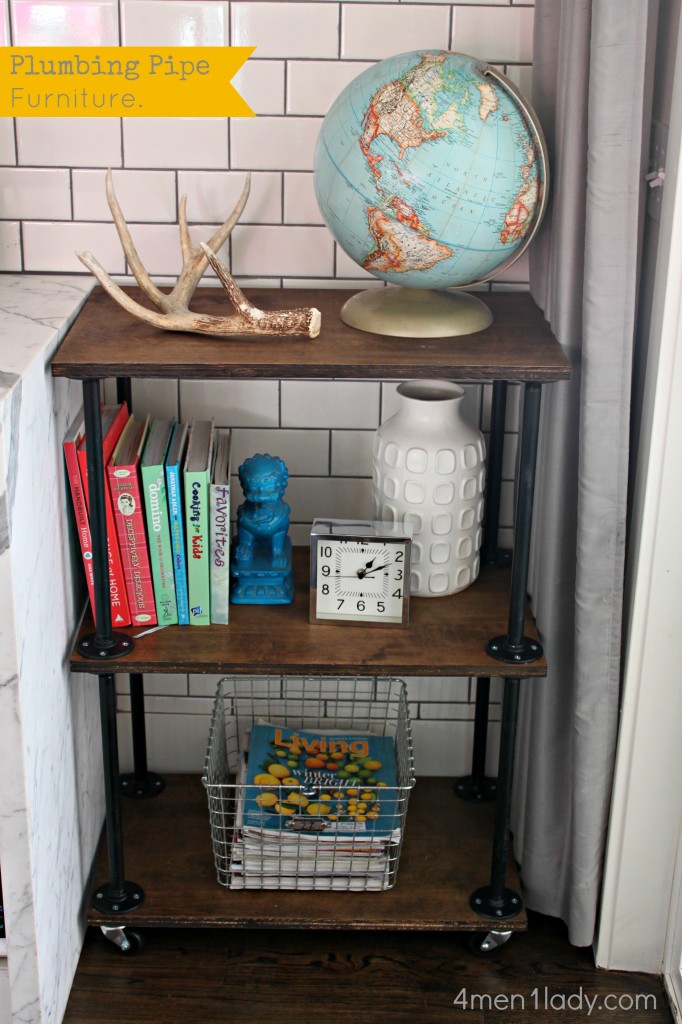
Click here to see details on my other plumbing pipe project.
Pretty please, show me some love if you liked this project. Thumbs up, Tweet, Facebook and/or Pin!


 Hey there! I’m Michelle; I’m an Passionate DIY’er and in constant pursuit of how to bring beauty to my house full of men (3 boys + 1 hubby). Stick around and see what I’ve got up my hard-working sleaves!
Funny you posted this cause I went looking through your blog to see if I could find info on it after I saw it – Love it! Now, I remember you saying that the first table you made was more $ than you wanted to spend on it, so, that is my concern with this one, too. Do you mind sharing how much this table cost? It might prevent me from doing it ;( Thanks for sharing and you are so crafty!!
I’m going to guess it was about $150. ish. I made a lot of mistakes and had to keep running back for more supplies. But I figure it was still way less than any custom table would have ever cost me. Share pics when you try it out pretty please! 🙂
I used your instructions to help determine the height of my desk, determine the size of pipe to use, and to determine casters/sockets. I didn’t follow your entire design, because I made a corner (L-Shaped) desk for my younger brother for college. You information was very helpful. I just called A1 Casters to order the plastic caster sockets, they were very nice and easy to do business with. I bet you have given them a lot of business, due to your tutorial!!!! Thanks for all the info!!!
I’ve been building my own furniture for awhile now and you get SO much more satisfaction from building your own and seeing your family use and enjoy it. Just finished building a Butcher block island on caster’s for my kitchen. Would love to share pics on here but I’m not sure how to.
Derek,
I am reaching out to you as you say you build furniture. I would like to build this pipe legged table — but I want to make it approximately 10 feet long. Do you think it would require an additional set of legs ( with casters) in the center for additional support ?
regards,
Janet
One suggestion is you could move the plumbing pipes further in so there is more overhang on the edges. Otherwise, an additional set of legs would be helpful, especially if you have kids climbing all over the table like mine. 🙂
I made mine 8 feet long and I almost did add a third set in the middle. I would suggest if it’s over 6 feet long to add a third leg in the center, ESPECIALLY if you are using expensive wood like the poplar wood I used. It turns out that Home depot now has caught on to these designs and offer industrial pipe decor that aren’t used for actual pipe but more for these applications.
This looks good.
Did you just hand tighten the pipes or did you use lock tight or something to keep them from backing out?
Nope, just hand tightened. 🙂
I just posted my outdoor dining area today! 🙂 If we hadn’t built our table already last year then I definitely would have given yours a try. I really love how it turned out! The vintage crate is the perfect accessory for the table’s industrial vibe too.
I left a comment on your blog but I’m not sure it went through or not. LOVE how your space turned out. That table is awesome! Kudos!
Have been thinking of making my own dining table but was hesitant because it would be a rather big project for me. Again, you have inspired me to try bigger projects. Thanks! 🙂
Yay! I hope you try it. Making it yourself is so much better than buying new (in most cases). Loving my new table. Thanks for your comment!
Would you mind sharing the budget breakdown of this project? I know plumbing pipe can really add up! Thanks!
Let me work on that for you. I actually spent way more than I should have because I kept messing up on measurements and had to keep running back to the store to fix my mistakes. Ugh, that learning curve. 🙁
this is so awesome for outside! i really love this, gonna show it to my hubby & see if we can whip this up.
Yay! Share pics when it’s completed! 🙂
Awesome DIY table! I’ve been dying to make a pipe table, too and I think an outdoor version is perfect! Thanks so much for the inspiration!
Loved it, pinned it!! I think I could do this on my own!! When my husband gets involved it get very complicated, wooodworking is his hobby and he is a perfectionist, good things…but when you just want a simple shelf…it can never be simple 🙂
I hear that sis-tah! Love our men but sometimes just best to venture on solo. Please share pics of your finished project!
You guys are so good! Can’t wait until we can come back and try it out! 😉 And just loving the yellow pop of color the drink tray from Cabootle gives everything! Although I keep wanting to pose a newborn baby in it! 🙂
Of course, only a newborn photographer would look at that crate and think those thoughts. 🙂 Yes, come visit and try it out!!!!
Gah, this is SO COOL! I wish I had patio space to do something like this…love the bookshelf too, definitely may have to try my hand at putting that together! Thanks for the ideas!
Thanks Alyssa!
Another excellent idea! Definitely worth pinning 🙂
What an awesome table! I love it and you did an amazing job. Thanks for the tutorial!
That turned out so great and it seems fairly easy to make too. I love the castors. It must be handy to just tuck it away when you dont need it.
This is fabulous! I am thinking I could talk my husband into turning this into a desk! Love it!
Yay! If you do it please share pics!
Where did you find the white chairs? Love the shape of them…..thanks!
Serendipity is all I can say. A neighbor gave me his discarded door. I want to add legs and use the glass part as a light table for my studio. The plumbing pipe legs will be perfect. I want casters too, so thanks for the info on them plus the bright idea of measuring the table height before adding casters.
Your projects are so clearly illustrated, I appreciate that. You are a clever lady.
Yay! Please share pics of your finished project!
My husband made one for me last night! I just have to stain it. What color stain did you use. I have Sedona Red but I’m looking for something dark but with less red in it? Is it Walnut?
What a swell guy! I used a Walnut and used three coats to get it pretty dark. Yay! I want to see pics…please share smhinckley (at) yahoo (dot) com.
What kind of wood did you use?
I believe it was redwood.
Great table. I am going to modify it to make a coffee table, but I am having trouble finding the plastic insert for the casters with the link you provided. Can you tell me where on that website that they sell them?
I don’t think they actually sell them on their website. I would suggest just giving them a call and do a phone order. Good luck! I hope you’ll share pics of your results!
I just came upon your site and I have to tell you that my daughter and her fiancée made a table similar to yours. However they didn’t think to spray the legs which I will suggest they do now that I’ve seen your end product…really love the industrial/country look which is their interior. For my own interest and to finish off a project I started, I’d love to find the plastic socket plugs. My google searches have been utter fails and the link you posted doesnt work. Can you tell us where you found them? Thanks!
Try this link: http://www.a1casters.com/. You’ll have to call them to order. Ask for 4, 1 1/8th plastic sockets. 🙂
First of all, thanks. Question for you – using those 1-1/8″ plastic sockets – are the stem-holes universal? I’m wondering if I can can use any type of caster wheel with threaded stem? They all look like they use the same size threaded stem, but hard to tell for sure.
I found these wheels on Home Depot’s site which I think you used:
http://www.homedepot.com/p/Honey-Can-Do-Urban-4-in-Wheels-4-Pack-SHF-01939/202868258?MERCH=REC-_-PIPHorizontal1_rr-_-203672611-_-202868258-_-N
But I REALLY like these ones:
http://www.amazon.com/Schioppa-GLEID-412-UPE-Polyurethane/dp/B00PS7LQFS/ref=sr_1_2?s=hi&ie=UTF8&qid=1438409059&sr=1-2&keywords=honey+can+do+4+in.+Wheels
I also don’t need brakes on all 4 wheels, but can’t seem to find a matching orange wheel without brakes…
Thanks for your help!
Those are great questions. I’m not really knowledgeable about universal fittings. I might suggest contacting A-1 Casters here in Salt Lake City. Even though they are here in SLC, they can answer your questions, give you suggestions and even ship product to you. Here is there website with phone number: http://www.a1casters.com/. Good luck!
I love this idea! I am having a hard time finding the perfect coffee table for my patio too- I have some of my favorite seasoned teak pieces (weathered to a silvery gray) & I want something fun & funkier than just a traditional teak coffee table. I am going to attempt a modified version of your table using a polished concrete top & keeping the pipes unpainted (galvanized steel color) and maybe using a more industrial looking caster. Thank you for the clever idea & especially for the directions & shopping list!! 🙂
Oooo! That would look fantastic. I hope you share pics of how it turns out. I’d love to see the finished result! Thanks Corinne!
oops – I mis-spelled my own last name on my comment.
Corinne K Baruch
Did you have any trouble with the black spray paint on the Galvanized Pipe? I’ve read that it’s hard to spray paint galvanized pipe like that. I’m wanting to build this, but wanted to make sure I get the right paint!
Hmmm? Strange. I didn’t have one bit of issue. The spray paint went on quite easy. 🙂
I built a version of this, but as an office desk 🙂
I lightly sanded the galvanized pipe, then wiped it down with rubbing alcohol to remove the grease. Then I applied a spray paint primer (2 coats), and then applied 2 coats of satin black.
Here is the finished product: http://imgur.com/a/GNmR5
Looks fantastic! The glossy finish looks so good. How has it held up? Thanks so much for sharing! I love using it as an office desk too.
It’s holding up quite well. Today is the first day of actual use, and I love it so far. Thanks!
How did you get that high gloss look on your wood? did you use a particular sand paper grit, or just a lot of coats of a semi-gloss/high gloss poly?
Just Minwax. 🙂
what type of wood did you use for the table top?
Redwood. 🙂
Found your blog when I googled “casters for 1-1/2 inch pipe leg”. You’ve done wonderful work and you answered a question that’s been perplexing me for 3 days … those plastic pipe fittings that actually hold the casters in place. THANKS!
Hi Jim! Glad you found us! Hope you’ll stick around. Thanks for leaving a comment. 🙂
I can’t find the 1 1/8 inch plastic sockets. 🙁 – In need of some help find those exact ones. please
Thank you
You can’t order it through the website. You actually have to call them and order it by phone. Hope that helps. Thanks!
Wow, nice table! You’ve really inspired me. I think I might give something like this a try.
Oh wow- I love this! The wheels are a wonderful touch. I would LOVE to link to your project if you didn’t mind.
Thanks Rachel. Yes, feel free. If you would just please credit the photos to “Michelle Hinckley of http://www.4men1lady.com” and also link directly to the tutorial link that would be great. Thanks again!
I need to make a very narrow version of your table (sans wheels) using a 26×86 piece of Ceasar stone. It is for a banquette & thus needs to be as narrow (think trestle) as possible and still steady/stable. The top is about 200 lbs. My base can’t be wider than 16-18″ at most. Do you think this will support that much weight with such a long, narrow table? Can you advise alternative set-ups?
OOOO. Good question. I’m afraid to give you an answer just in case the base buckles and your stone breaks. Yowzers. That’s some heavy stone. I might consider asking a metal worker or someone who is a little more experienced than me. Sorry…that was no help.
Poste rudement plaisant
Hi! I’ve been following your web site for a long time now and finally got the bravery to go ahead and give you a shout out from
New Caney Texas! Just wanted to say keep up the excellent job!
Thank you Heike! You’ve made my day. Really appreciate the shout out! 🙂
I am in fact thankful to the holder of this site who has shared this impressive article at here.
Its good to see that how you change scrap to a valuable thing. I usually scrap the plumbing pipe when it have some leakage problem.
Thank you for the very detailed plans. Looks incredible.
One question: were there any issues with getting all the angles square, while still having the pipe assembled/threaded tightly. Were there any loose joints in order to keep it square?
No problems with keeping it square at all. All is tight. 🙂
The link for the Plastic Sockets does not have those sockets listed anywhere. Did you have to call them to order? I have everything built but no way to insert the caster into the pipe. We ordered a set from Amazon that looked close to what you used but they were too small. Was curious if you knew of another option to install the casters. Thanks!!
Building two of these for office desks.
Yes, you have to order them by phone. You may want to google a caster store in your area. Then you don’t have to worry about shipping, waiting, etc. I’d love to see how your desks turn out!!
Quick question… I’m getting ready to head to the store to build a 4 foot version! I’m so excited! About how many screws did you use, and what size? Thanks…
Did you ever build your 4 foot table? I too want to use these same pipes but wanna build it taller, bar height. What were your measurements?? I assume the measurements listed for the pictured table are for a 3 foot high table. I’m making my table out of an old wood door and tiling the top with Mexican talavera tiles. I’m also interested in knowing how much you spent on that pipe from Home Depot?
Hi Michelle….What a great job on the table. I’m loving the industrial look lately and would love to have another go at an outdoor table. Last year I made one of these farmhouse tables, but it was mostly pressure treated wood, because it was all I had handy. I was told not to use that for the top because you would be eating from it, so went and found some kiln dried wood at an outdoor lumber mill (or what ever its called.) Anyhow…I was told it was good to go for staining or painting and sealing and would have no worries, as it was now dry. I was going to stain it with the minwax I had, (like yours) but was then told….I had to use one for outdoors, so did that, then was told I needed to seal it, so did that as well. The table top looked awesome, but not long after, it started bubbling, and was sticky in spots that had knots, and in some spots that had nothing. I did wait a good amount of time before sealing it,but it still bubbled. (like some of those public outdoor picnic tables you come across that have the rough spots on them….) Trust me…I sanded the wood really good before I started too. My table is not under any roof protection, but is also not in full sunlight all day, the deck is in dappled shade from the trees most of the day.
I stained and sealed on all four sides, and I’m still trying to figure out what the heck I did wrong. Then I found your table and want to start over.
What type of wood did you use for your top? was it pressure treated, or untreated? The stain you used…can you use it for outside? And did you stain all 4 sides? How long did you wait to seal it and did you seal all 4 sides of that as well, then attach the bottom? Please forgive all the questions. Your table is awesome and I’d really like mine to come out like that as well.
Enjoy the rest of your day….I just found your site, and am off for what I believe is going to be a wonderful tour!!
Debora Cadene.
It sounds like you did everything right. I think what might be happening is you have wood that is seeping sap from some of the knots. This is quite common and I think the only way to get around it is to use the cleanest wood you can find without any knots. I honestly can’t remember what kind of wood I chose but it was from Home Depot on on the more expensive side. It wasn’t outdoor or treated just regular old boards. Luckily it didn’t seep sap. I sanded and stained all sides. I used a 2×4 on the bottom to attached all the boards together then attached the flange to the 2×4. Hope that helps!
Thank you for the reply Michelle, I really appreciate it. I was afraid I may have suffocated the wood by sealing all the sides, leaving no where for the moisture to go. They assured me it was dry, but I guess you never know eh!!
Did you seal all the sides as well?
debbie.
Yes, I sealed every side. Best of luck! Michelle 🙂
Absolutely love it! Saw it via the Eclectically Vintage home tour. Thank you for the tutorial; it’s awesome!
Hey hey!!
I am doing this table as we speak!! And I’m panicking!! I had the pipes threaded twice, and still they fit so differently!! I can’t even remember how many trips I’ve made to Home Depot… I feel like the balance is all messed up, some go in more than others, making the T-joints be uneven, and therefore the whole table is just a mess!! I’m starting to think if this was a big mistake… 🙁 Also, I can’t find those sockets in all of Manhattan! Ugh… sorry for the long long text, I’m just agonizing… hahha!!! Thank you for any advice you can give me!!
Oh no! I’m so sorry this has turned in to such a headache. So I went back to Home Depot the other day and their was a guy who actually adjusted the machine to thread the pipes really well. My suggestion would be either ask for someone who really knows what they are doing with the machine or take it to a plumbing specialty store. That way you can really get those pipes fitted well and not have any discrepancies. Don’t give up! 🙂
This is so cool! I am visiting from Eclectically Vintage. Absolutely love this and pinning. Can’t wait to try my hand at it.
I have not been able to find the 1 1/8 in sockets for the 1″ pipe table. the A1 casters does not show any sockets.
my table is ready for the casters. I had granite that i placed on the table now it is heavy and it will need a stronger casters.
please help.
thank you
They don’t actually sell them online but if you call them you can place an order over the phone.
I really like this plumbing pipe table and plan to build this for my wife’s are studio. I am a little concerned about the socket and caster. You indicated that you used 1 1/8″ caster diameter socket inserts and hammered them into the pipe. The plastic inserts like this that I have seen are not threaded at yet the 4″ caster wheels that you used from Home Depot appear to be threaded (per the HD link I clicked on in your article). Most caster stems are not threaded and you just “punch” them into the socket. Did you just hammer the wheels into the socket or was the socket really threaded so you were able to screw the casters in?
Thanks for clarifying this.
Hi Mike,
Boy, it’s been so long ago now I’m really having a hard time remembering. Boy, I’m a lot of help. I really don’t think I threaded them in. Gah! Sorry.
I am dying to do this, I’ve fallen in love with tabouret chairs and I have priced tables like this to go with the chairs, all I can say is outrageous! Can’t wait to show my husband, I think we will have a blast doing this!
I used your instructions to help determine the height of my desk, determine the size of pipe to use, and to determine casters/sockets. I didn’t follow your entire design, because I made a corner (L-Shaped) desk for my younger brother for college. You information was very helpful. I just called A1 Casters to order the plastic caster sockets, they were very nice and easy to do business with. I bet you have given them a lot of business, due to your tutorial!!!! Thanks for all the info!!!
I hope you’ll share pics! Thanks Nicole!
I picked up the plastic sockets for the casters at Ace Hardware…
Hi, I absolutely love this table. I would like to make a larger version of it…much larger. If I wanted a 8 or 10 foot farm table, would it be wise to add support to the center, another set of legs? I have a huge family and a large dining room and this would be perfect.
I was wondering what type of Wood you used, I am looking to do this project, but potentaily add another tier of shelving underneath. I’m looking at wood now, and have no idea which I should use… What type did you use? Pressure treated? Framing lumber? Pine? Cedar?
Thanks!
I believe it is redwood. 🙂
I cannot seem to find the plastic socket at a1casters. Any other suggestions?
How much weight capacity would this table handle with the casters on?
YOu actually have to call them in person and order them. If that doesn’t work I would Google a caster store online or in your city. Take your pipe in and they can find one the perfect size for you.
I love it! I’ve been wanting a treadmill desk (I’ve got the treadmill) and all the standing or adjustable height desks on the market are either way overpriced and/or ugly. Your post has inspired me to make a narrower, taller version of your table so I can walk and work. Thank you!
We love this table idea and are currently making it. We would like to make matching benches. Do you happen to have a shopping list for a bench seat? Thanks so much…
No, sorry. Haven’t done that one yet.
Note: not every Home Depot will cut and thread pipe for you. Mine in Richmond BC does not, but they referred me to another location that does.
What are the plastic sockets called? Im making a table as well and can’t find those anywhere. if you have any other alternatives as to where I can find them, that would be great. Thanks in advance!
Hmm…You stumped me. I don’t know. The link in the post…you actually have to call them and order over the phone. They don’t do online orders.
This table is exactly what I was thinking of making with matching benches. Yours looks really good. I didn’t think of using castor wheels though but wanted to make it with bent pipes to make one continuous support on either side of the wood top. Do you think this would be stable enough?
That is great design idea. I would put it together that way and see how the stability factor is before you secure it down. If it’s not as stable as you’d want it you can always take it apart and go back to the drawing board. Let me know if it works. Thanks! Michelle
I am in the process of building this table. I am having a terrible time getting it to balance. If I tighten it, it’s way off and if it balances, then the pipes are not tight together. Did you have any issues with this? I can’t get to the tabletop because the frame is being such a pain.
Gosh, I’m so sorry. How frustrating. No, we didn’t experience this but I know this can happen if your threads aren’t tightened all the way or your pipes are not all the same lengths. I had a similar experience but with a different project using the pipes. I ended up having to take them all back and have them re-thread again because they were giving me such problems. Argh.
I just discovered this tutorial and I’m in love!
Do you think the pipe base would be solid enough for me to do this table for 8?
I was thinking of using 80 inches boards and a 60 inches pipe. Does that sound doable?
Thanks!
I would think so. I might make the base wider though.
Hey! Someone in my Facebook group shared this site with uus so I came too look it over.
I’m definitely loving the information. I’m bookmarking and will be tweeting this to my followers!
Superb blog and amazing design and style.
Just found this. I am moving and need a cutting table for my new quilting studio. I was thinking about plumbing pipe and an old door. This will give me exactly what I need. Thanks
Yay! Share pics when you make it! Thanks Susie.
Hi! I have been looking for table leg ideas for a while now and I am going to use your plans! My table is not as deep as yours though (it’s going behind the couch) about 2 feet. Can you tell me which measurement you used for the width of the table? Also not sure if I’ll use the casters or not because I want to get it done already!!
Thanks,
Tiffany =)
Mine is 34″ wide. Good luck. I’d love to see pics of it when you’re done!
I’m sorry I meant which pipe measurement but my husband just helped me figure it out! Here goes!
Where did you get the materials? All Home Depot ? The floor flanges are kind of expensive at $6 each. That about right ?
Yep, everything found at Home Depot.
Then, let it dry completely, and lightly scuff the surface with a 220-grit sandpaper so that
the finish you are applying will have something to hold onto.
With a good materials listing, you’ll be able to easily acquire the materials you need without investing a lot and
even determine the total price before you construct the project.
Learn as you go and you will be a natural in no time flat.
Love it. We have some juniper lumber that makes a great table top for outdoors. Thanks for the inspiration!
thank you so much for this! very detailed, i have just finished my table looking like this, but i used pallet table top. thank you for posting this!
Love love love the design of this table. We’d like to make it but wondering what you recommend if we don’t want the caster wheels? We have a toddler and so would need to fixed ideally. Thanks!!
Many hardware stores sell end pieces that you can easily twist on instead of the caster idea. Hope that helps! Best, Michelle 🙂
If you are in Australia and looking to buy galvanised clamps and galvanised/powder coated steel tubing we can assist with our DIY pipe clamp range. We do not stock the threaded pipe! Am not sure which is cheaper – our sizes are larger than shown – the minimum dimension of our steel tubes are 41mm.
We stock end pieces too!
As a general guide powder coating will double the cost of a part and you also need to wait a week for the powder coating to be applied. We are in the process of making outdoor shelves using the same materials.
Do you think 1 inch plastic sockets would work? I’m ready to get this project finished and I can find those in a local store.
Can you please tell me the final dimensions of this table? Once the castors are added, from floor to top of wood surface what is the height?
How heavy would you say this table is? I am looking to build something for similar use for theatre, and was wondering if it was easily moveable by a few people
Without the casters— I should add…..
Do you think it would be stable using 1/2″ pipe? I love the look of smaller pipe – but am wondering if you think it would be stable.
Also – how much did you end up spending just on the pipe? I just want to make sure I’m getting a good rate if I try not to get it from Home Depot. 🙂
I think it would work fine but probably depends on how large you are going to make your table. I honestly don’t remember how much I spent because it was so long ago. I do know you can get cheaper pipe online but then you have to factor in shipping. Let me know how the smaller pipe works.
Nice! Didn’t know Home Depot would cut and thread the pipes. That’s an especially helpful tip for a project I have going right now, so thanks for that info 🙂
Yep, they sure do! Good luck with your project!
Awesome table! I am making my own indoor version, only 23 inches wide but 5 feet long for my kitchen! I am getting the wood tomorrow and wondered whether I should get an oil or water based stain. You used oil, right? It’s pretty cold and wet where I am, and I’d rather not work outside. Could I still use an oil based stain and poly coat working with them indoors? What do you do with the dirty rags/brushes? I’d rather not clean them but dispose of them.
I prefer oil over water…it holds up better. Cons of oil is it takes forever to dry and stinks. Having said that, if my only option were to work indoors I would use water. The stink is just too great with oil. I don’t like to reuse brushes with stain. I use cheaper brushes and rip up t-shirts then just toss them when done. Good luck!
Hello! I am getting ready to make this and just wanted to know how yours has held up through the years? We will use fir and keep it inside to use as a desk, but I am especially curious to know if yours has “bowed” over the years?
Ours has held up awesome…which surprises me because it’s been outside through the heat of summer and freezing cold of winter. No bowing at all!
Thanks for this. I have been trying to figure out how to attach casters to a pipe legs for awhile. Quick question, it looks like you intentionally got caters that were larger than the diameter of the pipe. Is there a reason for this?
Thanks again
Sorry, my comment is confusing. I meant, “you intentionally got caster sockets which are larger in diameter than the pipes.”
Is there something you can do to avoid gaps between the boards?
Almost done! What size wood screws did you use?
Michelle, could you tell me what the overall dimensions of the base ended up being based on the pipe dimensions? (Exclude all of the wood table top from the dimensions). I want to do this base for an existing table top and this would allow me to ensure the dimensions of my pipe cuts are appropriate based on adjusting your finished product to my table size.
If this thread is still open I’m planning to build the same table and I’m curious to know how you avoided warping of the table top? Did you let the wood acclimate a bit and did you finish both top and bottom or just top of the table? Or were you just lucky? 😉
Well I finished my table! I followed your directions. I made my table bar-height though. I also used an old door as my tabletop and tiled over that. My wheels are 5 inch with breaks. Wish I knew how to post a pic of it on here.
Yay! So glad it worked out!!!
How far in did you set the legs? Love your table. Inspired me to make an end table.
I want to say about 8 inches in.
Good addition:
If you want a more finished look, instead of using the plugs and epoxy, go here and call the company and ask for a caster kit with plugs for your size pipes. No glue and they snap together. I think my 1/2 pipe needed a 5/8 plug and the caster goes in the center. sweet!