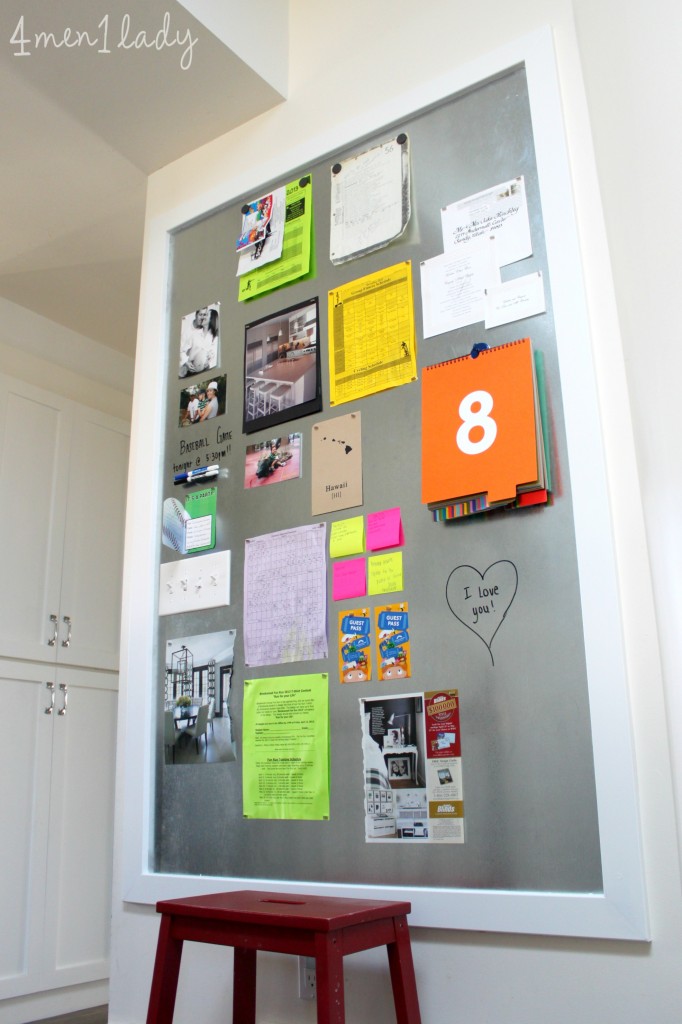
I’ve been busy at work with the Mr. making and installing a new DIY magnetic message board.
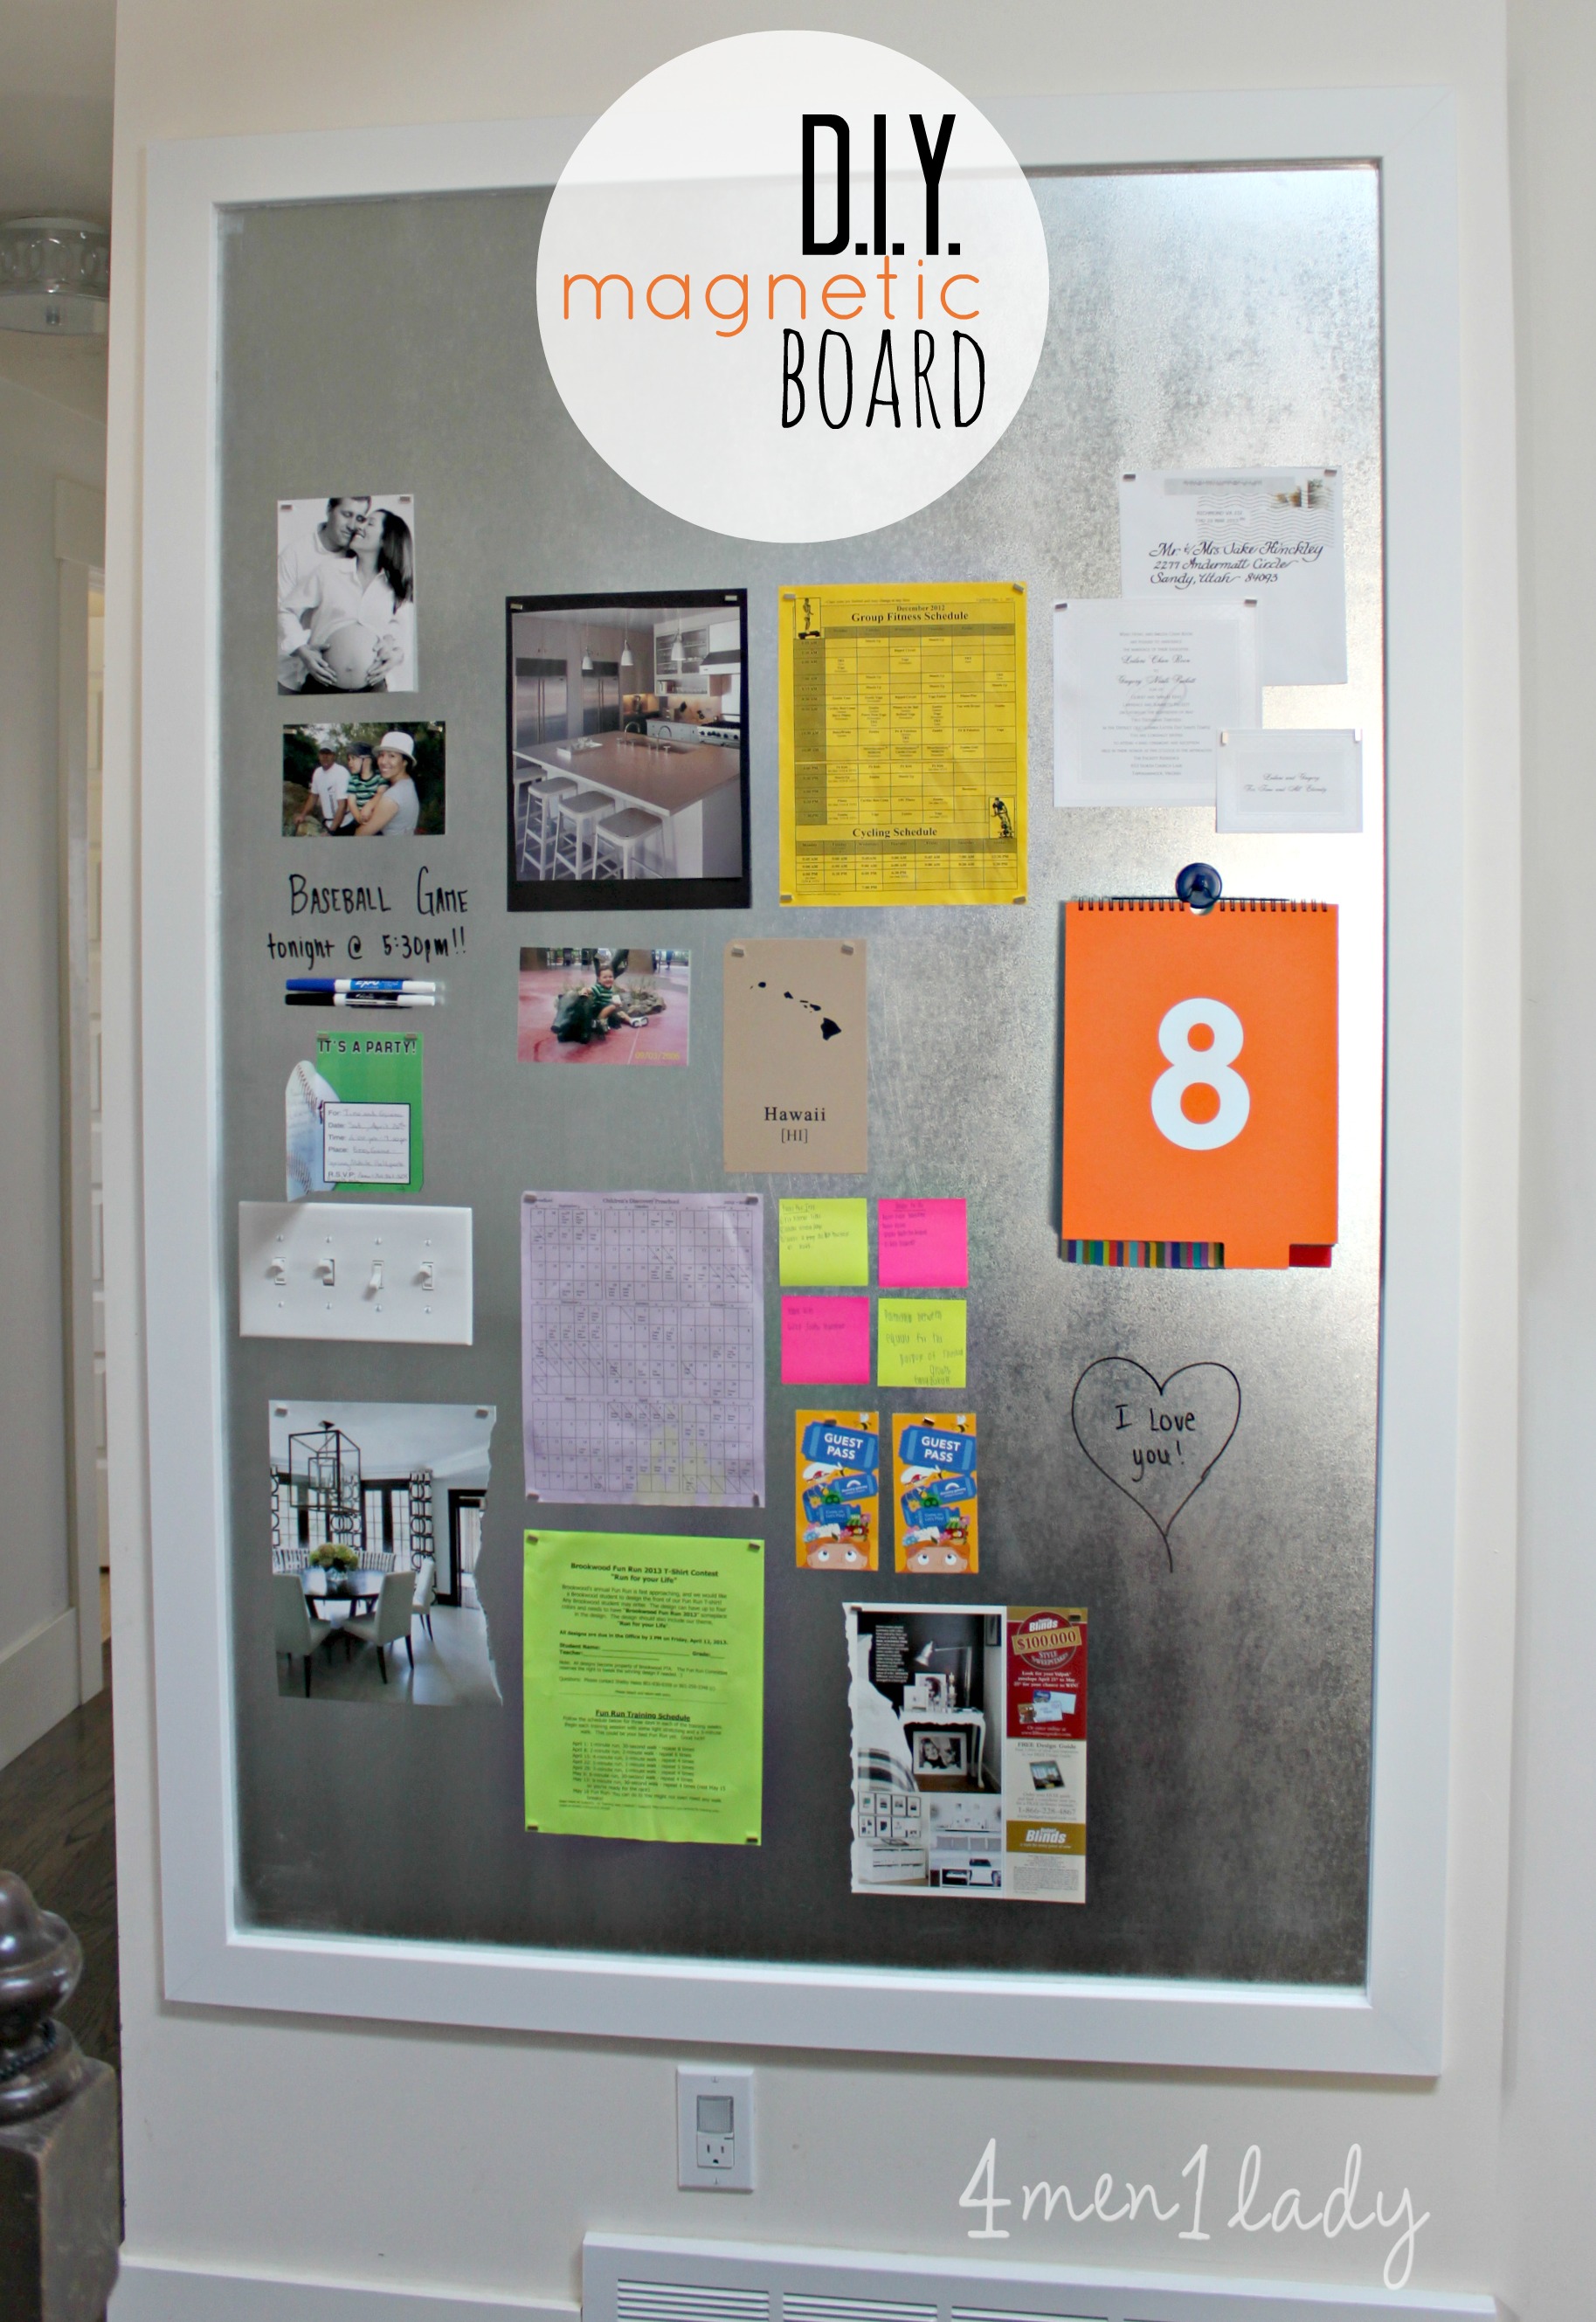
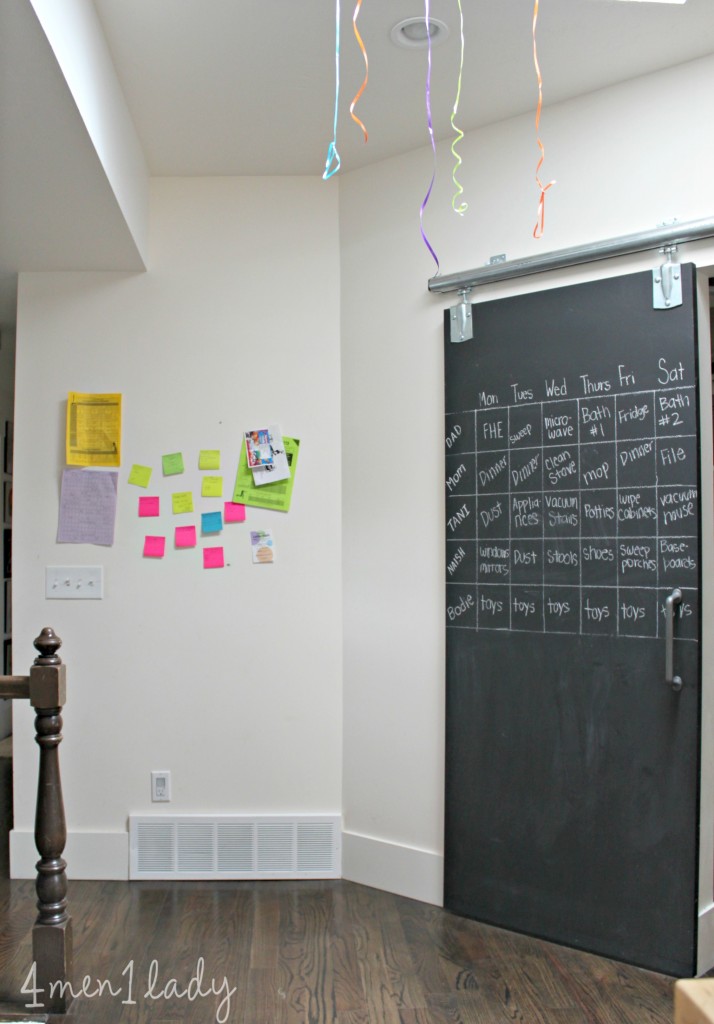
This wall off our kitchen has sort of become our make shift message center. We end up taping any important notes, forms, invites, etc. right here so naturally it was the perfect place for a message center. I was originally going to make a cork board message center but then I saw a much smaller magnetic board for sale for on one of my favorite shopping sites for around $200.00. A bit pricey so I decided to see if I could d.i.y. it for much less.

After calling around I ended up on the phone with Metal Supermarket here in Salt Lake City. Apparently they are a chain and can be found in many other cities. I was able to get this board for around $40.00. I needed a rectangle cut out to accommodate my light switch which about doubled the price for labor but I was still way under the much smaller, $200.00 board so I went for it.
I have a tendency of changing my mind on decorating projects quite often so I would never recommend gluing anything right to your wall. However, I’m pretty certain this message board is going to be a much used permanent feature in our home.
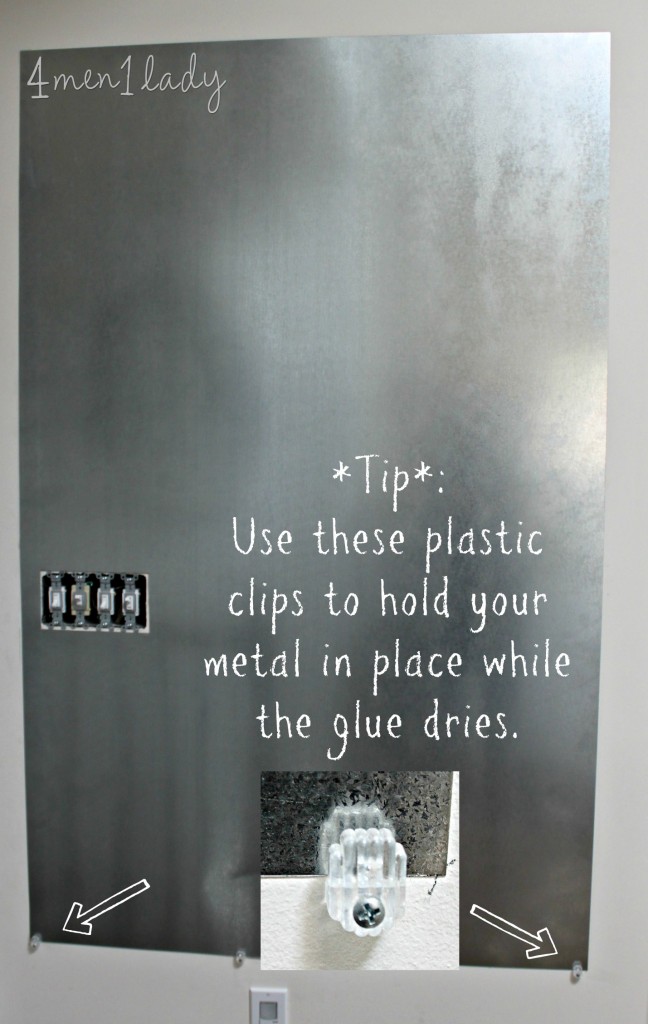
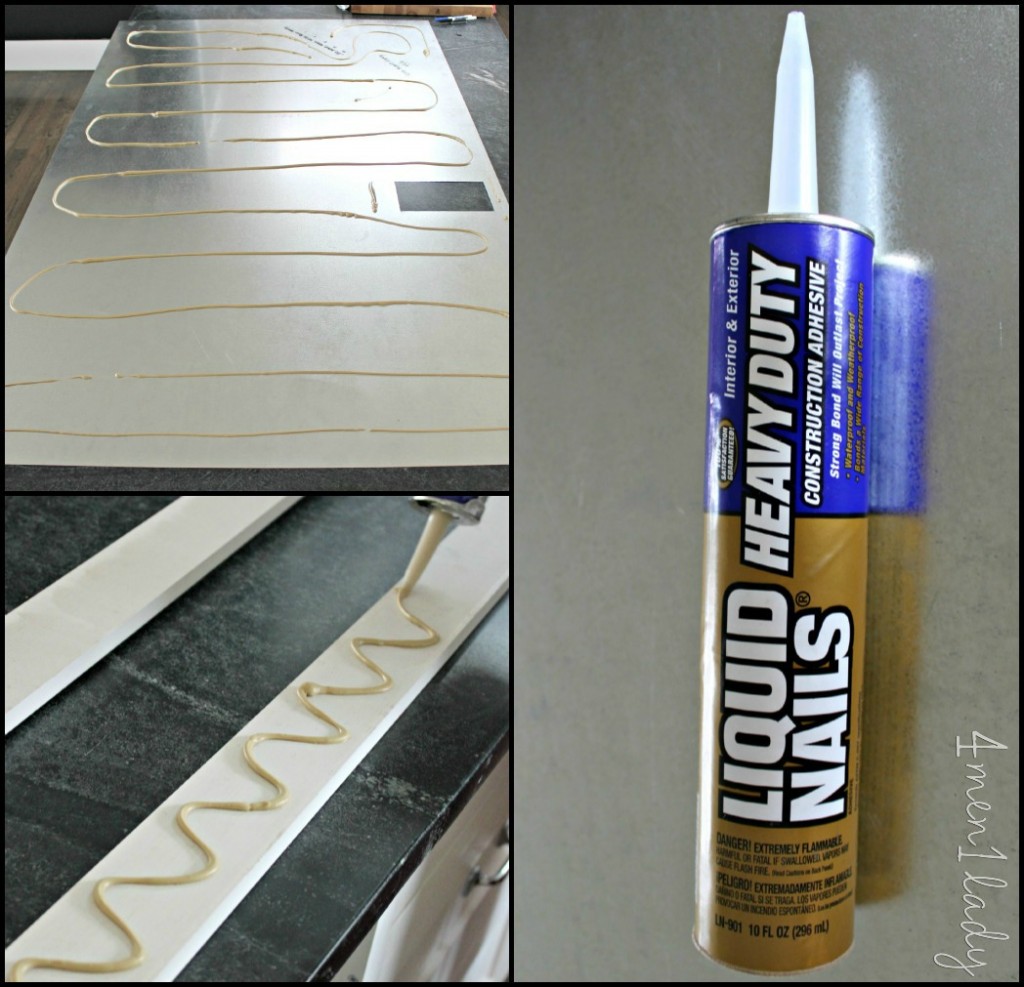
I then picked up some MDF, pre-primed board from Home Depot for under $10.00 and made a frame which I measured, cut and glued right to my wall as well.
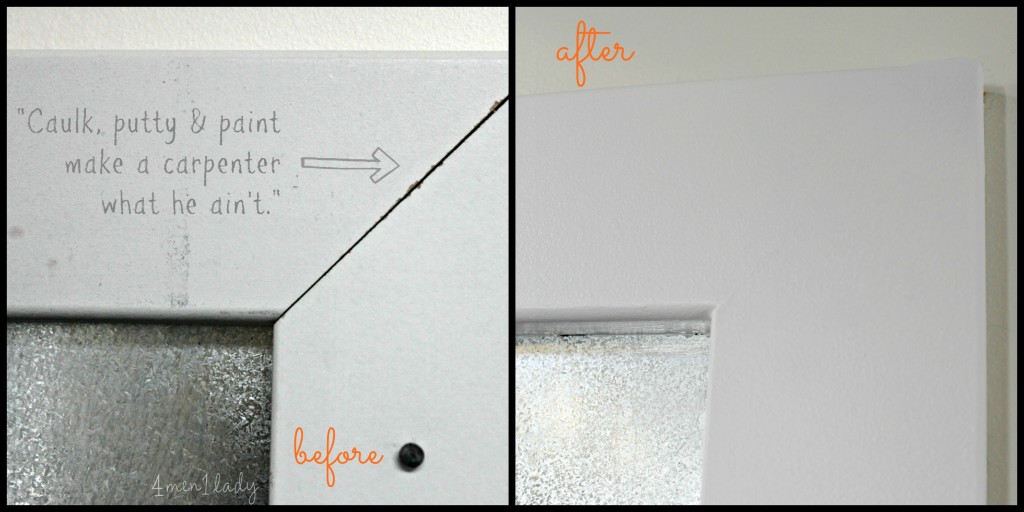
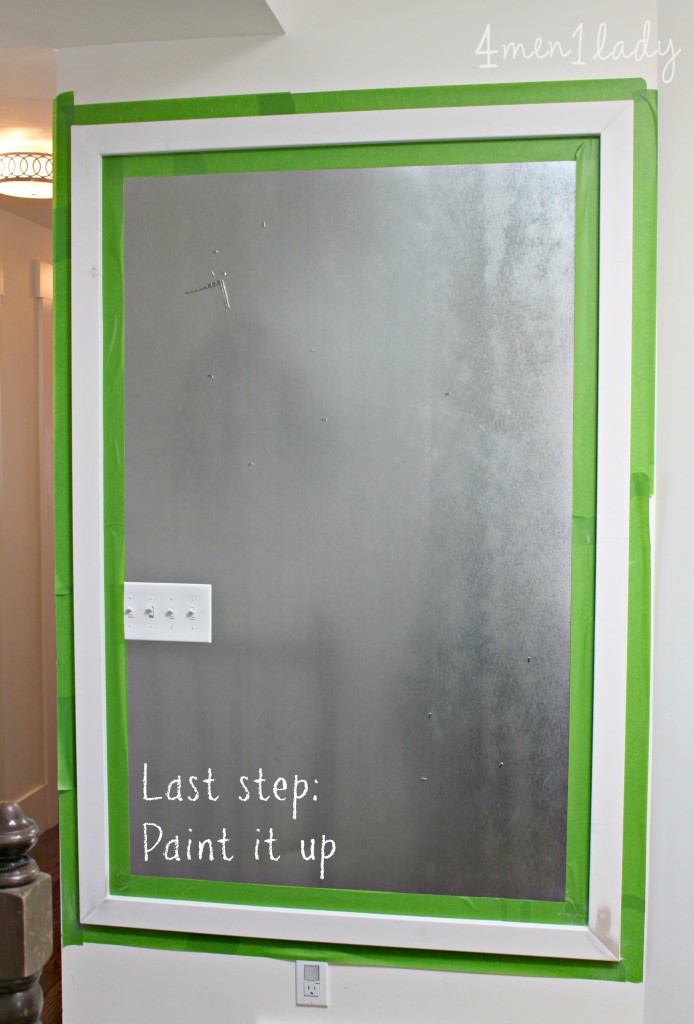
Then I painted my frame and was done.
I know I must be a broken record with my love for Frog Tape but it really is the best kind of tape because it doesn’t bleed under the tape. Right after painting wait just a few minutes until the paint is just tacky to the touch then remove your tape for best results.
Flip calendar from Fab.com (because I knew you’d ask).
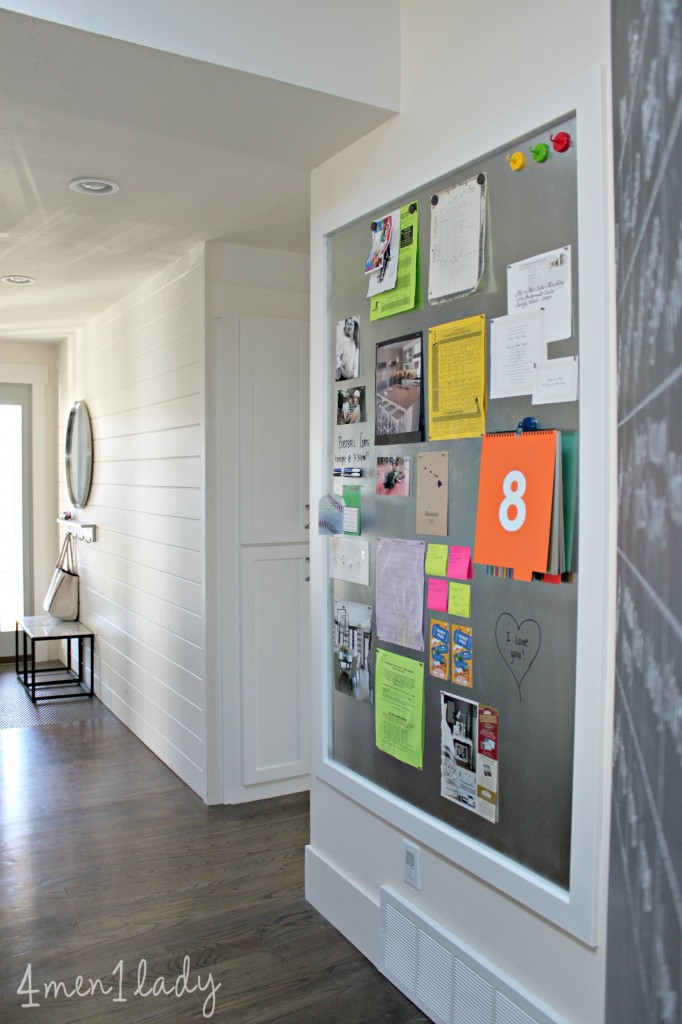

Love that I can also write notes to my family right on the board!
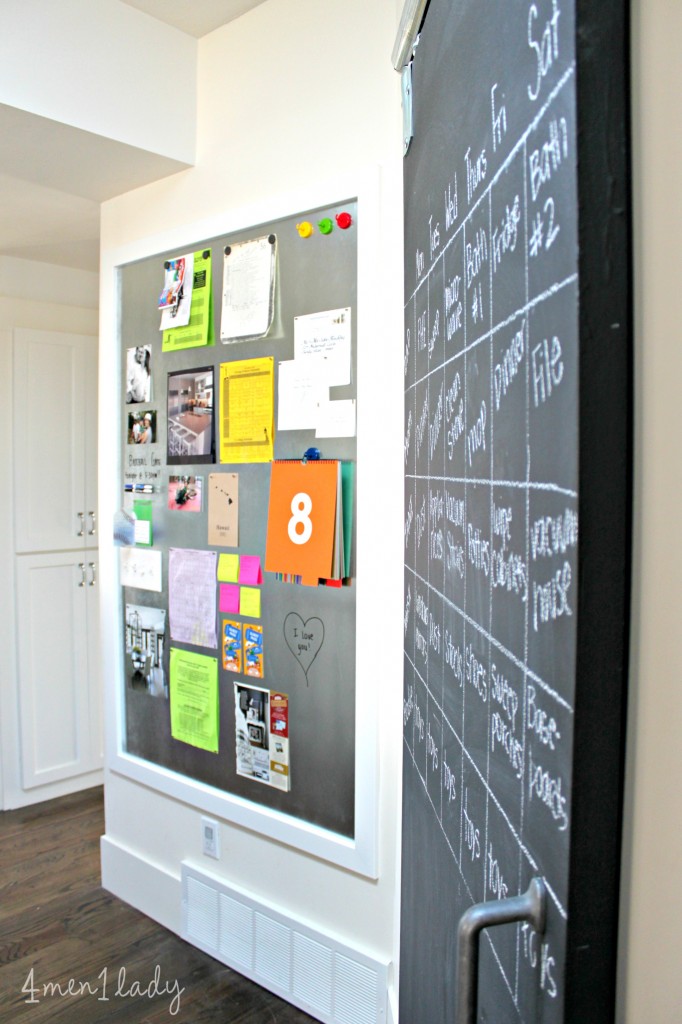
For under $100.00 I have a new magnetic message board (would have been around $60.00 if I didn’t need any special cuts made).
***After posting this project I had several inquiries as to the exact metal I used.
Metal details: 26 gauge, galvanized steel sheet.***


 Hey there! I’m Michelle; I’m an Passionate DIY’er and in constant pursuit of how to bring beauty to my house full of men (3 boys + 1 hubby). Stick around and see what I’ve got up my hard-working sleaves!
love this!
Thanks Natalie!
I have a question though. I was wondering how you transported the board and was there any danger of it bending? I have tried to find some here in Melbourne, Australia and the delivery to keep it flat is more than the actual piece I need! Just wondering if you had any tips? Thanks
Darn those delivery fees! We transported it in the bed of our truck. If we didn’t have a truck I would have paid to have it delivered so it would be kept flat. Do you have a friend who has a truck you could borrow?
Not at this stage, but we haven’t done anything about it due to that reason…..we keep thinking on it…..
thanks,
Nat
You could get smaller square size. So it looks the same but maybe have three smaller framed ones on top of one another. Top one could be a calendar, another meals, another chores etc?
This looks great.
Thanks for sharing.
Hi Michelle, I would love to do this project. I was thinking of making it without the frame. Does the galvanized steel stick out at all once it’s glued down? I worry if it did it would cut someone who accidentally brushed up against it.
Thank you,
Heidi
That would be my concern too. It doesn’t stick out much but it would take something little to pull at it and be a hazard.
Great!! And loving the metal!!
looks great! and, I love that it’s built-in.
This looks awesome! I’m a inspired to get organized!!
I love this & I have a spot at home where I would love to do something like this! Tangent – while I love that stainless steel appliances are not magnetic, as to prevent me from cluttering it up with nonsense magnets, sometimes you just need a place to put something up quickly & temporarily! Anyway, I was wondering how much you think that sheet of metal weighs? I don’t want to glue it to our wall, but I worry that it would be too heavy not to? Ours would be smaller — maybe 24″ x 48″. Looks great! Love it!
Thanks Emily,
I think the weight is around 10 pounds but when you call your metal store they will be able to give you an exact weight. Thank you!
Love it, I love the metal look so much better then cork board. It looks so clean and modern.
This is awesome! I can totaly use this for our everyday reminders and ever changing to-do lists!
This is sooo great for a family!! Great idea! xo Kristin
Love this idea! Did you use stainless and what gauge? Thanks!
Love the way it looks! Sleek design and simple.
Thank you!
Loving it! So great for staying organized
Fabulous outcome! May I ask if you can give me the source for the round dining table and chairs in the magazine clipping you have tacked on your board?
I’m actually not sure…the page was torn out. Darn it…so sorry.
As usual – so very clever and inspired! Beautifully done! It occurs to me that this would also serve as a wonderful area to let those little men ‘decorate’ around the borders of the metal space with seasonal items – celebrating the coming of spring – or summer – or fall – or Christmas – then winter, etc, etc.
Thank you for sharing with us!
Now THIS is super cool! So tidy looking. Nice work!
LOVE… gotta go and pick out a wall over here to do this too! Thanks for sharing. Brilliant!
HI, I am wondering exactly what type of metal you used. I am trying to copy your awesome idea and I bought a piece of sheet metal. However, it does not look as good and when I cleaned it with stainless steel cleaner it turned black. Yours appears to be stainless steel, however magnets can’t stick to stainless steel so I am perplexed. Any help you can shed on this would be greatly appreciated. Thanks.
Ingrid, I used a 26 gauge, galvanized steel sheet. Hope that helps! 🙂
Thank you so much, that helps a lot!
Hi! Did you have to paint or prep the metal you used???
Thanks!
Nope, no prep needed. Just hung it up and voila! 🙂
What size sheet did you use?
26 gauge, galvanized steel sheet
Can I paint the metal with chalkboard paint??
Absolutely!
This is beautiful. What are the dimensions of the sheet metal you got?
Approx 45 X 65 in. Thanks!
If you paint galvanized steel like this, will it retain it’s magnetism?
And if I paint it, and add a clear coat of dry erase paint, will the metal maintain it’s magnetism?
I bet it will but I can’t find the answer to this anywhere and I thought you might know.
Thanks!
My first response is yes because I know you can paint on magnetized paint then coat it with chalk board paint. To be sure, I would call a place that sells metal and ask them…somewhere like metalmart.com. Good luck…let me know what they tell you.
Thanks!
What size sheet did you use for the message board?
Approx 45 in x 65 in.
Thats a great idea!! I could definitely use this in my house. I make small ones.. but yours is awesome!
It’s been one of the most used wall in our whole house. Thanks Danielle!
This looks great! And I really like your floors 🙂 What kind of floors do you have and why color are they? Thanks for your time!
Hi, how has the metal held up over time in terms of its ability to double as a dry erase board? Is it a good dry erase board?
At first I used it as a dry erase board then my toddler got a hold of the marker and started writing EVERYWHERE, table, walls, etc. Gah! So I took the marker away and we don’t use it anymore as a dry erase board. Sorry I can’t answer that question very well. Thanks!
I hope can do that also…
Hi there. I love this! I Got a great quote from the metal company you used today. I do plan on using this as a dry erase board. Before you had to hide all the markers in the house how did it work for that? Did it clean up/erase well?
Yay! I really do think you’ll really like it! We used it as a dry erase board for about a week then my toddler old got a hold of things and that was the end of that. When you use dry erase markers it will wipe off easily with your finger. It may leave a shadow or hint of what was written there…didn’t bother me. If it bothers you just use a magic eraser sponge and you’re good to go. Share pics when you’re done! 🙂
Thank you! Will do! This is going to be a surprise project for my husband’s office in our new home – I only have 2 days to put it all together so hopefully it all works out! Any tips on the chalkboard wall? I plan on doing that too.
What a sweet wife you are!!!
I am planning a magnet board and a Google search led me to yours – the information was just what I needed. Thanks! Did you butt the wood for the frame right up against the sheet metal or overlap it a little?
I overlapped it a little just in case my measurements were a tad off. 🙂
I saw above how to make one of these boards, but is there somewhere I can order one?
Thank you!
Try Metal Mart online.
We are adding a panel very similar to this in our basement renovation. Planning to use it as a dynamic place to stick photo snapshots / kid’s artwork etc. Stainless steel won’t work as it isn’t magnetic, so we went with regular steel. We’ve thoroughly waterproofed our basement, but I’m still concerned that if the humidity gets a tad too high it could start to show rust. Sounds like you didn’t do anything to treat yours. Has it held up well?
Hi Ken, no we didn’t treat ours and it has held up really well to three boys throwing things at it, writing on it, abusing it, etc. Hope that helps! Michelle
I LOVE this! Does it scratch easily? I’m looking to do this for my toddlers to use with their alphabet magnets and such, but don’t want to make it permanent if it’s going to get scratched by them. Thanks!
Thank you so much for sharing. I am so excited about this. I just went to pickup the materials however I am doing it a little differently. Home Depot in central Ohio has a 36″ x 48″ sheet of galvanized steel for $16.38. I bought 2 sheets of galvanized steel, a sheet of Sparta Oak paneling for $9.97(backer board. Will be enough for 2 boards), and I bought 4 – 8 ft pieces of White FRP/Tile Cap for the edging of the board(found in the moulding aisle)($2.68/ 8ft piece and no painting necessary). Luckily we are a very handy family and have extra locktite glue around the house/garage. Based on my totals(minus the glue) I will be able to make 2 large sleek and stylish magnetic dry erase boards for around $57.00 (with tax included)! I am so excited to have a sleek and stylish organization center near my entry way to save dates and grocery lists. My husband is excited to have a much larger dry erase board to put in his man cave/garage (He tracks the mileage for all of our vehicles on the board for oil changes and other maintenance items). Perfect timing for Fathers Day tomorrow! Thank you again!
Below are links to the items I purchased to make my boards:
Edging : http://www.homedepot.com/p/Stabilit-3-16-in-x-13-16-in-x-96-in-White-PVC-Tile-Cap-Moulding-FRP-CAP-WHITE/202083288?keyword=788594730182
Backing Board: http://www.homedepot.com/p/Unbranded-32-sq-ft-MDF-Wall-Panel-739522/202090195?keyword=081999557591
Galvanized Steel Sheet: http://www.homedepot.com/p/Master-Flow-36-in-x-48-in-Galvanized-Steel-Flat-Sheet-GFS36X48/100175914?keyword=050206937068
What metal did you buy from the metal super market? Their site has several different types. Thanks! 🙂
Just a word of caution about this one….
I purchased the exact metal specified in your blog in size 4′ by 4′ at Metal Supermarket in Atlanta. Be prepared to specify “scratchless” or “as few scratches as possible”. When I showed up to pick up my cut piece, it literally had GOUGES on the surface. Only with more back and forth with them were they willing to exchange it for a new piece that had no gouges. I had even sent them a picture from your blog so they knew the application, but they still gave me a hard time about exchanging the piece for one wih fewer scratches. You still have some minor scratches where they pull the sheets out from the stack but I would HIGHLY recommend going in person to inspect the metal sheets before they are cut, if you live close enough to a metal fab shop.
Thank you for the great site and this DIY tutorial. I also really appreciate your lead to Metal Supermarkets. I had not heard of them before your blog. What a great deal on the materials for this project. The fact that iit can be used as a writing board with dry-erase markets is just perfect – and how durable/easy to clean too! Thanks!
I want to make a portable magnetic board for Primary. We do not have cupboard space to store a board and the chalkboard is too far away for some of the kids to see what is posted there. Any suggestions?
If you can’t keep the magnetic board there I wouldn’t recommend it. The metal is REALLY heavy and sharp. Unless you can mount it permanently it may not be the best solution.
This is really awesome DIY tutorial.
I have prepared one magnetic board at my place bt mine is small.
Thank you 🙂
This is fantastic!! We are planning a similar project with chalkboard/magnet board using this technique. Can you share what size mdf you used – 1×3 or 1×4? Thank you for sharing your creativity!!
I think it was 1×3.
What a great project! I definitely need one of these in my home office!
Hello- I’m all set to start this project for my laundry room- perfect idea! I’m wondering how the size of the frame compares to the size of the metal sheet? Did you glue the frame to the wall or to the metal? If you glued the frame to the wall, how much “extra” did you allow for the dimensions of the metal sheet under the frame so that the frame completely covers the metal and there are no gaps? If you glued the frame to the wall with a slight overlap of metal under the frame, did this make the frame ‘stick-out” from the wall some? (bc the frame is partially held out from the wall by the metal?) I’m getting down to nitty-gritty details I know! hope my questions make sense….. Thanks!!!!
We measured so the metal fit just beyond/under the frame…maybe 1/2″ – 3/4″? We glued the frame to the metal and the wall. The metal we used really wasn’t that thick so it didn’t make the frame stick out very much or leave much of a gap on the outside. If it does or bothers you, you could run a small dab of caulk around the outside to hide it. Hope that helps…good luck! 🙂
The board looks great but where did you get the tiny little magnets?
I got them online but I’ve seen them everywhere including Staples. They are the best magnets ever…super strong and not an obnoxious eye sore. 🙂
We did this year’s ago at out previous house!! Loved it. Thought I would mention we glued it to some really the part that we bought at home depot amd the screwed to wall and added trim directly on top if thar. Worked great and could remove if necessary without hurting wall!!
How do you have the calendar hanging? Is it on a hook or something? I just bought the calendar – only $14 on clearance, plus an extra 20% off!! I plan on making the magnetic board this weekend 🙂
How well is the dry erase part holding up?
Hi Amber, I’ll be honest, I bagged the whole dry erase board the same week when I found marker on the wall. Three boys, black marker…not a good combo. So I’m no help on the subject. Sorry. 🙁
I love this. I’ll be using the magnetic board idea for 2 of the walls in my classroom next year. 🙂
I am so doing this!! You inspire me, Michelle!
It’s one of those life-saver projects. Thanks so much beautiful girl!!! Aloha.
I was wondering if you treated/protected your sheet metal with a product after building. I was told that sheet metal dulls with time.
That is corrected…the sheet of metal will dull, scratch, all of the above. But, it’s a magnetic board with paper covering it most of the time. I didn’t treat it but the wear & tear doesn’t bother me. Hope that helps! 🙂
I’m curious if I didn’t want to use liquid nails, can I use screws? Does the casing around the metal sit right on top or on the edge? Thanks much:)
The metal (at least the size we used) is REALLY heavy. I’m sure screws would work but in our case, the liquid nails was just an extra safety precaution. We put the casing so it barely covers the edge of the metal.
Love this idea and am in the process of doing this in our kitchen. So…it had been a couple years since your original post…how has it held up? Any thing that you would do differently?
Thank you for sharing this great idea!
I’ve loved everything about this board. It has been so functional. Held up great. Thanks. Michelle
Your post was perfect! Thanks so much for all the detail, this is exactly what I’ve been wanting to do but wasn’t sure where to find the materials. Question, I am going to mount this piece of metal to a tile wall. The rep suggested putting foam board behind the metal so it doesn’t bend as it’s used. Do you think that’s needed? Is it thin enough that we’ll end up seeing the tile pattern behind it?
I believed I used 22 guage metal which is really stiff. I can’t imagine you would see the tile behind it. 🙂
What dry erase paint did you use? Brand? Color?
I didn’t actually use dry erase paint on this board.
I have a piece of regular steel that I want to be black dry erase and I’m trying to figure out what’s the best dry erase options.
Thank you for adding the update about the gauge you used; it saved me a TON of money! Can’t wait to make this for our coffee shop’s conference room!
You’re welcome! Can’t wait to see it!
What is the width of your frame? Covering a wall and your frame size doesn’t look too small.
Width of the frame is 2 1/2 inches.
Michelle!thanks so much for this posting! I am making 2 of these for all those magnets one accumulates when traveling! Our fridge door was over run! You saved me a lot of grief!! Lol
Yay! You’ll love them. Thanks. 🙂
What size is the sheet used to make the message board?
Approx 45in x 65 in.