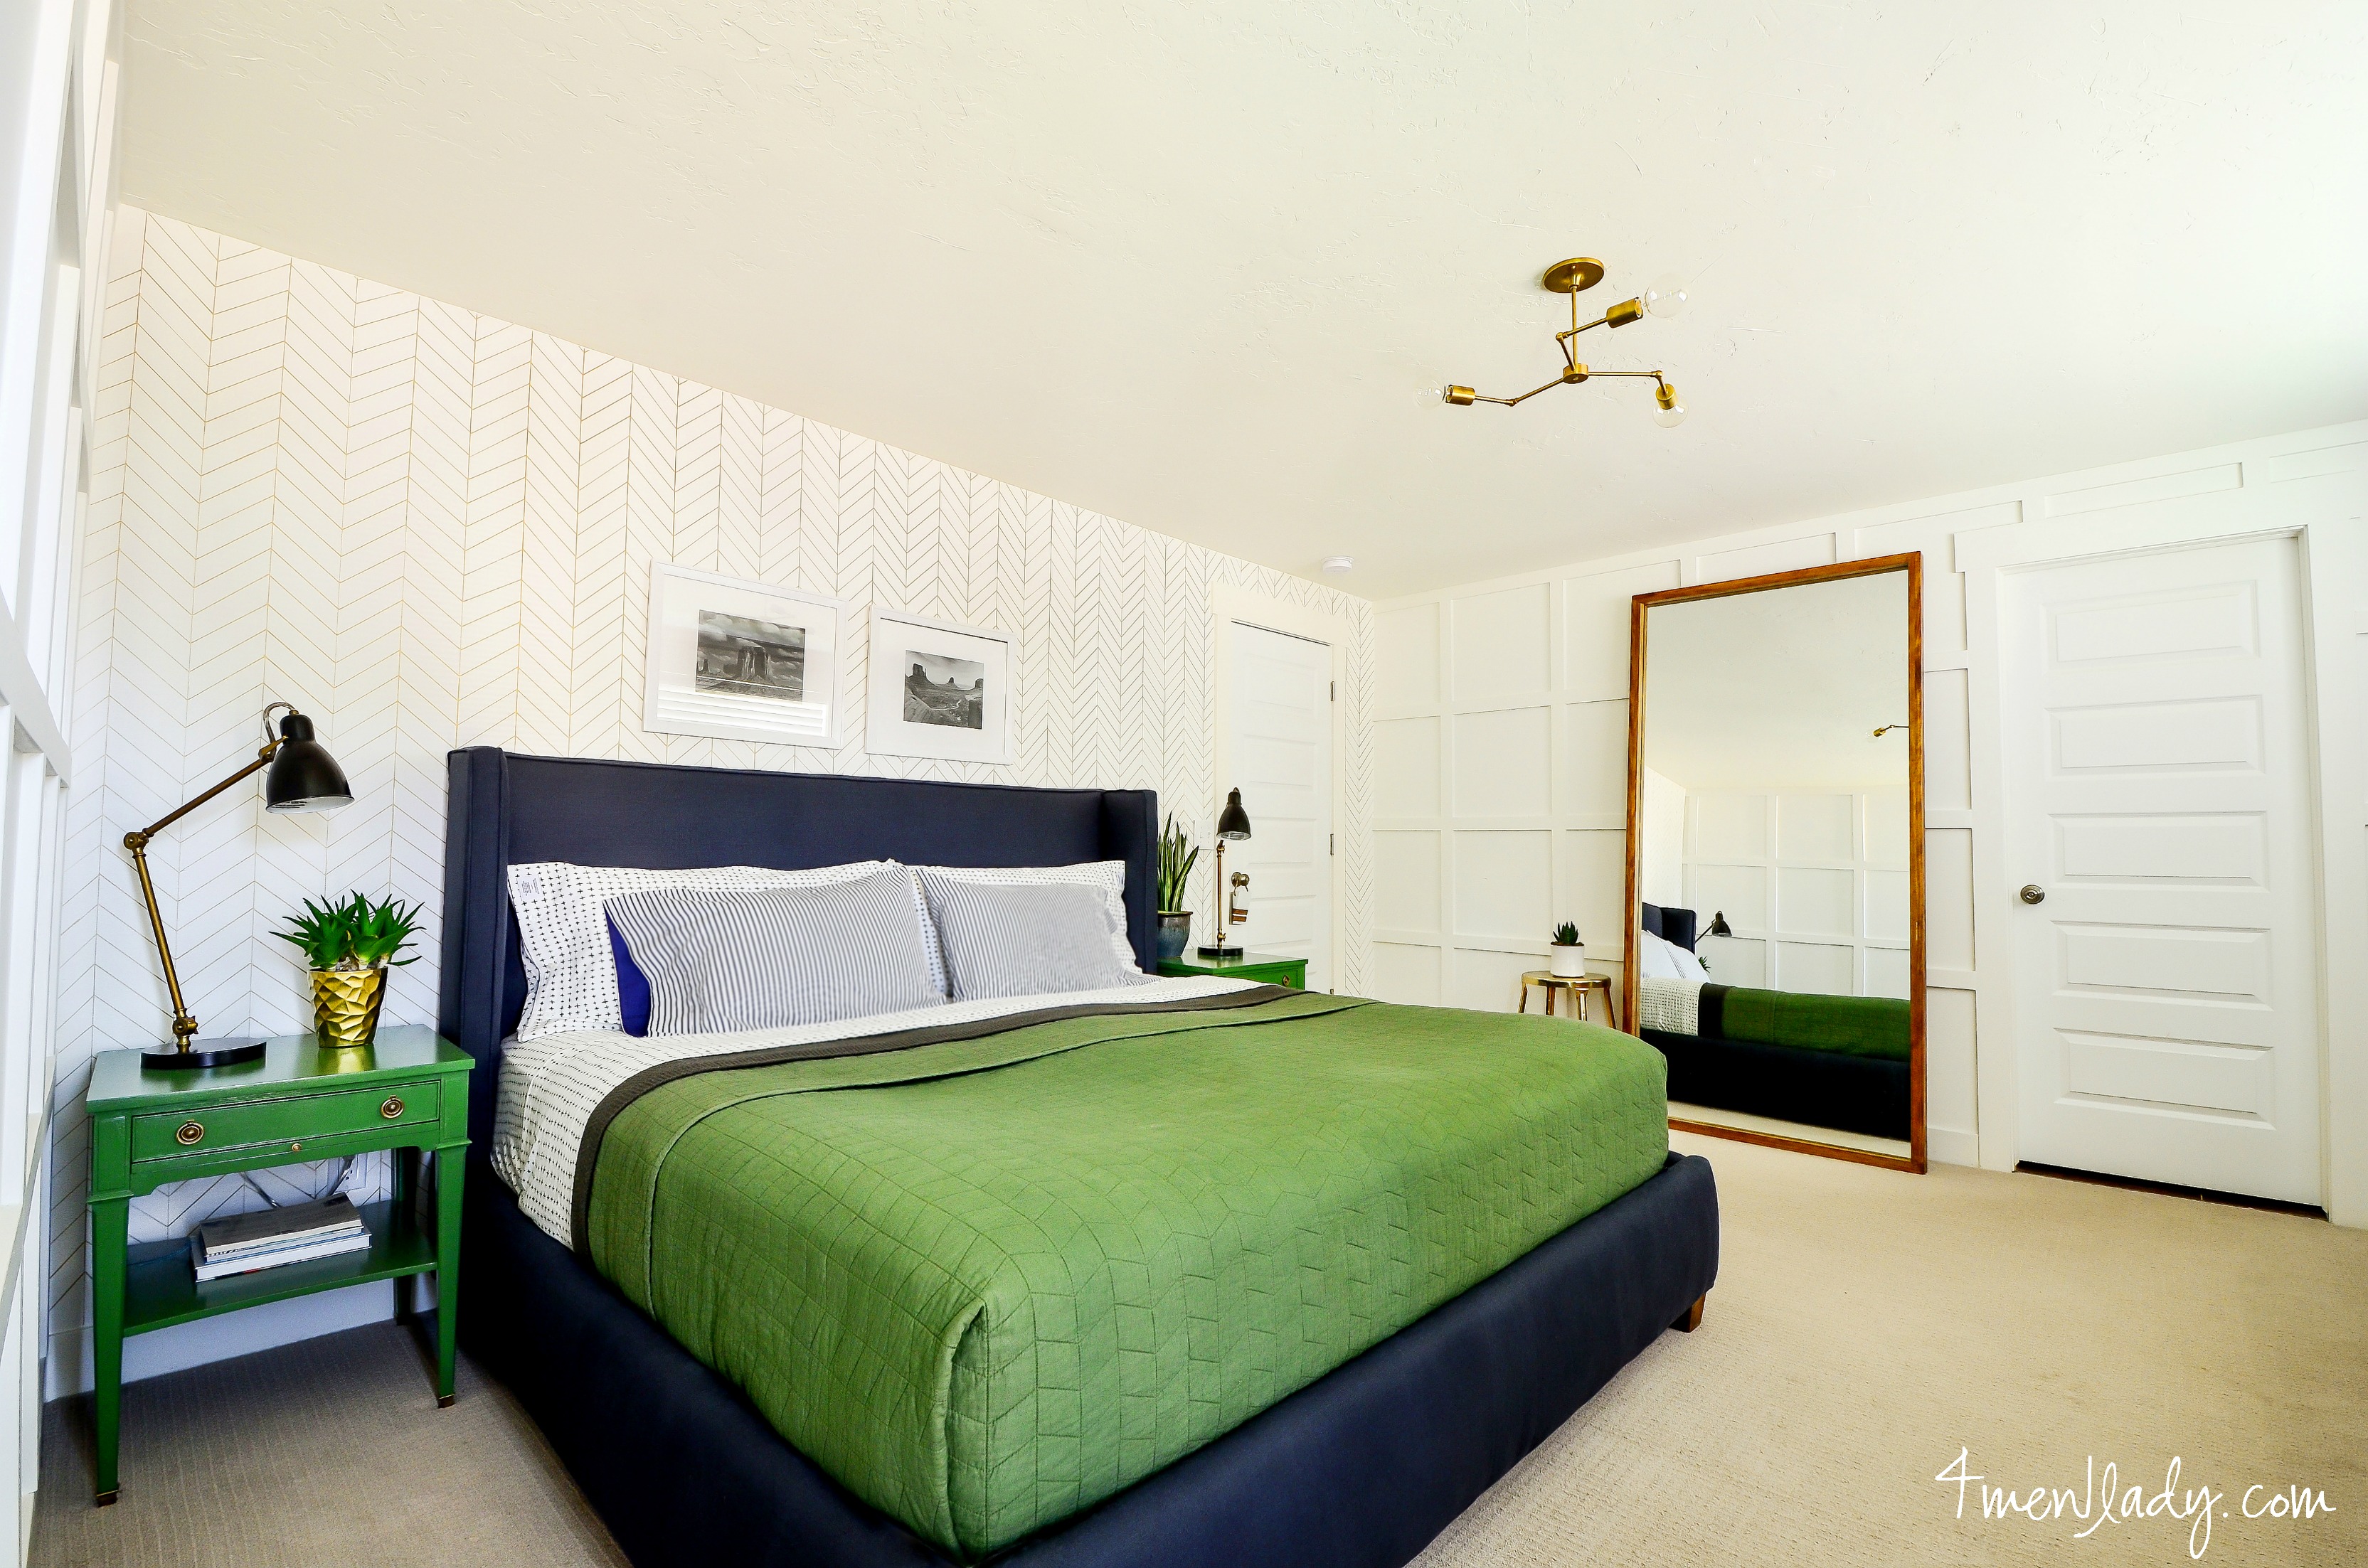
Continuing on with details on our master bedroom makeover…today we’re talking the Herringbone wall feature.
Dressing up your walls with color and pattern is nothing new.
Normally you’ll see trim at the head of the bed on the wall. I switched it up and did the trim on every wall BUT the main wall which left me with a blank canvas wall to go nuts with. Whatever I chose I wanted to make sure that it wasn’t going to compete with the amount of pattern on the other walls but also not feel like a underwhelming after-thought in the presence of the other walls. Make sense?
I considered everything…
My first thought was wallpaper but I was nervous I wouldn’t be able to justify the expense of the paper and installation, just to tear it down after I would ultimately get tired of it soon after.
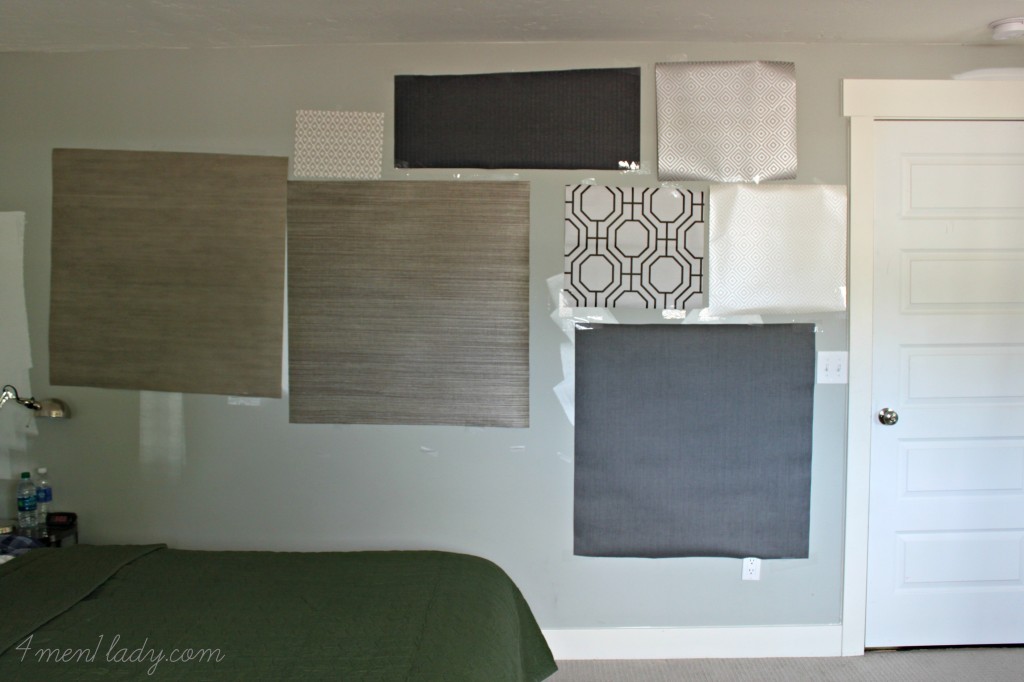
So thinking along the lines of something less permanent I considered a stencil. I’m no stranger to stenciled walls and ceilings. I looked and looked but couldn’t find anything I absolutely loved. I ended up finding a custom stencil site which made me a stencil similar to an expensive wallpaper I fell in love with. The stencil was really high quality but unfortunately it ended up flopping because the pattern was so intricate and tiny that all paint bled together. A big disappointment.
After spending some time on Pinterest I came across several sharpie marker walls. I loved this idea because it allowed for a creative feature wall with very little money investment (except if you consider your time being money). Plus if when I get tired of it in a year or so it will be easy to paint over.
I decided to go with a herringbone pattern. While herringbone is a classic and timeless pattern it’s become a popular trend as of late. I used the pattern on our basement floor and shower niche with tile.

So up went the herringbone pattern our master bedroom wall:
To create this look I used a 4ft level, a ruler, a pencil and a gold Sharpie paint marker. I used three markers to complete one wall.
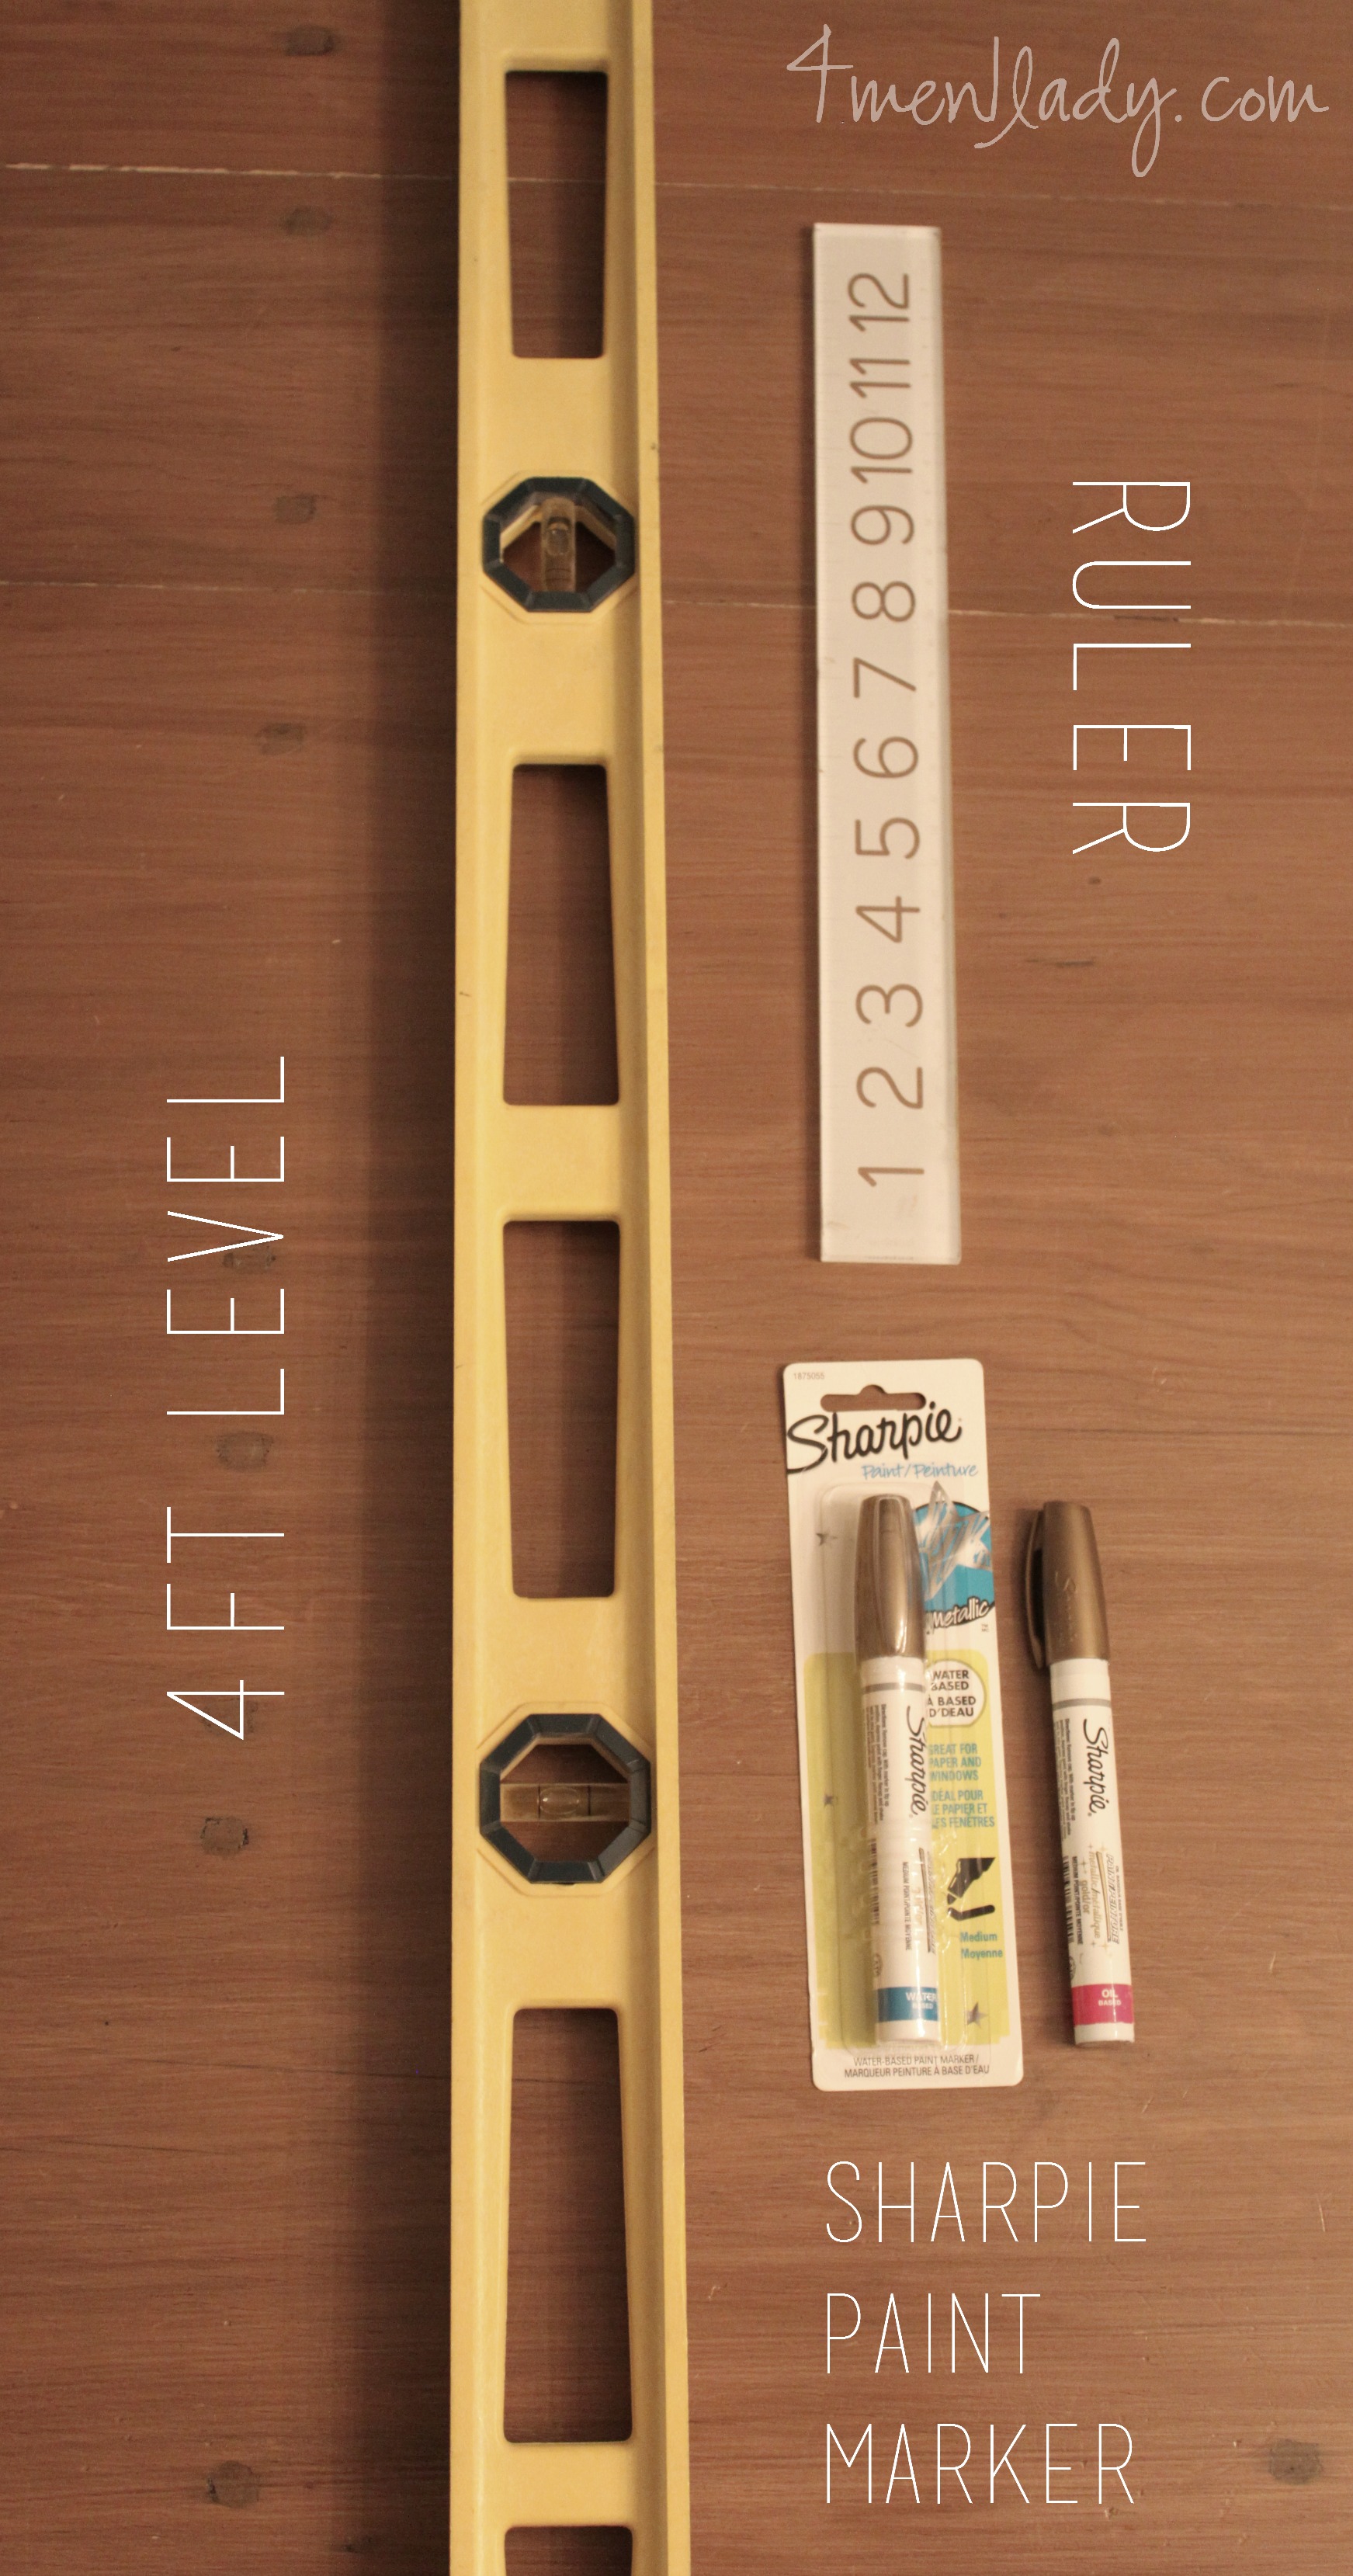
One thing to note: Sharpie makes an oil based and water based paint marker. I didn’t learn this until halfway through when I realized I was going to need a third marker to complete the wall. I went to a different store to get another marker and they had the two options (oil or water-based). Had I known this I would have used the water based marker to begin with because my wall is painted with water-based, latex paint. Generally, you can put latex over oil based paint but not the reverse. According to this rule I should have used a water based paint marker on my wall. I didn’t even look at the pen when I started to know if it was oil or water-based. I took a chance a stuck with the oil because I didn’t want any chance of variations. Even though I broke the rule it still worked. I don’t know if there’s a difference because it’s a marker and not actual roll-on-paint (we’ll see what it looks like in a few months). At any rate my advice is to just not mix the two. Use water-based on top of water-based and oil on top of oil.
Believe it or not, tackling this wall was actually quite easy. The hardest thing about it was finding the time to do it. To not completely overwhelm myself I would set a goal of completing at least 5 columns per day, which was usually done at 10pm when all the kiddos where in bed and sound asleep. It was surprisingly relaxing to get in to the groove of drawing…probably the same feeling you get from a hobby like knitting (I’m guessing. Maybe not. I dunno).
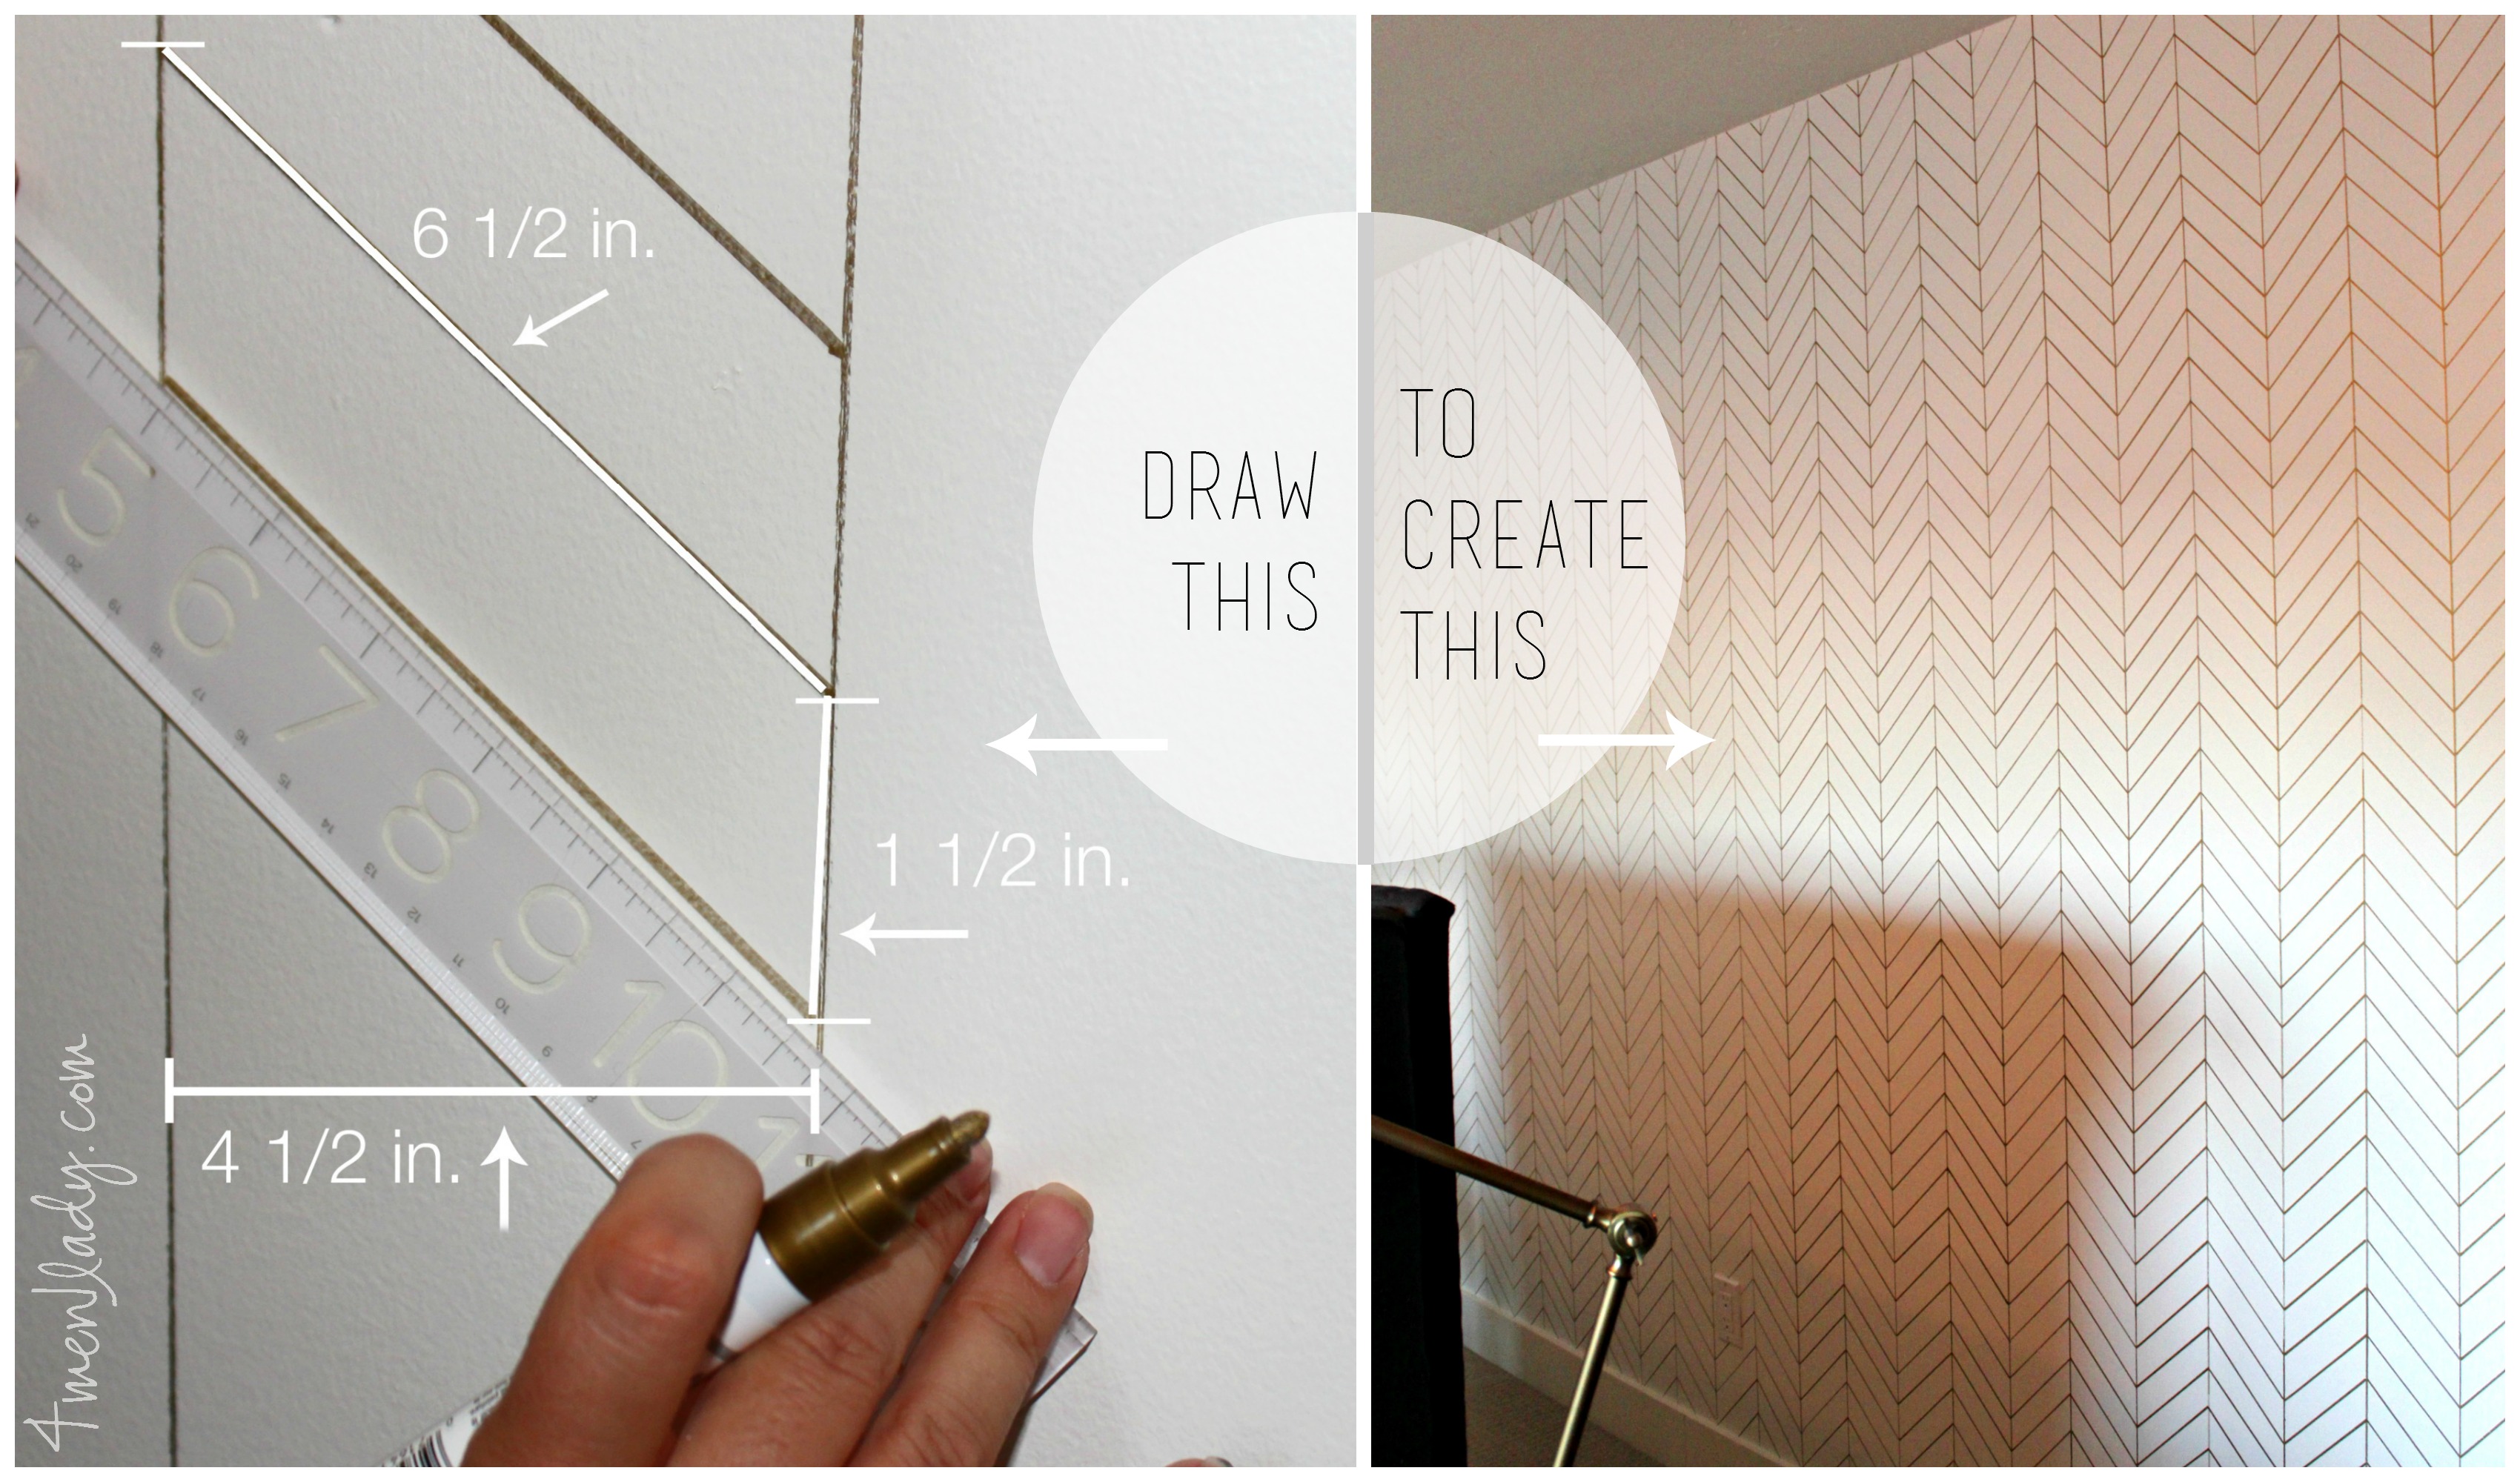
To begin, start by drawing vertical rows.
![]()
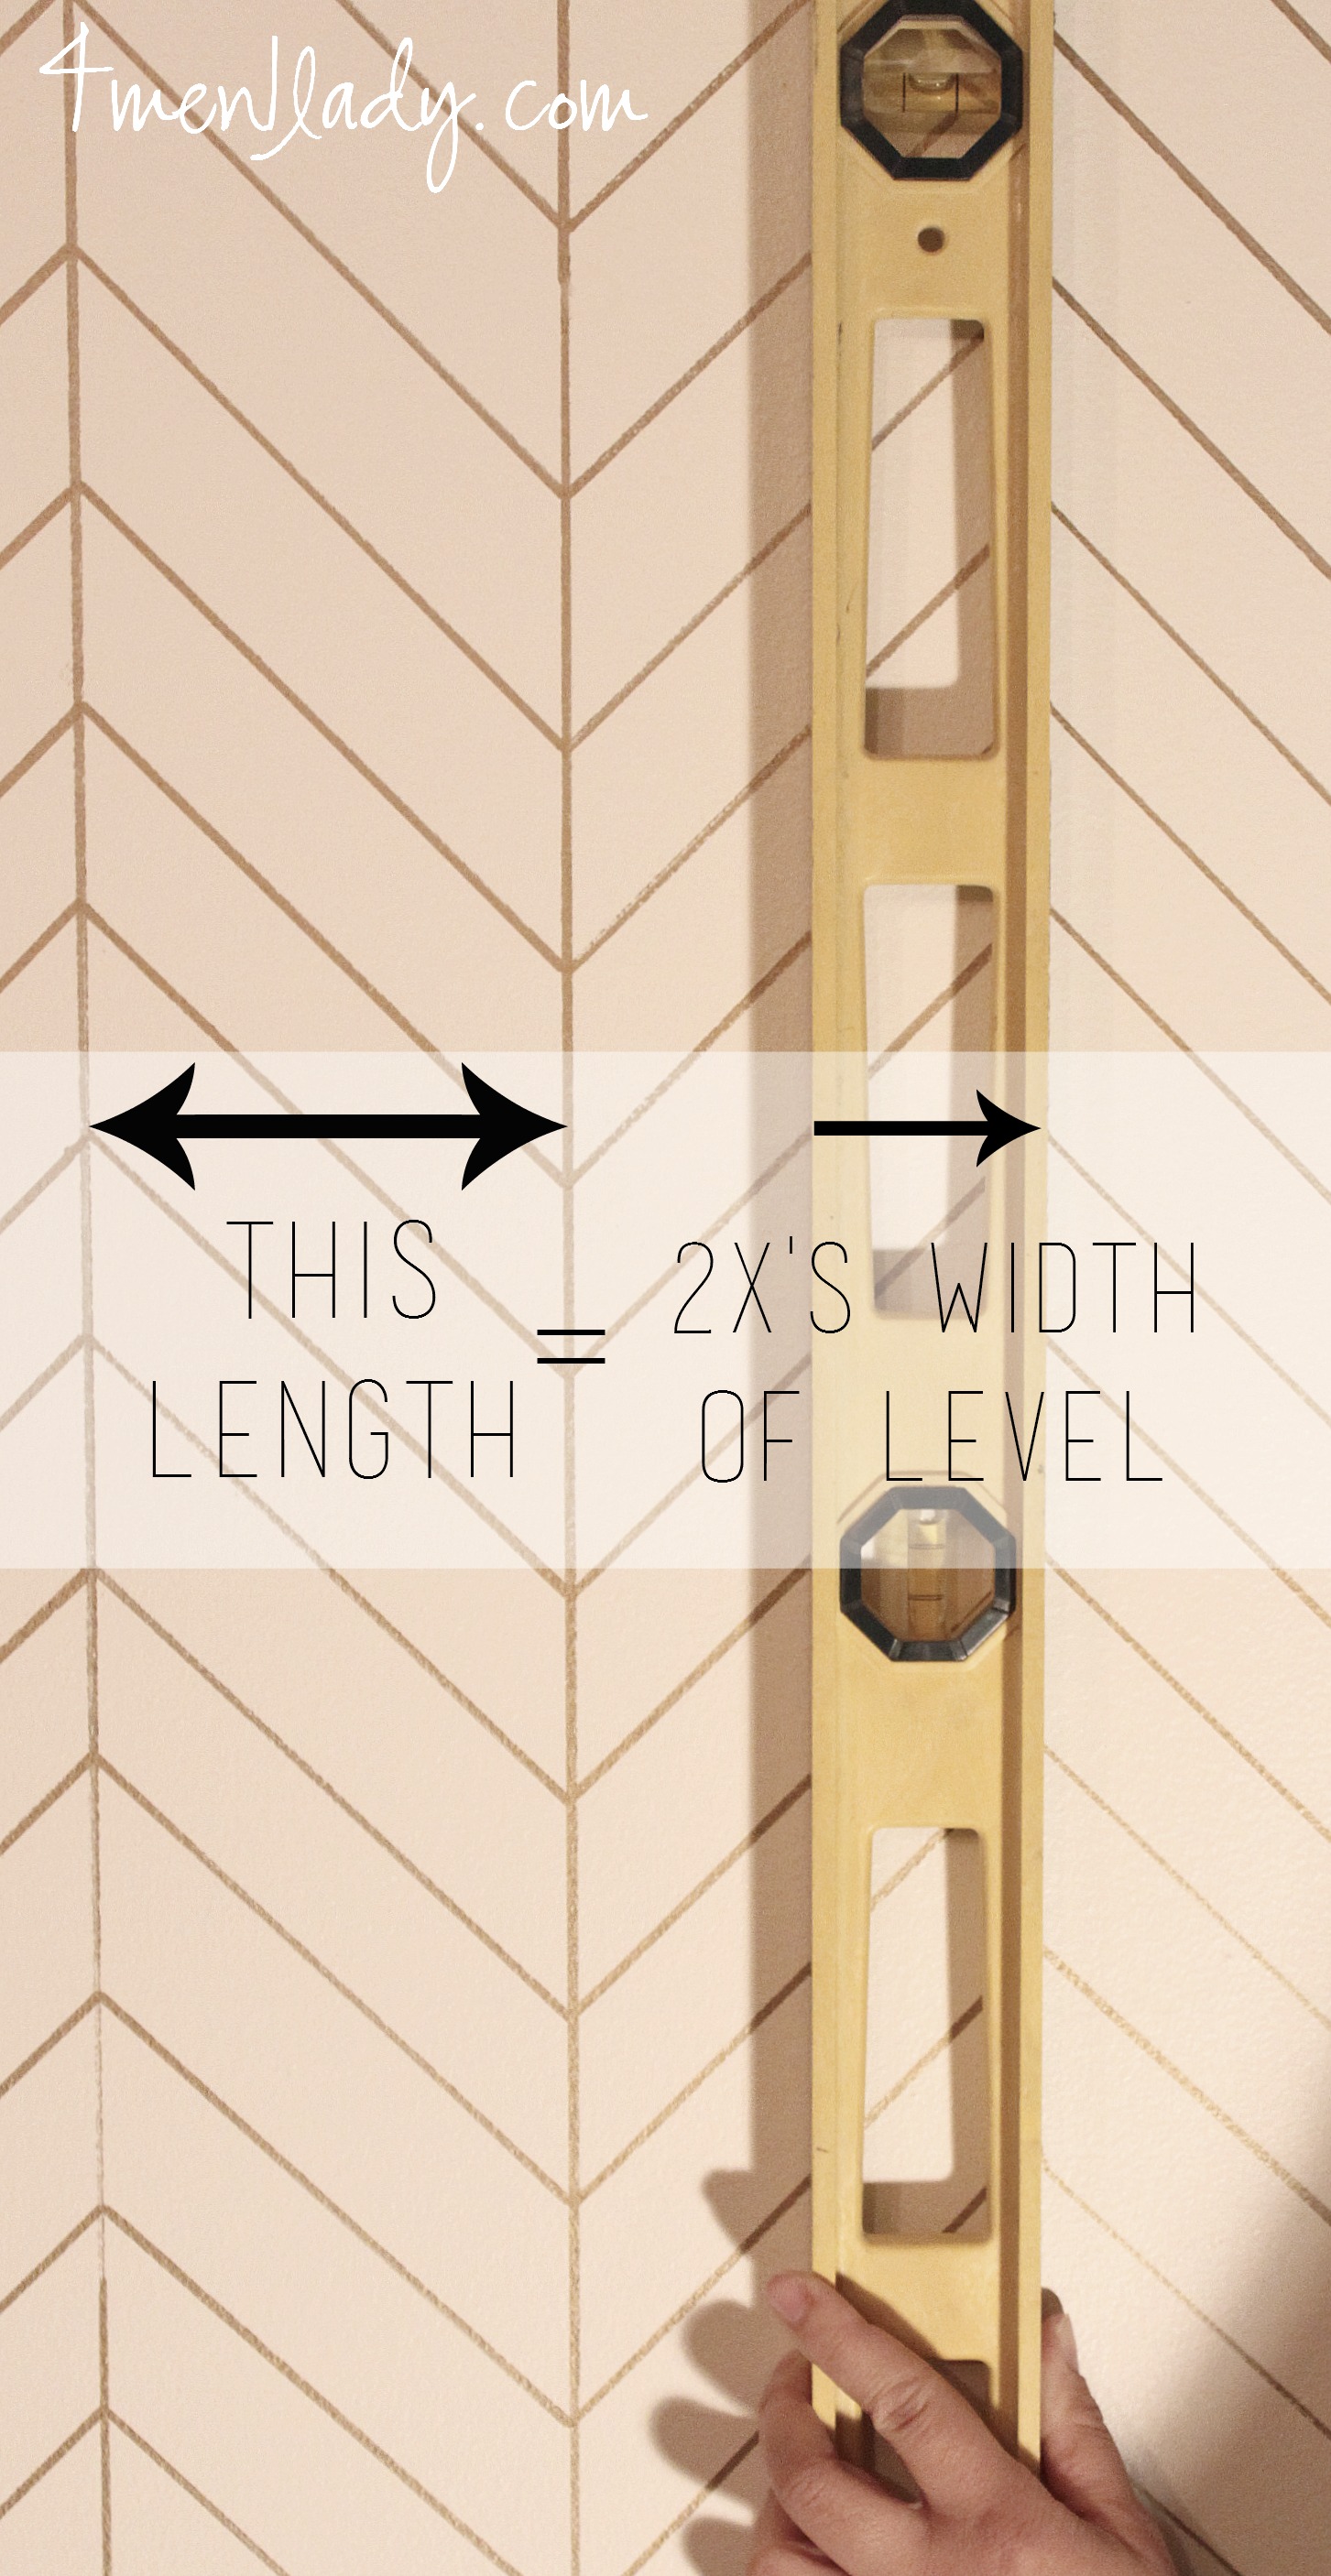
Tip: Even though I have the measurement written as 4 1/2 inches I actually never measured the distance out. Instead I just used 2x’s the width of my level as my guide. I put my level on the wall and made sure it was level, I then made a little tick with my pencil and moved the level over one length and drew my next column line. I never really knew what the measurements were until I was writing this post and had to provide measurements for you guys. You can measure if you like but it will add so much time on to the project. If you can find straight line-tools, play around with using their widths as your guides.
![]()
Tip: Again, I never measured out the distance between diagonal rows. Instead I used the width of my ruler to determine what the distance should be by drawing my first row then continually moving the ruler down and lining it up against the previous line (which was 1 1/2 inches).
![]()
There you have it. Like I said, it’s actually quite simple, just time consuming. If you have patience you can really create a beautiful custom masterpiece.
To see the full reveal of our bedroom makeover go here.


 Hey there! I’m Michelle; I’m an Passionate DIY’er and in constant pursuit of how to bring beauty to my house full of men (3 boys + 1 hubby). Stick around and see what I’ve got up my hard-working sleaves!
Thank You!!! This tutorial is perfect. I am anti-measuring so this works for me. Would it look weird if I were to go more than 1 1/2 inches between the lines?
No I don’t think it would like weird at all. I would just make sure to also lengthen the space between columns though too. 🙂
I have been dying to do a sharpie wall for a year or more. I just don’t know where to do it. I think it looks best on a white wall, & I have no white walls in my house. In fact we’re about to tackle the master, but I sleep best in a dark painted room. I do have a very light gray room….
This is probably the easiest and we’ll explained tutorial for the herringbone pattern I’ve seen. It looks amazing!
Ooo, that would be awesome on a gray wall. Share pics if you end up doing it. I’d love to see how it turns out.
This room is such an amazing transformation, and you guys deserve it! I am, however, extremely jealous of your smooth walls, this would soooo not work on our heavily textured walls 🙁 It can be done I’m sure, but would look super wonky.
Great work! However you were mis-informed about latex vs oil. Generally speaking, it’s latex that should NOT be applied over oil-based paint – oil over latex IS fine. Traditionally, oil paint would need to be sanded and primed well to allow latex to adhere although the newer paints containing primers can reduce alot of that prep.
So your oil-based marker will hold up just fine but you will need to lightly sand it and apply a primer like Killz if you paint over it with latex in the future to avoid bleed-through.
(Tip for the readers: to test if your paint is oil or latex, rub it with a cotton ball soaked in alcohol. If latex, the colour will come off onto the ball)
Hi Karen,
When I was doing my research I found several sites that said it is not recommended that you paint oil over laytex. Here’s a couple: http://www.doityourself.com/stry/how-to-paint-oilbased-paint-over-latex-paint ALSO, http://www.paintquality.com/paint-professionals/paint-tools/faqs/exterior/latex-over-oil.html. I also called a couple of paint stores. One place said no to painting oil over latex. The other said yes. So apparently the reviews are mixed. :/
Michelle,
I LOVE reading your blog!! I always have amazing DIY ideas. I absolutely LOVE the herringbone wall in your room. How long did it take you to do it?
Aww, thanks Alison. Gosh, if I had to estimate I would guess probably 8-10 hours.
Love the new look! Have you thought about painting your doors a color? Perhaps to match the upholstered bed or a tone of gold that matches the accent wall. Just a thought.
Did your wall have any texture? I have a wall I would love to do this on but it has pretty goo texture on it. Thanks
No, my walls didn’t have texture. Depending on the texture this still could work…it just might take a lot more attention and finesse. If you end up doing it I’d love to see how it turned out! 🙂
I love the classic appeal of herringbone. Such a great wall treatment!
I love it. It really looks good! I think it’s more of a zig zag though after watching Genevive’s Renovation today where she mentioned the difference. I really never paid attention to the difference and I have a herringbone pattern wall in my kitchen!
Amazing! How many sharpies did you use? Was it easy to use on a wall (versus on a flat surface)? Medium tip?
THanks!
3 Sharpies, medium tip. Thanks Jillian! 🙂
First, I want to say this is awesome, I’m totally doing this in my house…somewhere. Second, since you didn’t measure out your entire wall…then divide and do all the math with measuring, was your last column much smaller/wider than the rest?
Yes, the last column was a little short. BUT…the shorter column was behind the door and the pattern is so busy that you don’t really notice it. Hope that helps! 🙂