This house has shaped up to be much different than our last home in AZ.
For starters, almost all the walls are white (by choice).

Now I love me some clean and crisp white walls but this wall just looked naked.
(Yes, there’s that blue/green door still covered with tape just waiting for me to pick a color…
that’s another post for another day).

I hung up the beautiful canvases of my boys taken by Michelle of Wondertime Photo, which I love and adore, but the wall still needed something more. Color? Pattern?
Perfect timing…Cutting Edge Stencils approached me about reviewing one of their wall stencils.
You may remember I stenciled my AZ bathroom ceiling with their Trellis Stencil a while back with great results.
This go around decided on the Birch Forrest Allover Stencil.

First, I taped off all my edges with Frog Tape’s Delicate Surface Tape.
The tape you use is very important!
Because you are moving your stencil over it’s own pattern you just painted you must pick a tape that won’t remove the freshly painted surface.


My stencil was all curled up so I used my blow dryer to warm the surface so it would lay flat.
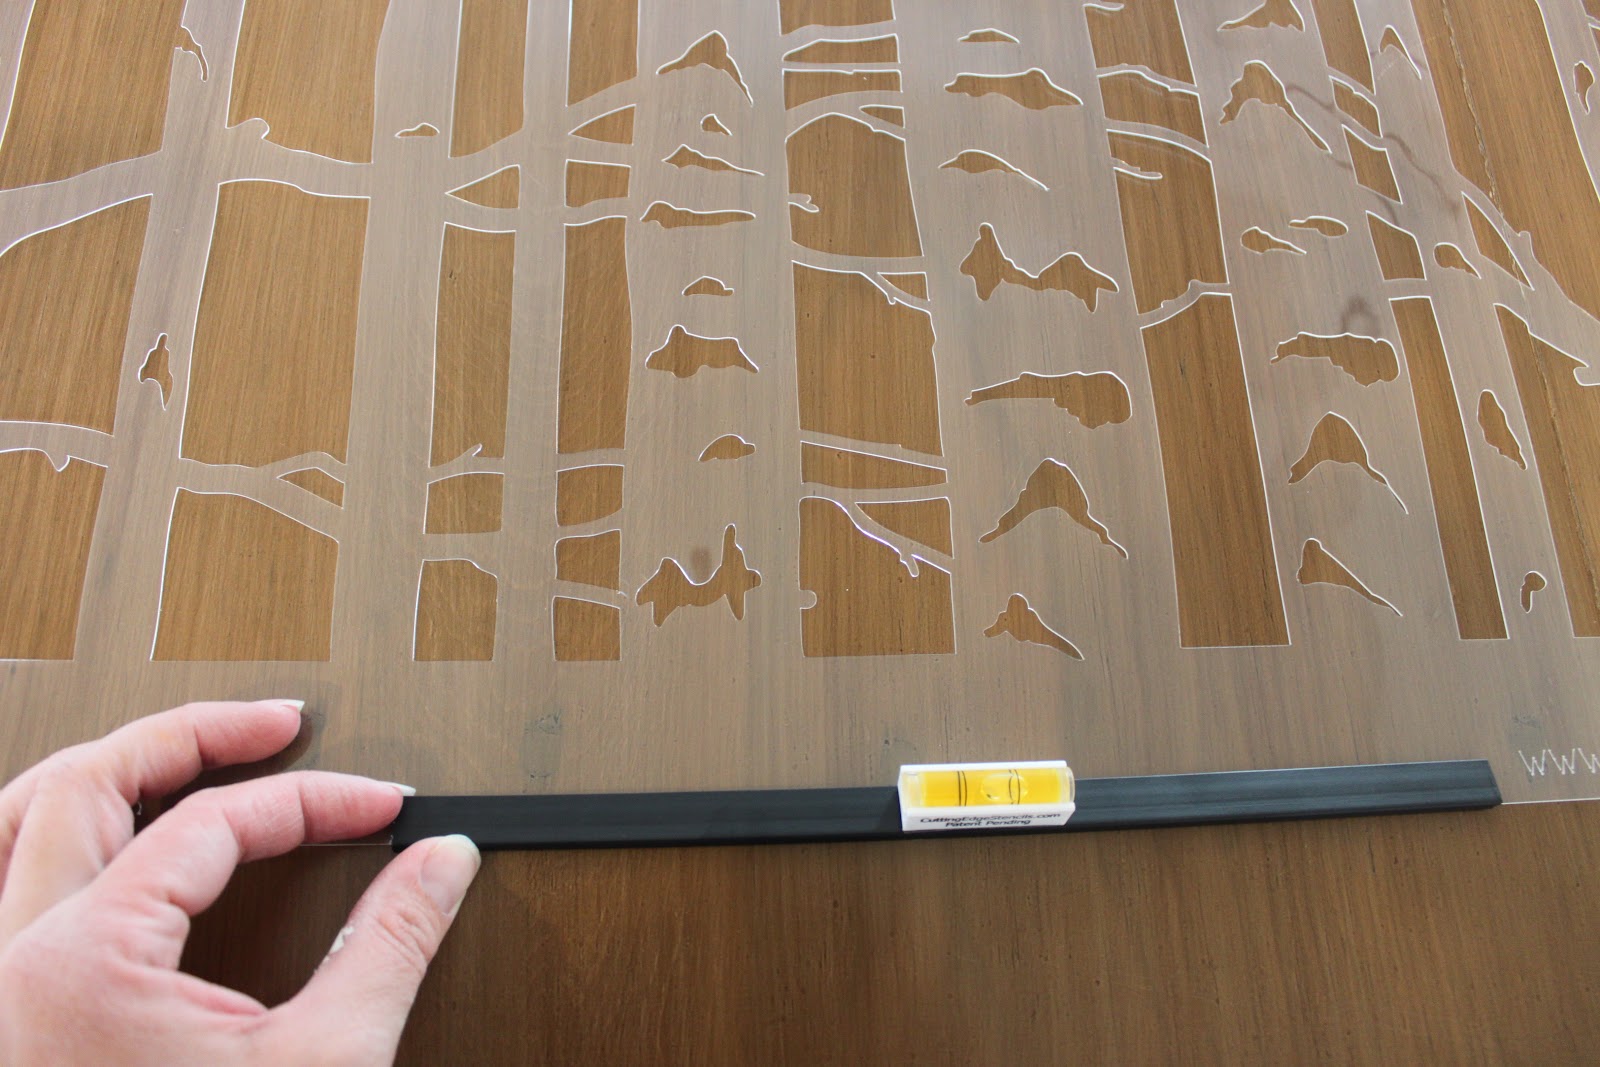
Cutting Edge Stencils has this really cool tool called the Clip On Stencil Level and it is a MUST have.
Made it really handy for keeping my stencil level and straight.

Tape the edges of your stencil with Frog Tape Delicate (my recommendation) and roll your stencil with paint. Tip…after you load up your roller with paint, roll off the excess on a paper towel.
This will ensure that your paint isn’t bleeding up underneath your stencil.
Paint is a shade by Benjamin Moore called “Half Moon Crest” which was left over from our master bedroom.

“Inch by inch, row by row…I’m gonna make my garden grow.”
Before:

After:

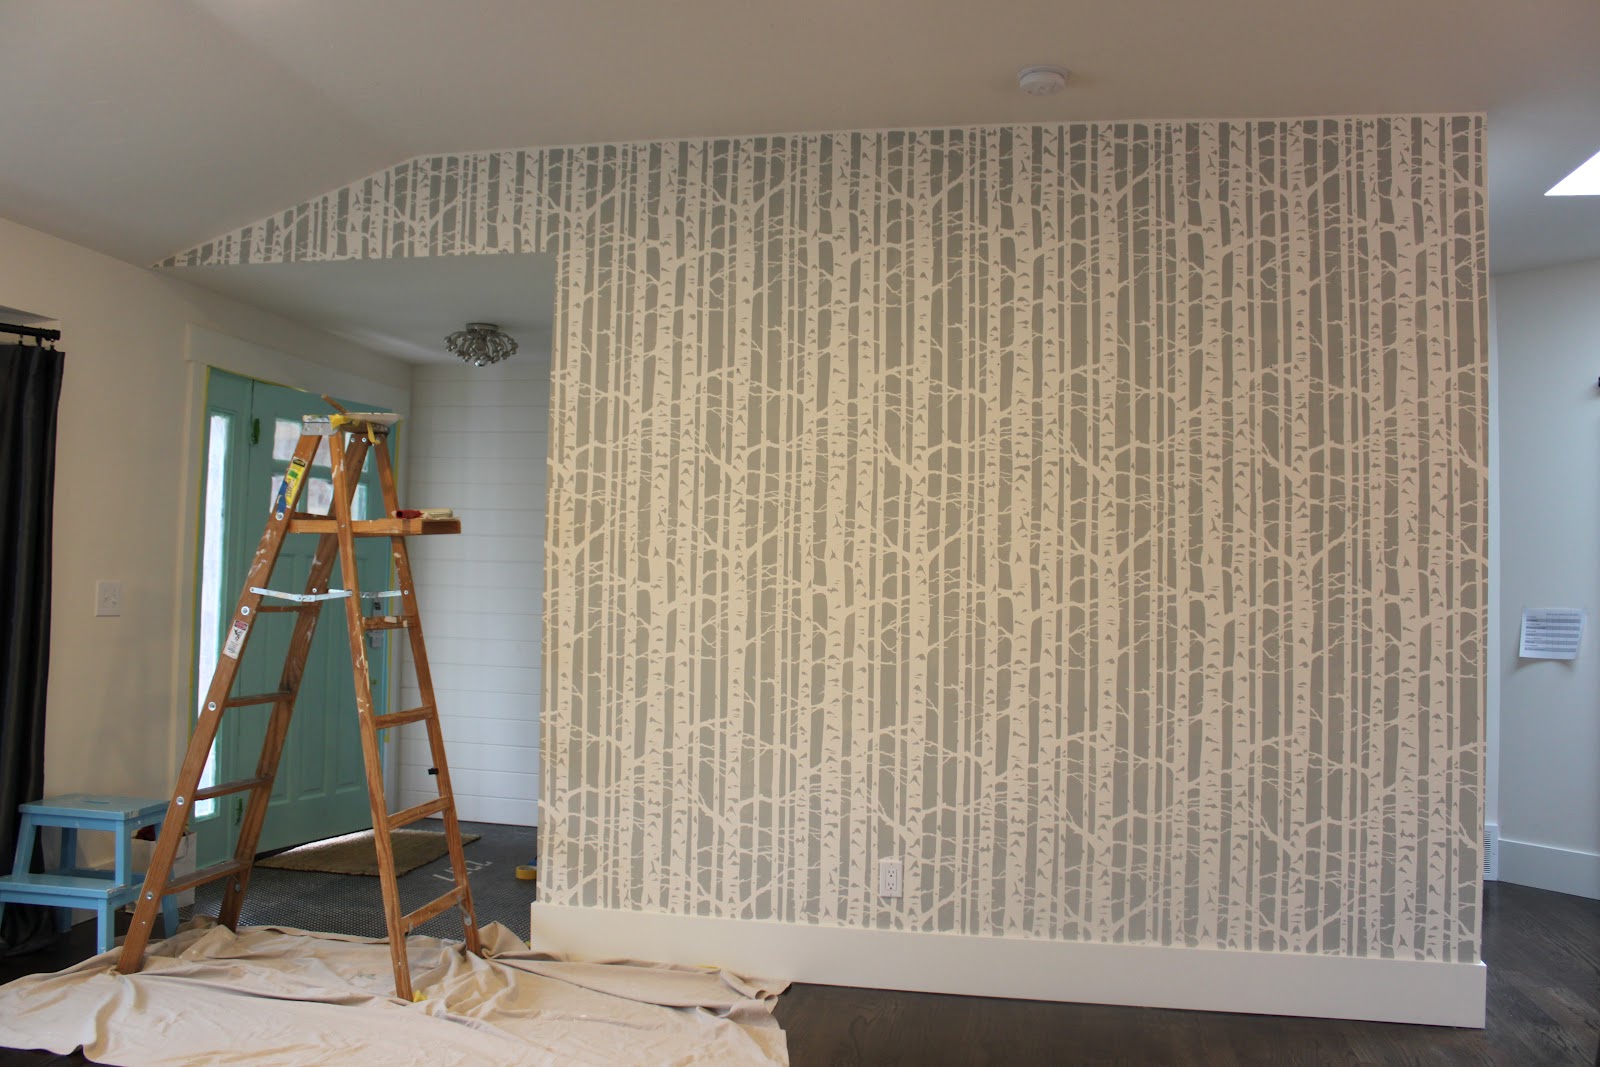


I will say, it looks pretty darn good.
I wish my photos did it better justice…Michelle, come back with your camera!


 Hey there! I’m Michelle; I’m an Passionate DIY’er and in constant pursuit of how to bring beauty to my house full of men (3 boys + 1 hubby). Stick around and see what I’ve got up my hard-working sleaves!
Absolutely stunning! Was it hard to line them up? Couldn’t see a single mistake (and I looked!) – wonder if I could do that?!?
Wow! That looks amazing!!! I love your style!
Wow that looks amazing! Your new house is looking very fun
It looks incredible. I really love it. Great job!!!
http://leeanderin.blogspot.com/
That’s beautiful! Love it!
Very cool! And I like the blue door – very fresh (although I can understand if the color doesn’t vibe with the feel you’re going for)
What’s going on in the floor of the entryway? Is that tile with in-layed numbers?
wow! what a fun statement wall.
That looks so amazing!
The husband has been asking me to paint birch trees – by hand! – in our hallway and I’ve resisted until now because I knew I couldn’t do it properly. But with these? Golden.
Thanks for the review.
holy crap! I love it! Major impact and shows off those gorgeous pictures so nicely!
Wow!! That looks fantastic!! the more I am seeing these stencils being used around the blog world, the more I am wanting to try them in my own home!
That wall looks SO great!
The SHIZZAT! Love this, need to contact them to see if they want ME to do a review….lol
Looks amazing! I’ve been eyeing that very stencil for some time now….just need to find somewhere to put it!!
loving the aqua door with that greyish wall now!
One word . . . WOW !!!
I cant stand how cute this is. Excellent!
Amazing!!! I love that stencil and you picked the perfect colour to paint!!
Love it! This looks fantastic on your wall. What a great addition.
It looks beautiful! I love those pictures of your boys too-
I have to agree it’s looks wonderful, but not better than the pictures of the little ones though.
Amazing!!! Great job!
Wow, If you didn’t see the step by step pictures you could swear it was wall paper.
It looks great! At first I was thinking that I would probably never pick birch, but now I think I might order it if I can find a wall to use it on!
WOW amazing stencil job!! 😀
Fabulous!! Come design my house please! lol!
Love it! Looks so good!!!
Shut. the. front. door. That looks outstanding. Spectacular job, Michelle! I love watching you make your house a home! =)
Fabulous!
I have had one rolled up in the box it came in for about a year. I thought it would be so much harder. Thanks for the tip on the hairdryer – never thought of that. Some of the blogs say to do a spray adhesive first and let it get tacky so it doesn’t totally stick to the wall. Your way is much easier. Thanks so much!
That looks fantastic! I can’t wait to see more and more of your new home, love your style!
So gorgeous. Seriously, you have wonderful taste.
oh my god it is totally perfect!!!!
I love it
I so love that! That wall is D- o-n-e!
i’ve been totally in LOVE with that stencil, and your results are awesome!!!
Oh my gosh that is absolutely AMAZING! I will have to get a stencil and get going on one of the walls in my home! THANK YOU for sharing this!
-Amy
takingstepshome.blogspot.com
Looks amazing! I was a bit sceptical looking at the pic of the stencil on it’s own but I love it! Am extremely tempted for my own walls, and I agree that the grey works so well with the turquoise door….
Love it!!! I have a cutting edge stencil I need to get using!
Oh, wow.. it looks fantastic!
wow that looks amazing! i love what you did! i am going to have to try it!
Love it!
I have been dying to do a birch forest stencil in my house but don’t have any good walls for a feature wall.
WOW!!!
Love the stencils. They look great. I also love the canvas photos. I was thinking about turning my prints into canvas. What size are those you have?
I LOVE your new stenciled wall…FANTASTIC!!!!!!!!
That looks AMAZING. I’m doing a Cutting Edge review, too… you might just have swayed me to try the birch forest. It’s the perfect contrast to the photos as well as the rest of the room.
That is 100% amazing. I’m obsessed!
Absolutely amazing! I am now considering doing this in our boys playroom. I have one wall that I feel needs a little something and this might just be it!!!
That looks amazing! Way better than birch tree wallpaper… and more affordable too.
I happened to stumble upon your blog and saw the stencils. Absolutely pretty and it goes well with the photos you had. I have two daughters and Im planning to redecorate their room and make it their own space. Do they have other designs?
I just did this same stencil on the wall behind my bed. I actually messed up ans painted the wall first the color I wanted the back drop, but it still looks great. It was a fun stencil but required a lot of patience. Looks great!
LOVE!
Hey girl! I bought this stencil awhile ago and I am just now getting ready to do my hallway ( I am only doing one wall in the hallways so it does not feel like a fun house 🙂 Did you use stencil creme paint or just regular latex ?
I used regular latex with really great results. My biggest tip is when you load up your roller with paint, make sure to roll any excess off on to a paper towel before rolling on to your wall. It’s kind of a pain but for sure a step you’ll want to make sure and not skip. Please share pics! I’d love to see how it turns out! Best!